
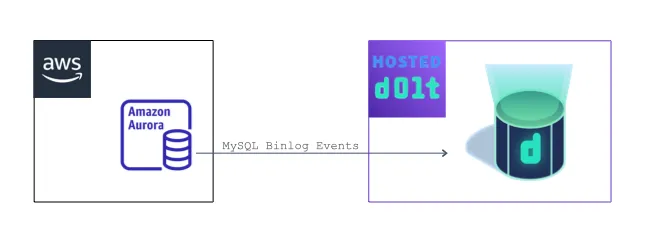
Today we’re showing how to use Hosted Dolt to run a versioned MySQL replica. Adding Dolt to your existing MySQL database as a replica is a great way to easily try out Dolt with your own data. As we’ll see in the demo, the changes from MySQL flow through to the Dolt replica, and Dolt creates a Dolt commit for every transaction. As the data changes flow through to Dolt, you’ll be building up a versioned history describing how each cell of your MySQL database has been changing. You can use this versioned history for auditing, disaster recovery, analytics, and more. We’ll dive into a couple examples of using this data in today’s demo.
There are currently two requirements for running a versioned MySQL replica on Hosted Dolt:
- The primary MySQL server must be accessible on the public internet. In order for the Hosted Dolt instance to connect to the MySQL primary server, it currently needs to be accessible via the public internet. If you’d like to set up a versioned MySQL replica for a MySQL server on a private network, reach out to us on GitHub or ping our sales team.
- The MySQL server must have binary logging enabled, in row-based format, with
GTID_MODEenabled. We’ll show how to set this up on AWS in our demo below and also show how to verify the correct settings.
Demo!#
Let’s get right into seeing this in action. We’re going to start up an Amazon RDS instance to serve as our primary MySQL server. We’ll show you how we configure the instance for replication, then we’ll launch a Hosted Dolt instance and connect it as a replica for the RDS instance. After that, we’ll run some data through the system and show you how it replicates to Dolt and creates a versioned history that describes exactly how our data changed at each commit.
The next few sections go into a LOT of detail on setting up and configuring an Amazon RDS database cluster for this demo. If you don’t care about all those gory cloud infrastructure provisioning details (I won’t judge), you can jump right to the punchline and see how we use Dolt’s data versioning features to audit the replicated data changes, calculate the SQL patch statements needed to revert data changes on the primary MySQL server, and inspect exactly how our data changed.
Start a Primary MySQL Server#
We’ll be using the Amazon RDS web console to launch our primary MySQL server. RDS packs in a bewildering amount of options, so hang on while we get through the setup – it’s a bit of a slog. As always with cloud resources, don’t forget to shut down your database when you’re done trying this demo out, otherwise you’ll have a surprise in your bill at the end of the month!
Configure DB Cluster Parameters#
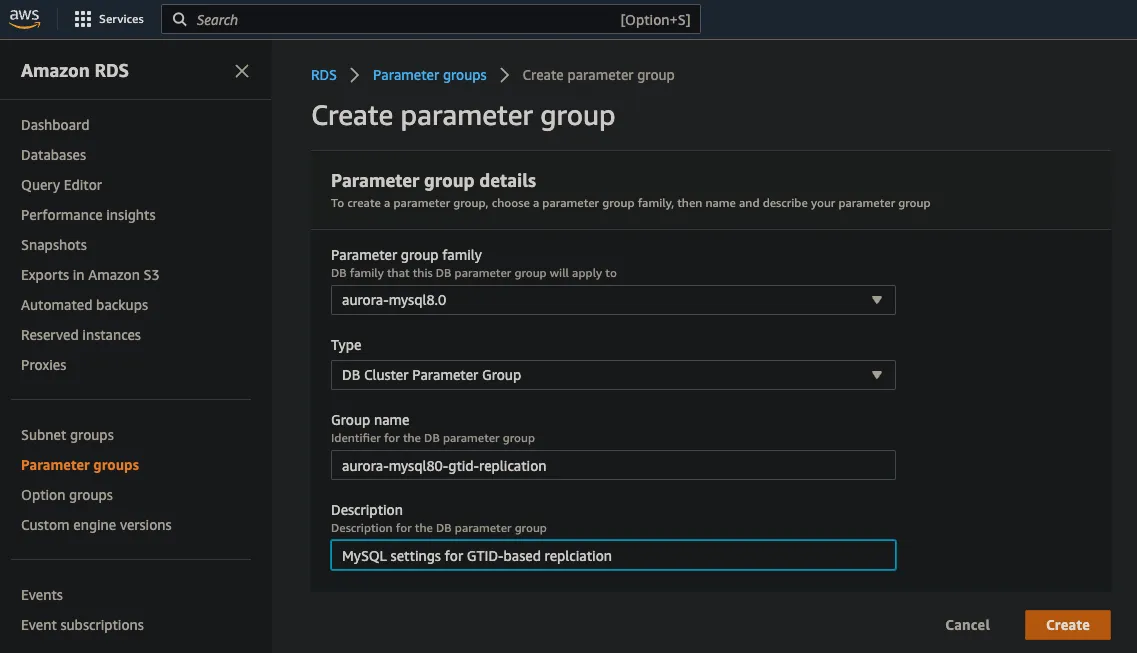
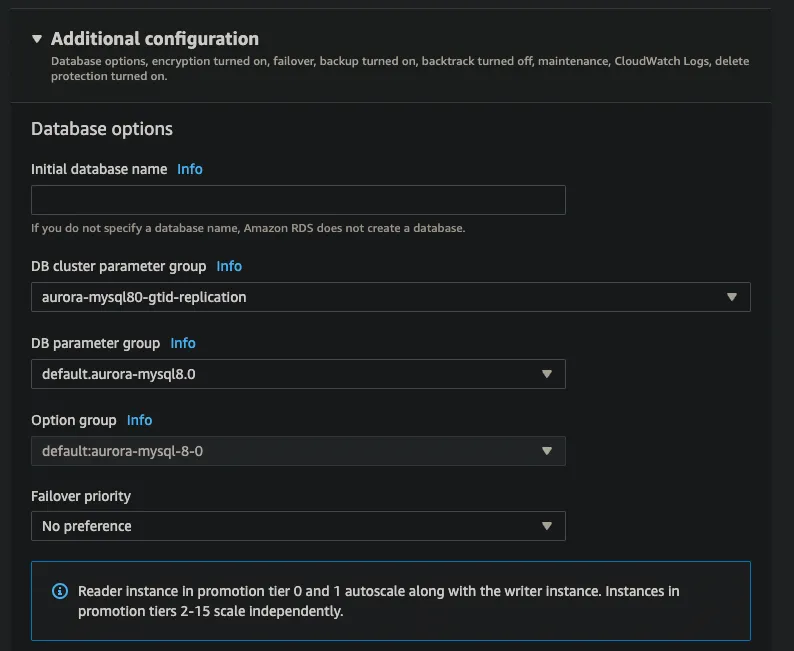
Before we launch the RDS instance for our primary MySQL server, we’re going to create a new RDS DB cluster parameter group and configure the replication settings we need – enforce_gtid_consistency, gtid_mode, and binlog_format. Click on the “Parameter Groups” link on the left-side of the RDS console and then click on the “Create Parameter Group” button on the top, far right. Make sure you select the “aurora-mysql8.0” parameter group family and the “DB Cluster Parameter Group” type. I named mine “aurora-mysql80-gtid-replication”, but you can use whatever name and description you want of course.
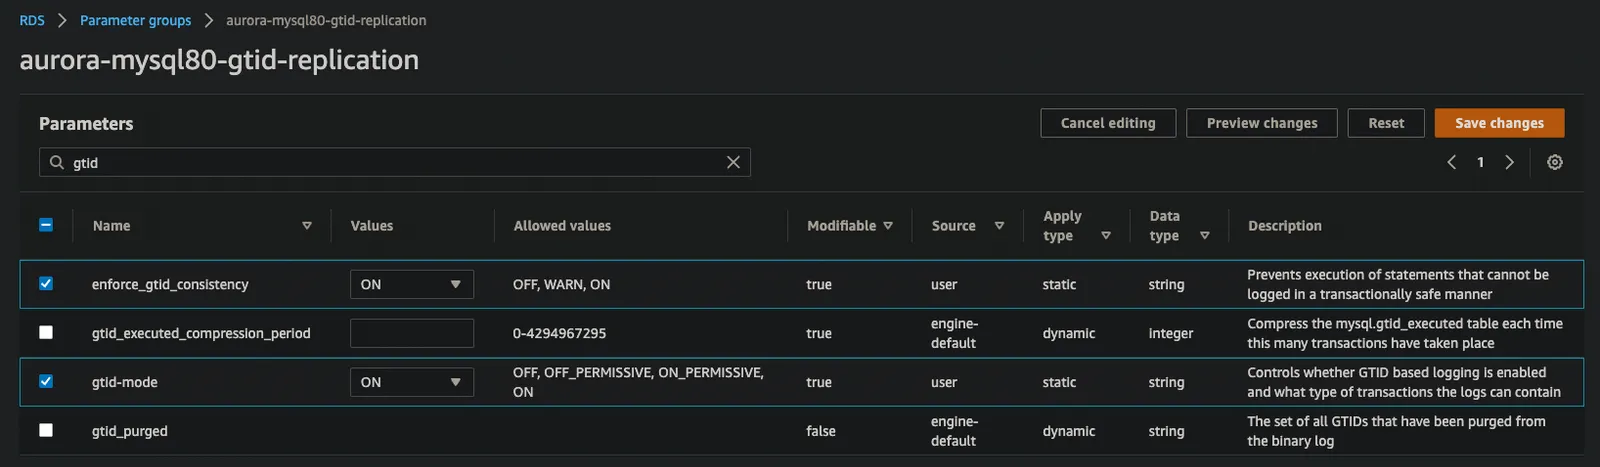
After you hit the “Create” button for your new DB Cluster Parameter Group, the next screen allows you to specify the configuration settings. Search for gtid and set enforce_gtid_consistency to ON and gtid-mode to ON.
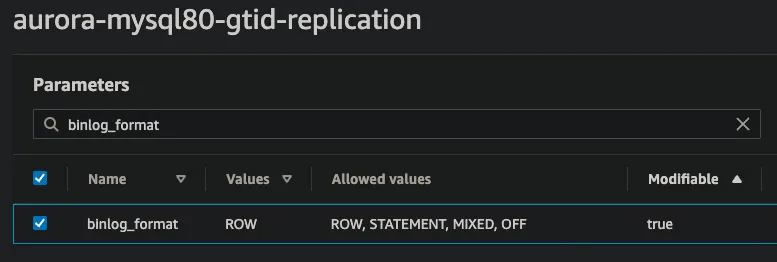
Next, change the filter search to binlog_format and set binlog_format to ROW. This is what enables the RDS Aurora engine to actually create binary logs for replication, so don’t forget this setting! Note: Even though ROW is the default setting for binlog_format in MySQL 8.0, you still need to set it here! It is not the default in Aurora and explicitly setting the binlog_format config setting is what causes Aurora to turn on binary logs.
Finally, don’t forget to hit the “Save Parameters” button before you leave this page!
Launch the MySQL Primary Server#
Now that we’ve got our DB Cluster parameter group configured to enable replication, let’s use it to launch the primary MySQL database for this demo. Click on the “Databases” link on the left-side navigation bar, and then click “Create Database” on the top, far right. This brings up the RDS launch database wizard, which gives us a lot of options for setting up our new database. The next sections walk through how to configure each section of the wizard.
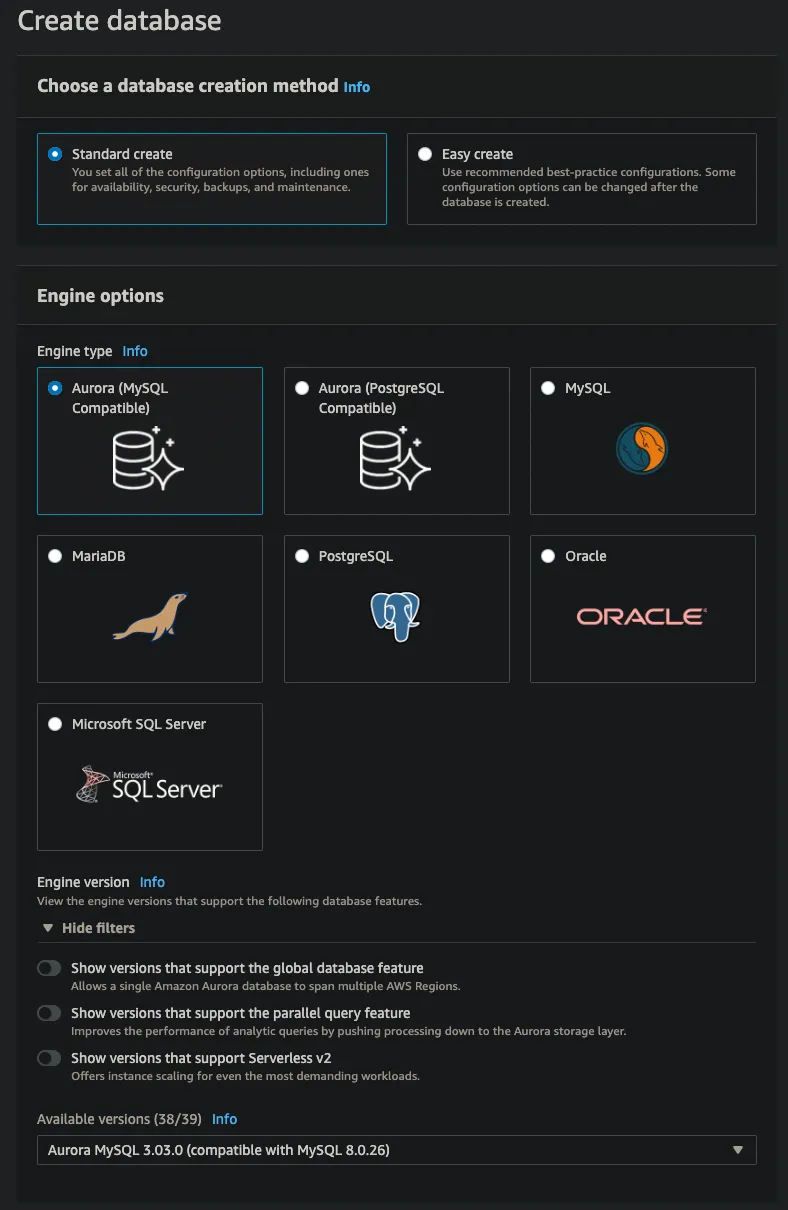
Creation Method and Engine Options#
Select “Standard Create” for the creation method, and select “Aurora (MySQL compatible)” for the engine type. (You could also use the “MySQL” option, but for this demo, I thought it would be fun to use the serverless Aurora option.) At the bottom of the “Engine Options” section, make sure you select “Aurora MySQL 3.03.0 (compatible with MySQL 8.0.26)”. The exact version isn’t critical, but make sure you are using a MySQL 8.0 compatible version.
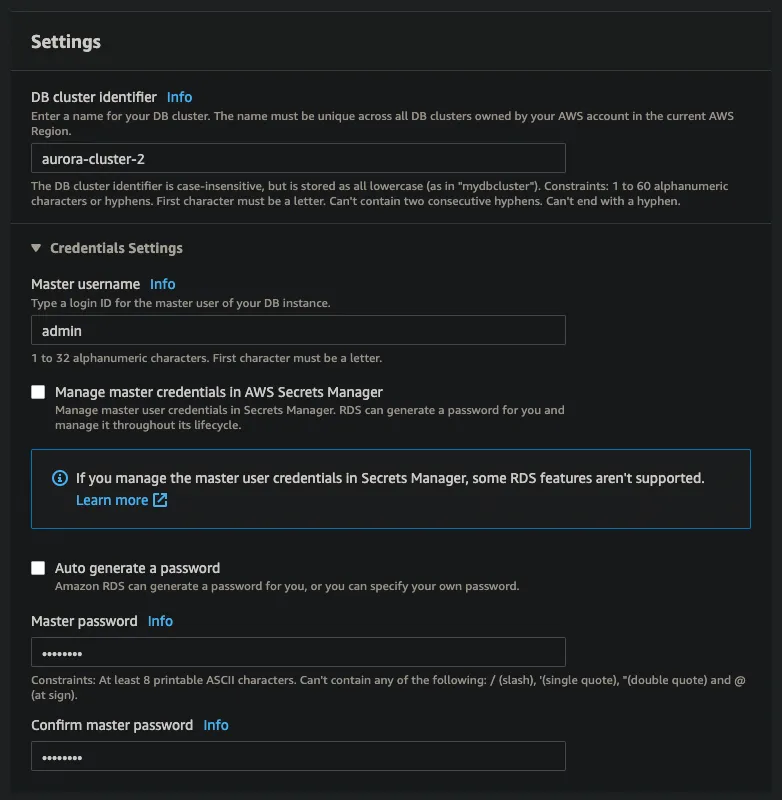
Settings (Cluster ID and Credentials)#
Next we specify an ID for our database cluster, as well as an admin login and password.
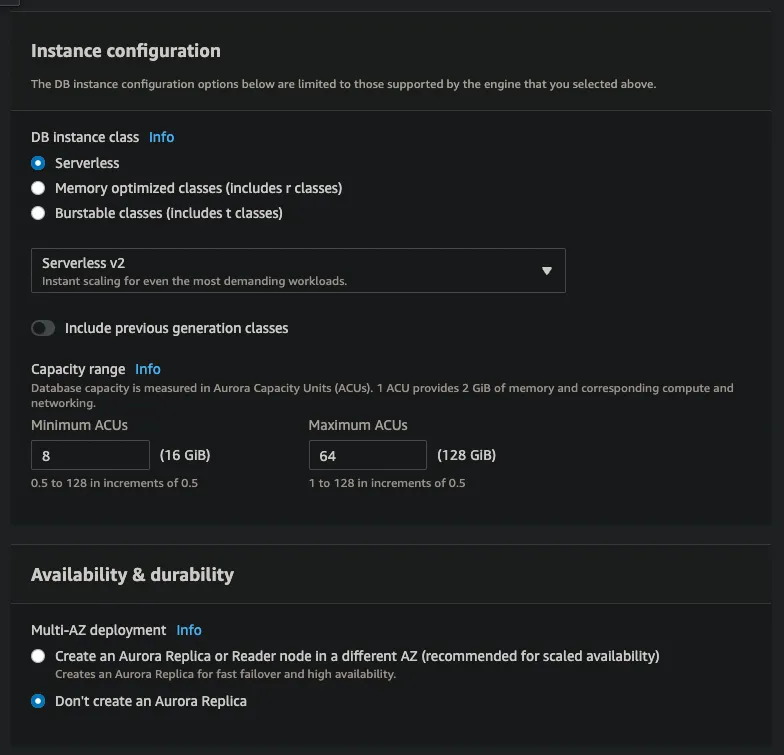
Instance Configuration#
In the Instance Configuration section, select Serverless for the DB instance class and don’t create an Aurora Replica, since we don’t need it for this demo (although there’s no problem with having multiple replicas syncing from your primary MySQL server).
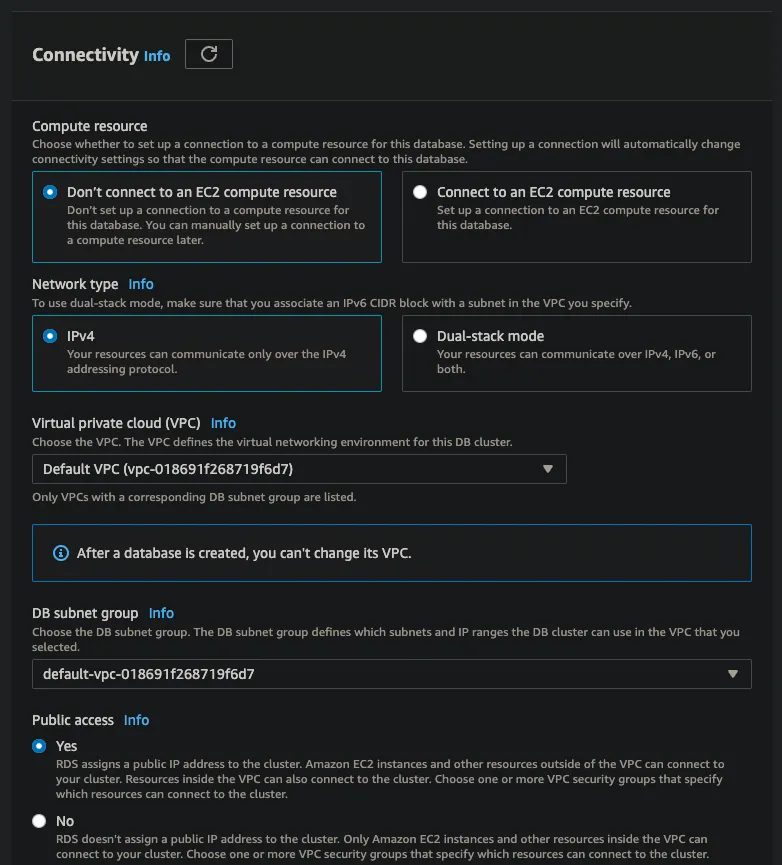
Connectivity#
Almost there! Next, we need to specify a few connectivity options. Select “Don’t connect to an EC2 compute resource”, leave “IPv4” selected, and use the default VPC and subnet settings. Make sure to select that you want this database instance to be publicly accessible on the internet. This is very important, otherwise you won’t be able to connect to it from Hosted Dolt.
Additional Options#
Last, but definitely not least, open up the “Additional Options” section at the very, very bottom of the launch wizard. Make sure you specify the DB Cluster parameter group we created earlier here! This is what will tell our DB Cluster to use those GTID settings we configured earlier.
Wait for the Database to Launch#
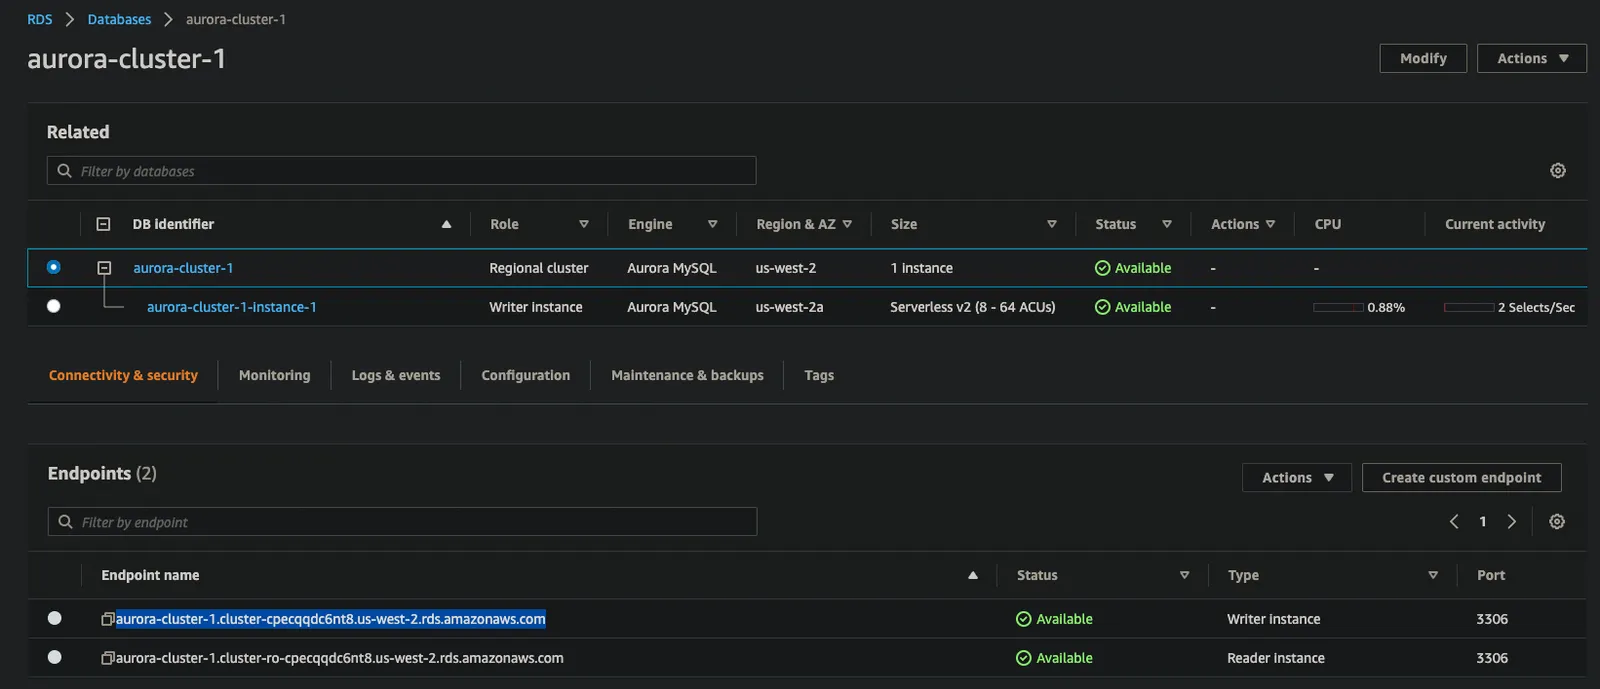
After you launch the database instance, you’ll need to give it a few minutes to spin up. Check the status of your database by clicking on the “Databases” link on the left-side navigation bar, and then clicking on the name of your database. You’ll see a status indicator that will tell you when your database is ready.
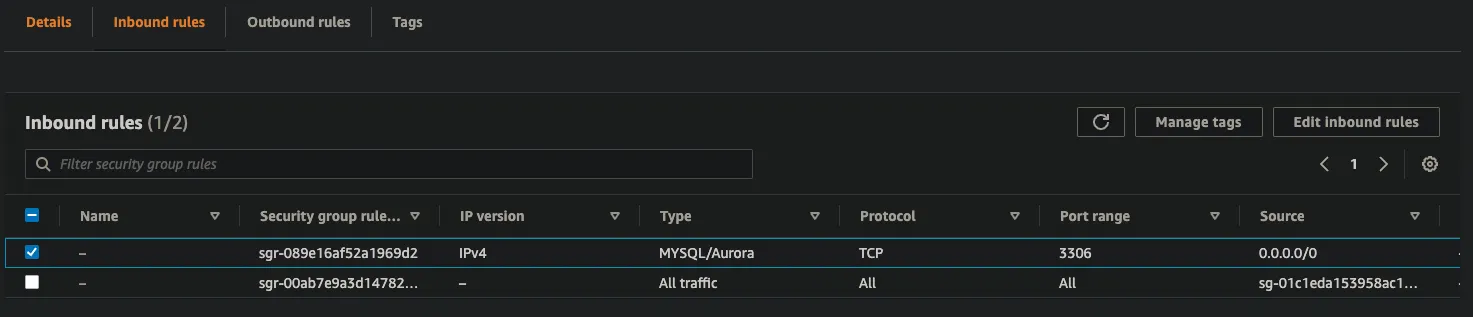
While your DB cluster and instance are spinning up, let’s double check our security group permissions. Select the DB instance (not the DB Cluster) and look in the “Connectivity and Security” tab. The security section will have a link to the security group for this database instance. Click on the link and check on the inbound and outbound rules. We’ll need this group to accept any incoming traffic on the MySQL (3306) port (see below). Similarly, on the “Outbound rules” tab, we’ll need to make sure the security group allows outbound traffic over IP/TCP for the MySQL port (3306) to any destination (0.0.0.0/0).
Once the status for both the cluster and the instance in the cluster both say Available, you can grab the endpoint URL (don’t select the ro endpoint, since that one is read-only) and use it to connect to our database. Before we go any further, let’s do a quick test to make sure this database is ready. Let’s log in using the credentials we set in the wizard, and run a simple command to verify our settings.
mysql -u admin -p --host aurora-cluster-1.cluster-cpecqqdc6nt8.us-west-2.rds.amazonaws.com

SHOW VARIABLES WHERE Variable_Name LIKE '%gtid_mode' OR Variable_Name LIKE '%enforce_gtid_consistency' OR Variable_Name LIKE '%binlog_format' OR Variable_Name LIKE 'log_bin' OR Variable_Name LIKE 'server_id';

+--------------------------+------------+
| Variable_name            | Value      |
+--------------------------+------------+
| binlog_format            | ROW        |
| enforce_gtid_consistency | ON         |
| gtid_mode                | ON         |
| log_bin                  | ON         |
| server_id                | 1507716454 |
+--------------------------+------------+
If you were able to log in to the database, run the SHOW VARIABLES command above and see the same settings for binlog_format, gtid_mode, log_bin, and enforce_gtid_consistency, then your database is ready to go!
If you enter your password, but then don’t ever receive any response back, it’s likely that your security groups are not configured to allow egress. Double-check the steps above and make sure you have the correct ingress and egress rules added.
Create a Hosted Dolt versioned MySQL Replica#
Whew! There are a LOT of options for launching an AWS database! If you’re following along, good job making it this far. Getting our Hosted Dolt instance up and running will be easier…
Launch Hosted Dolt Instance#
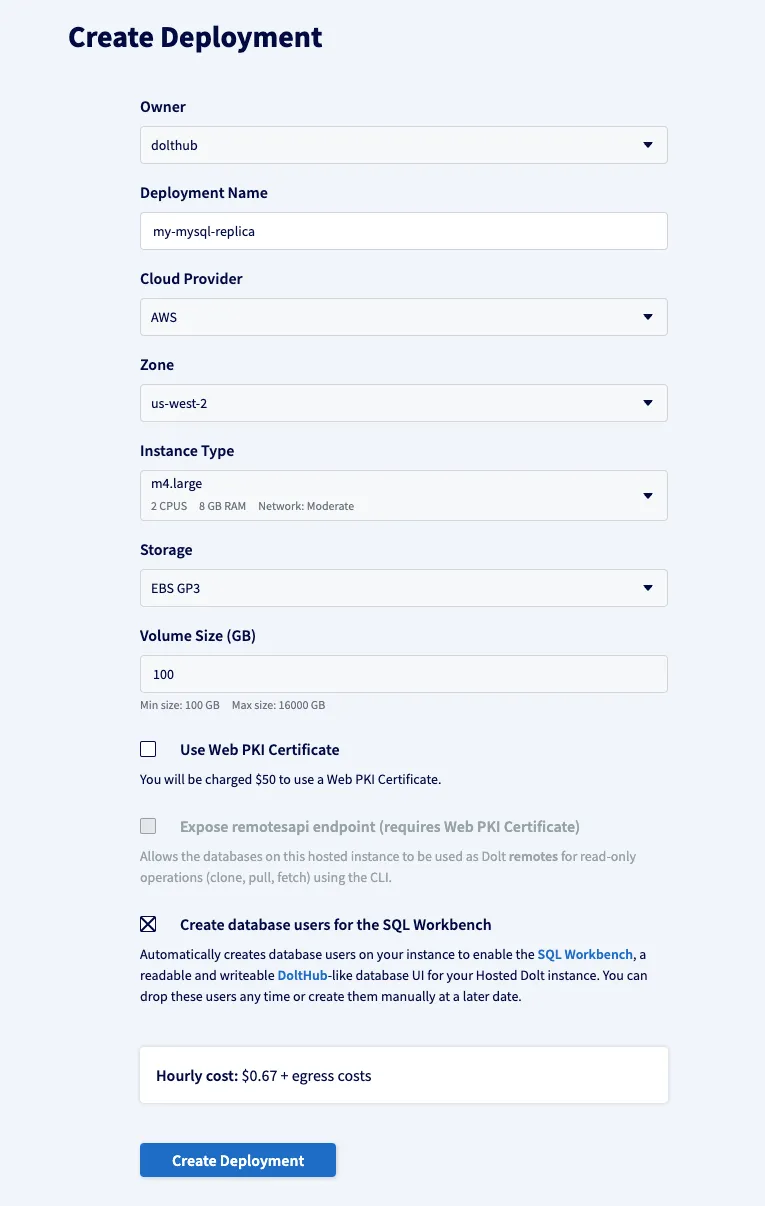
Let’s launch a Hosted Dolt instance and configure it to be a versioned replica of our MySQL primary server. Using Hosted Dolt makes this super easy, but of course you could also run and operate your own dolt sql-server on premises if that’s what you prefer.
Open the Hosted Dolt launch wizard and fill in a name for your deployment. All the default options are fine, so go ahead and hit “Create Deployment” after you enter a deployment name.
After you complete the Hosted Dolt launch wizard, you’ll be taken to a status page for your deployment. Give the Hosted Dolt database a few minutes to spin up, and then we can connect and configure replication.
Configure Replication#
Once your Hosted Dolt database shows as started, look on the “Connectivity” tab, in the “Connect to server” section and copy the mysql command line for connecting to this Dolt database. Run that command in your shell and make sure you are able to successfully connect to the SQL shell for your Dolt database:
mysql -h"dolthub-versioned-mysql-replica.dbs.hosted.doltdb.com" -u"m8b0shq40jvuod9m" -p"vFHOo594i5pJrv9PFqS2D6P9689TdEn9"
Welcome to the MySQL monitor.  Commands end with ; or \g.

mysql> select dolt_version();
+----------------+
| dolt_version() |
+----------------+
| 0.75.9         |
+----------------+
From inside this SQL shell, we’ll run a few commands to configure our replica…
The first command simply gives our Dolt server a unique server ID. This can be any positive integer you want, as long as it doesn’t conflict with another server in your replication topology.
set @@global.server_id=42;Next we need to tell the replica how to connect to our primary MySQL server using the CHANGE REPLICATION SOURCE statement. Plug in the same endpoint we used earlier to connect to the Amazon RDS instance, as well the right username and password for your source server. In our quick demo, we’re using the admin login we created earlier, but if this weren’t a demo, we’d follow the standard MySQL best practice for creating a dedicated replication user for our replica to connect with.
CHANGE REPLICATION SOURCE TO SOURCE_HOST='aurora-cluster-2.cluster-cpecqqdc6nt8.us-west-2.rds.amazonaws.com', SOURCE_USER='admin', SOURCE_PASSWORD='aurora-1';After that, we just need to start the replication process:
START REPLICA;Let’s check on the status of the replica to make sure it connected correctly. Run the SHOW REPLICA STATUS command, and make sure you see that the IO and SQL threads are both running, and no errors are reported. (The \G vertical result layout option is helpful here. 🙌🏻)
SHOW REPLICA STATUS \G

...
IO_Thread_Running: Yes
SQL_Thread_Running: Yes
...
Last_IO_Errno: 0
Last_IO_Error:
Last_SQL_Errno: 0
Last_SQL_Error:
...
If all that looks good, your Dolt versioned MySQL replica is connected to the primary MySQL server and ready to replicate data!
Replicating Data#
Now that we’ve got our primary MySQL server and our Hosted Dolt versioned MySQL replica up and running… let’s get to the fun stuff and replicate some data! 😎
For this example, we’re going to use the datacharmer/test_db repo on GitHub for a decently sized MySQL dump (~160MB) with some good test data. I’ve cloned that repository and moved into the root of it, and we’ll load this data set into our primary MySQL server:
mysql -u admin -p --host aurora-cluster-1.cluster-cpecqqdc6nt8.us-west-2.rds.amazonaws.com < employees.sqlAfter a minute or two, all of that data is uploaded to our primary MySQL server. We can log in and look around and take a quick peek at what’s there.
mysql> use employees;
Database changed

mysql> show tables;
+----------------------+
| Tables_in_employees  |
+----------------------+
| current_dept_emp     |
| departments          |
| dept_emp             |
| dept_emp_latest_date |
| dept_manager         |
| employees            |
| salaries             |
| titles               |
+----------------------+

mysql> select count(*) from employees;
+----------+
| count(*) |
+----------+
|   300024 |
+----------+
Over on our Dolt versioned MySQL replica, we can quickly confirm the same stats:
dolt> select count(*) from employees;
+----------+
| count(*) |
+----------+
|   300024 |
+----------+
Let’s jump back over to our MySQL primary and make some changes to our data. We expect these to show up as new commits in our Dolt versioned MySQL replica.
SET AUTOCOMMIT=0;
INSERT INTO employees VALUES (999999, '1999-01-01', 'Dee', 'McDolt', 'M', '2000-01-01');
COMMIT;

DELETE FROM employees where first_name='Irene';
COMMIT;

INSERT INTO employees VALUES (999998, '1981-02-16', 'Jason', 'McDolt', 'M', '2022-01-15');
COMMIT;
Now that we’ve created a few more transactions to change our data on the primary MySQL server, let’s go see how that data looks on our versioned replica. We can use the commit log system table, dolt_log, to find the three most recent dolt commits.
dolt> select commit_hash, date from dolt_log limit 3;
+----------------------------------+-------------------------+
| commit_hash                      | date                    |
+----------------------------------+-------------------------+
| s96oerpvmta7gj1oj77cf95ngj8lnor5 | 2023-04-03 22:39:05.555 |
| f5qju7maa3ig72cql5m9lgv4cfp2mjdq | 2023-04-03 22:38:29.664 |
| 8abeha64dtf24ah4k2aqjjf54crcac4q | 2023-04-03 22:35:28.69  |
+----------------------------------+-------------------------+
Each of those dolt commits maps back to the three transactions we just committed on the primary MySQL server. There are a ton of data versioning features in Dolt we can use from here to inspect the changes. For example, the dolt_diff() table function will give us a report of exactly what rows changed, and how, between any two commits.
dolt> select * from dolt_diff('s96oerpvmta7gj1oj77cf95ngj8lnor5^', 's96oerpvmta7gj1oj77cf95ngj8lnor5', 'employees') \G
    *************************** 1. row ***************************
       to_emp_no: 999998
   to_birth_date: 1981-02-16
   to_first_name: Jason
    to_last_name: McDolt
       to_gender: M
    to_hire_date: 2022-01-15
       to_commit: s96oerpvmta7gj1oj77cf95ngj8lnor5
  to_commit_date: 2023-04-03 22:39:05.555
     from_emp_no: NULL
 from_birth_date: NULL
 from_first_name: NULL
  from_last_name: NULL
     from_gender: NULL
  from_hire_date: NULL
     from_commit: s96oerpvmta7gj1oj77cf95ngj8lnor5^
from_commit_date: 2023-04-03 22:38:29.664
       diff_type: added
The dolt_diff_stat() table function gives us higher level details about how one revision of our data is different from another revision. In the query below, we show how to calculate the combined diff stats for all three of the changes we just committed.
dolt> select * from dolt_diff_stat('8abeha64dtf24ah4k2aqjjf54crcac4q^', 's96oerpvmta7gj1oj77cf95ngj8lnor5');
+------------+-----------------+------------+--------------+---------------+-------------+---------------+----------------+---------------+---------------+----------------+----------------+
| table_name | rows_unmodified | rows_added | rows_deleted | rows_modified | cells_added | cells_deleted | cells_modified | old_row_count | new_row_count | old_cell_count | new_cell_count |
+------------+-----------------+------------+--------------+---------------+-------------+---------------+----------------+---------------+---------------+----------------+----------------+
| employees  |          299761 |          2 |          263 |             0 |          12 |          1578 |              0 |        300024 |        299763 |        1800144 |        1798578 |
+------------+-----------------+------------+--------------+---------------+-------------+---------------+----------------+---------------+---------------+----------------+----------------+
The recently added dolt_patch() table function allows us to translate data diffs back into SQL statements. For example, if we wanted to generate a SQL script that we could run against our primary MySQL server to undo deleting all the “Irenes” from our database, we could use dolt_patch() to get a list of all the SQL statements we’d need to execute to get all our Irenes to come back. Note in the query below that we supplied our commits in reverse order here in order to generate commands that reverse the data changes.
dolt> select * from dolt_patch('f5qju7maa3ig72cql5m9lgv4cfp2mjdq', 'f5qju7maa3ig72cql5m9lgv4cfp2mjdq^');
+-----------------+----------------------------------+----------------------------------+------------+-----------+-----------------------------------------------------------------------------------------------------------------------------------------------------------------------+
| statement_order | from_commit_hash                 | to_commit_hash                   | table_name | diff_type | statement                                                                                                                                                             |
+-----------------+----------------------------------+----------------------------------+------------+-----------+-----------------------------------------------------------------------------------------------------------------------------------------------------------------------+
|               1 | f5qju7maa3ig72cql5m9lgv4cfp2mjdq | 8abeha64dtf24ah4k2aqjjf54crcac4q | employees  | data      | INSERT INTO `employees` (`emp_no`,`birth_date`,`first_name`,`last_name`,`gender`,`hire_date`) VALUES (10256,'1960-12-02','Irene','Radhakrishnan','M','1985-10-12');   |
|               2 | f5qju7maa3ig72cql5m9lgv4cfp2mjdq | 8abeha64dtf24ah4k2aqjjf54crcac4q | employees  | data      | INSERT INTO `employees` (`emp_no`,`birth_date`,`first_name`,`last_name`,`gender`,`hire_date`) VALUES (10360,'1960-11-04','Irene','Munck','M','1996-09-04');           |
|               3 | f5qju7maa3ig72cql5m9lgv4cfp2mjdq | 8abeha64dtf24ah4k2aqjjf54crcac4q | employees  | data      | INSERT INTO `employees` (`emp_no`,`birth_date`,`first_name`,`last_name`,`gender`,`hire_date`) VALUES (13237,'1963-06-01','Irene','Demeyer','M','1995-01-09');         |
...
|             263 | f5qju7maa3ig72cql5m9lgv4cfp2mjdq | 8abeha64dtf24ah4k2aqjjf54crcac4q | employees  | data      | INSERT INTO `employees` (`emp_no`,`birth_date`,`first_name`,`last_name`,`gender`,`hire_date`) VALUES (499770,'1958-03-07','Irene','Trumbly','M','1992-11-06');        |
+-----------------+----------------------------------+----------------------------------+------------+-----------+-----------------------------------------------------------------------------------------------------------------------------------------------------------------------+
263 rows in set (0.18 sec)Conclusion#
We saw how to launch a Hosted Dolt instance and configure it as a versioned replica of an internet-accessible MySQL server. As data flows through our primary server and is replicated to Dolt, a Dolt commit is created for each transaction. That gives us a versioned history, from that point forward, for every change to any cell of our data, at a transaction level granularity. This enables us to deeply audit how our data has changed, recover “lost” or corrupted data (versioned data is never really lost!), protect from operator mistakes, and analyze how our data has changed, in ways that we just can’t do from the primary MySQL server.
We’re confident that you’ll love seeing a versioned history of your data and having the power to analyze how your data changes, recover from data errors, and much more. If you’re curious and want to try out Hosted Dolt, but aren’t able to pay for an instance yet, just reach out to our sales team and mention this blog post and we’ll be happy to help you out with some free trial time on Hosted Dolt to try out versioned MySQL replication.
We think anybody running a MySQL server can benefit from having a versioned replica of their data! Swing by the #dolt or #hosted-dolt channels on the DoltHub Discord and hit us up! We love talking to customers and helping them get the most out of Dolt.