
We recently released single sign-on (SSO) for two of our web products, Hosted Dolt and DoltLab Enterprise. Administrators can configure an Identity Provider (IdP), where their users can authenticate and authorize access to their organization (Hosted) or application (DoltLab) through the provider. This is a popular enterprise solution due to improved user experiences and increased security.
This blog will walk you through how to set up a simple SAML SSO solution for your web application.
What is single sign-on?#
Single sign-on (SSO) permits users to log in to multiple applications with one set of login credentials. It works based on a trust relationship between a Service Provider (SP) and an Identity Provider (IdP). This relationship is often based on a certificate that is exchanged between the IdP and SP.
There are a few types of SSO configurations, such as Kerberos and Security Assertion Markup Language (SAML). We chose to support SAML integration due to its popularity and a customer ask.
Our web application (the Service Provider) allows customers to configure a third-party Identity Provider of their choice. Some popular third-party IdPs include Okta, Auth0, Shibboleth, and OneLogin.
Considering your permissions model#
A user that signs up through a single sign-on workflow will automatically have permissions to certain assets. We have implemented SSO for two different models: per-organization (Hosted Dolt) and per-application (DoltLab).
Per-organization#
The example in this blog will show how to set up SSO per-organization. Our products follow a GitHub-style permissions model, where an entity (user or organization) can own an asset (repositories on GitHub, databases on DoltHub and DoltLab, deployments on Hosted Dolt). Organizations can have multiple users as members with varying permissions. Assets can also have individual collaborators. Users that sign up through their organization’s SSO workflow will have access to all assets within that organization and only that organization.
Per-application#
This is different from setting up per-application SSO, like we have on DoltLab, where enterprise customers host their own application and therefore would configure SSO for the whole application rather than one organization within the application. This is similar to the GitLab model. Users that sign up through their application’s SSO workflow have access to any asset within the application that they have permissions to.
Organization-specific users#
Users that are created through an organization’s SSO workflow are different in nature than users who sign up through the general application authentication workflow. There are a few rules we decided on to simplify our authentication workflows for these users:
- SSO-created users do not exist outside of their organization.
- SSO-created users cease to exist when they are removed as members from their organization or if the organization is deleted.
- SSO-created users cannot be added to other organizations or added as collaborators to assets outside of their organization.
This blog will walk through how we built per-organization SSO for our web application. It has two main parts: configuring an Identity Provider on an organization and building SAML authentication workflows on the Service Provider.
Configuring an Identity Provider on the Service Provider#
To get started, we need a way to associate a configured third-party IdP with an organization on the SP. To do so, we store certain IdP information in our SP database and associate it with an organization ID. Once the IdP is configured, we will also want workflows for deleting and updating the IdP configuration for an organization.
Before we can add an IdP to an organization, we need to set up the third-party IdP. The
IdP will ask for certain information from the SP. The most important piece of this is the
Assertion Consumer Service (ACS) URL (also called the Callback URL). This is the
location within a SP that accepts a <samlp:Response> message after the IdP authenticates
a user. We will cover this in the next
section.
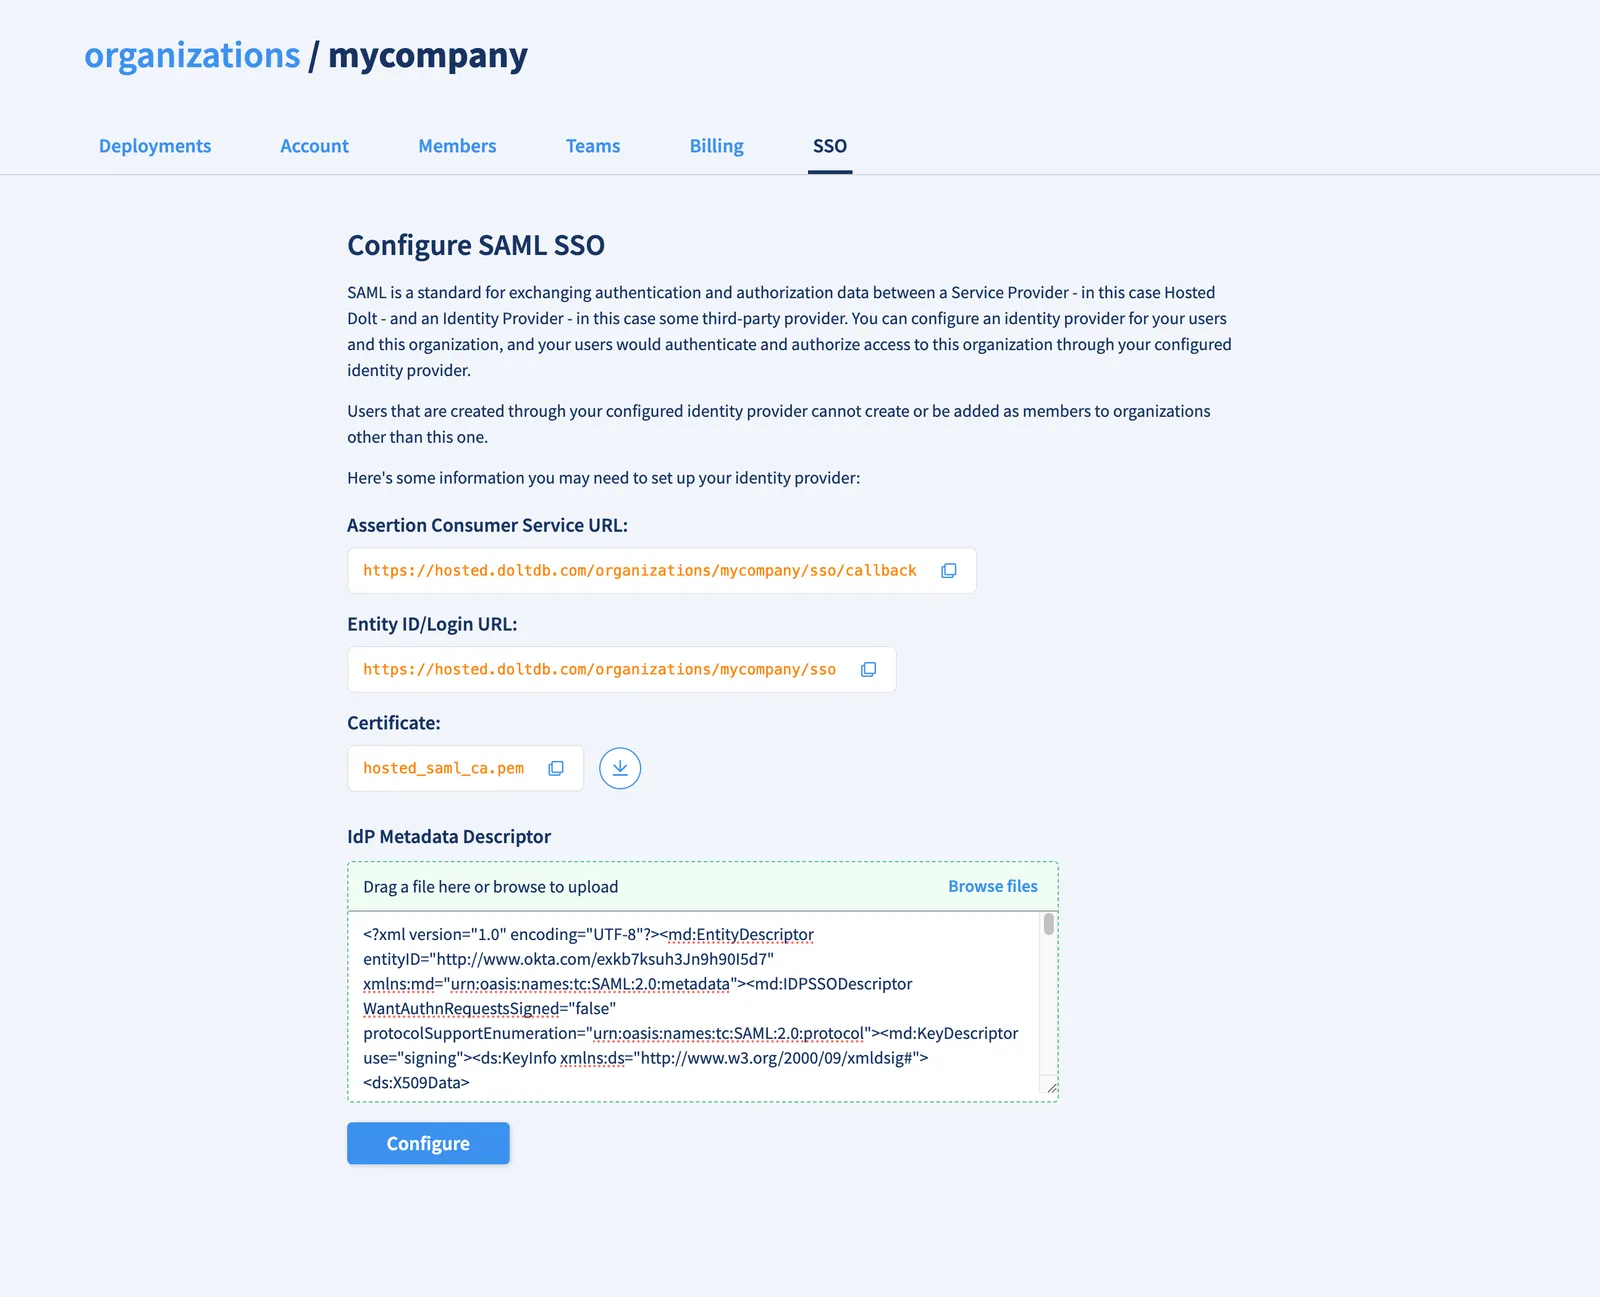
Some IdPs will also ask for a Login URL (a place in the SP that starts the SSO authentication workflow) and a signature certificate. We provide these on the organization’s SSO configuration page.
Here’s an example of the information Okta (a third-party IdP) asks for when setting up a new SAML integration:
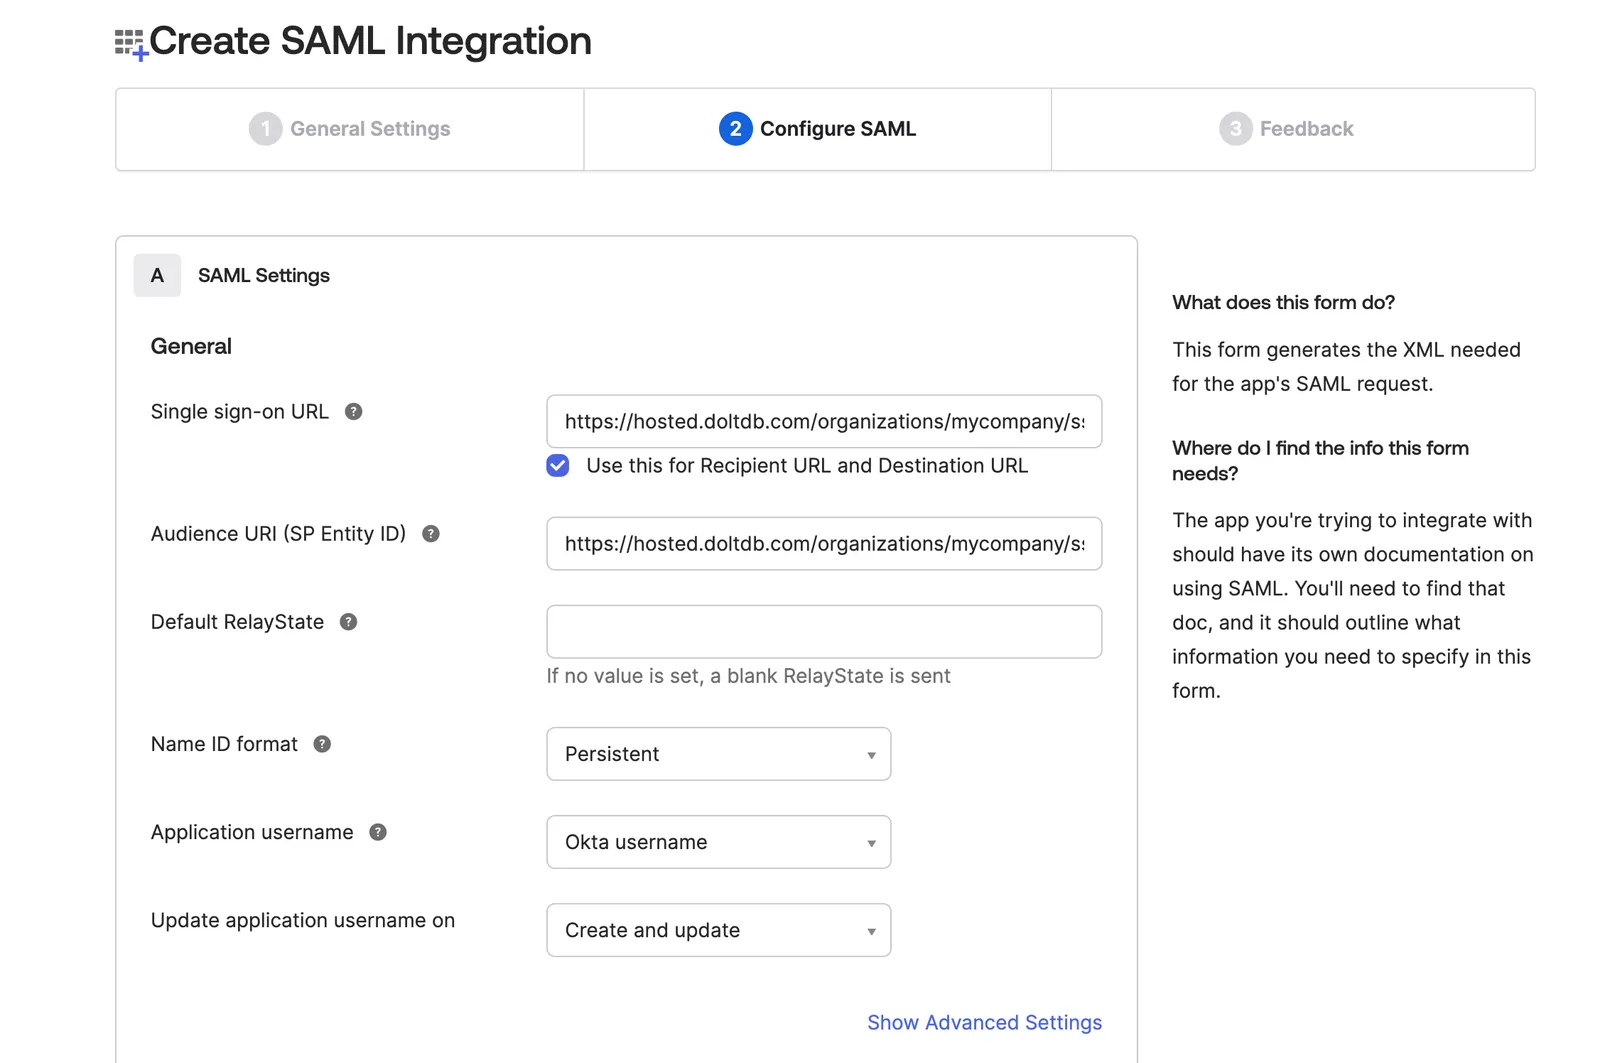
There’s more fine-grained information you can configure here, but we’re keeping it simple.
Once the IdP is set up, there is usually a place you can download the SAML Metadata Descriptor. This includes important IdP information we’ll want to store for the IdP configuration we associate with our organization.
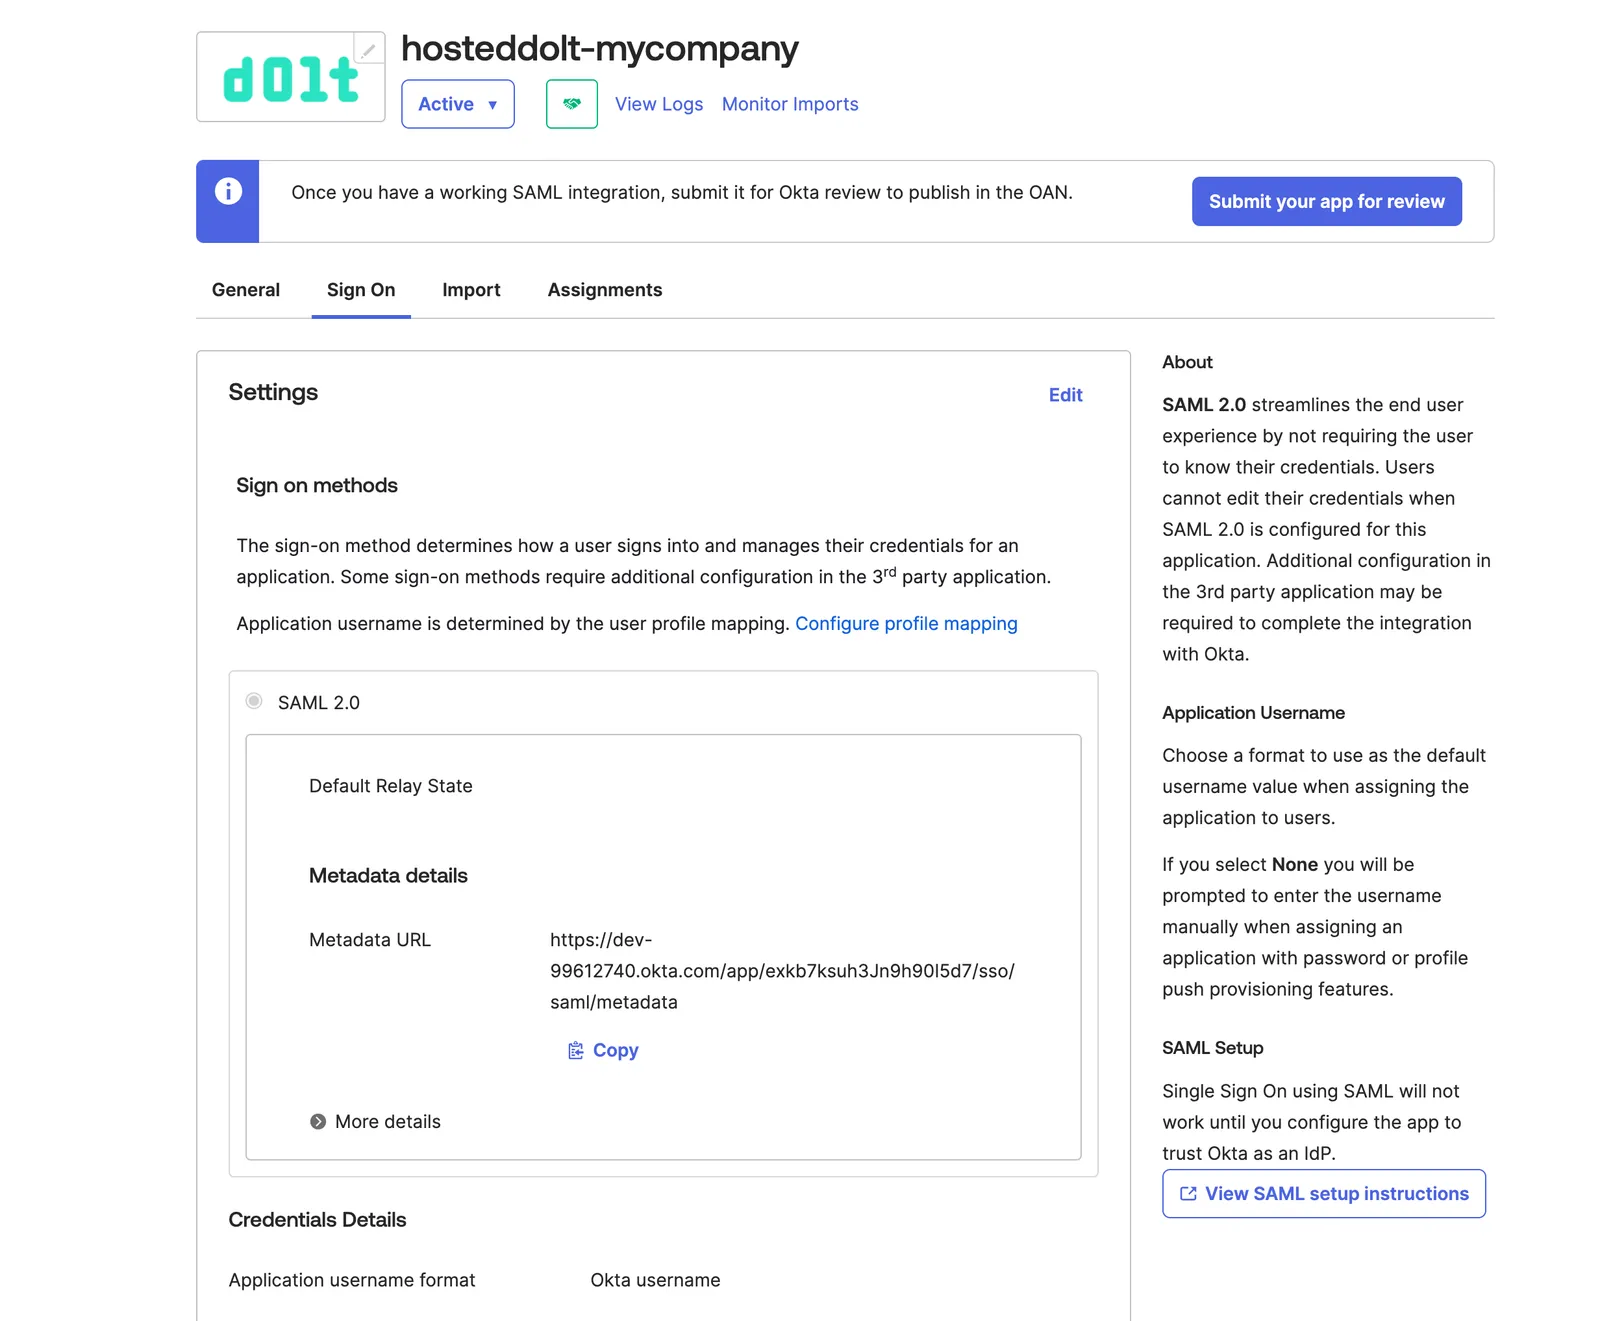
Our application’s API is written in Golang, and we use a SAML library to parse this XML descriptor and get three key pieces of information: the [Entity ID](https://mojoauth.com/glossary/saml-entity-id/#:~:text=A%20SAML%20(Security%20Assertion%20Markup,in%20SAML%20messages%20and%20metadata.), signing certificate, and HTTP-POST binding URL. We store these in the SP database with the following schema.
CREATE TABLE saml_identity_providers (
  id VARCHAR(36) PRIMARY KEY NOT NULL,
  entity_id VARCHAR(255) NOT NULL,
  cert VARCHAR(8192) NOT NULL,
  http_post_url VARCHAR(2048),

  created_at TIMESTAMP(6),
  updated_at TIMESTAMP(6),

  FOREIGN KEY (id) REFERENCES organizations(id) ON DELETE CASCADE
);
These will come in to play later when we build the authentication workflow.
Once the Identity Provider is associated with an organization on the Service Provider, we built CRUD operations to allow organization administrators on the SP to delete the IdP configuration and update the IdP configuration by uploading a new SAML Metadata Descriptor.
Building SAML authentication workflows on the Service Provider#
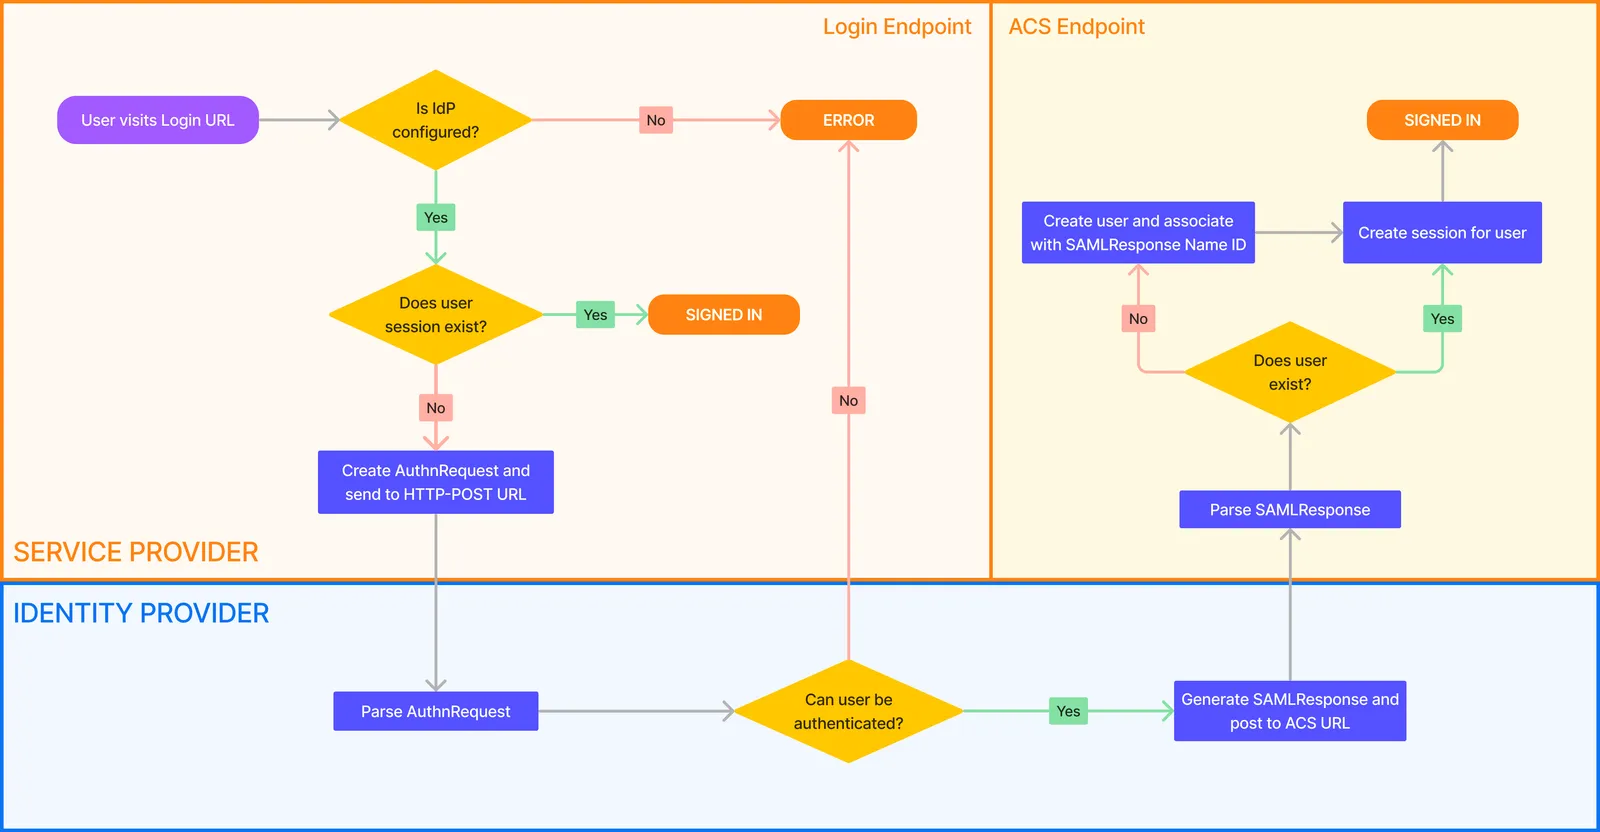
This flowchart is an overview of what the SAML SSO authentication workflow looks like. The Identity Provider steps are handled by the third-party IdP we configured above. We will go into more detail about how to implement the login and ACS URLs below.
Login URL#
A user hits an organization’s SSO login URL (in our case /organizations/[orgName]/sso).
If SSO has not been configured for the organization, the login will be unsuccessful. If a
session exists for the user, they are already signed in and we route them to the
organization page.
If a session does not exist, we generate a SAML AuthnRequest using the fields we store
when we create the IdP configuration on the organization. This request is submitted to the
IdP’s HTTP-POST URL.
This is the form we use to submit the AuthnRequest:
<>
<form action={httpPostUrl} method="POST" id="saml-request-form">
<input type="hidden" name="SAMLRequest" value={authnRequest} />
<input style={{ visibility: "hidden" }} type="submit" value="Submit" />
</form>
<Script
id="submit-saml-request-form"
dangerouslySetInnerHTML={{
__html: `document.getElementById('saml-request-form').submit();`,
}}
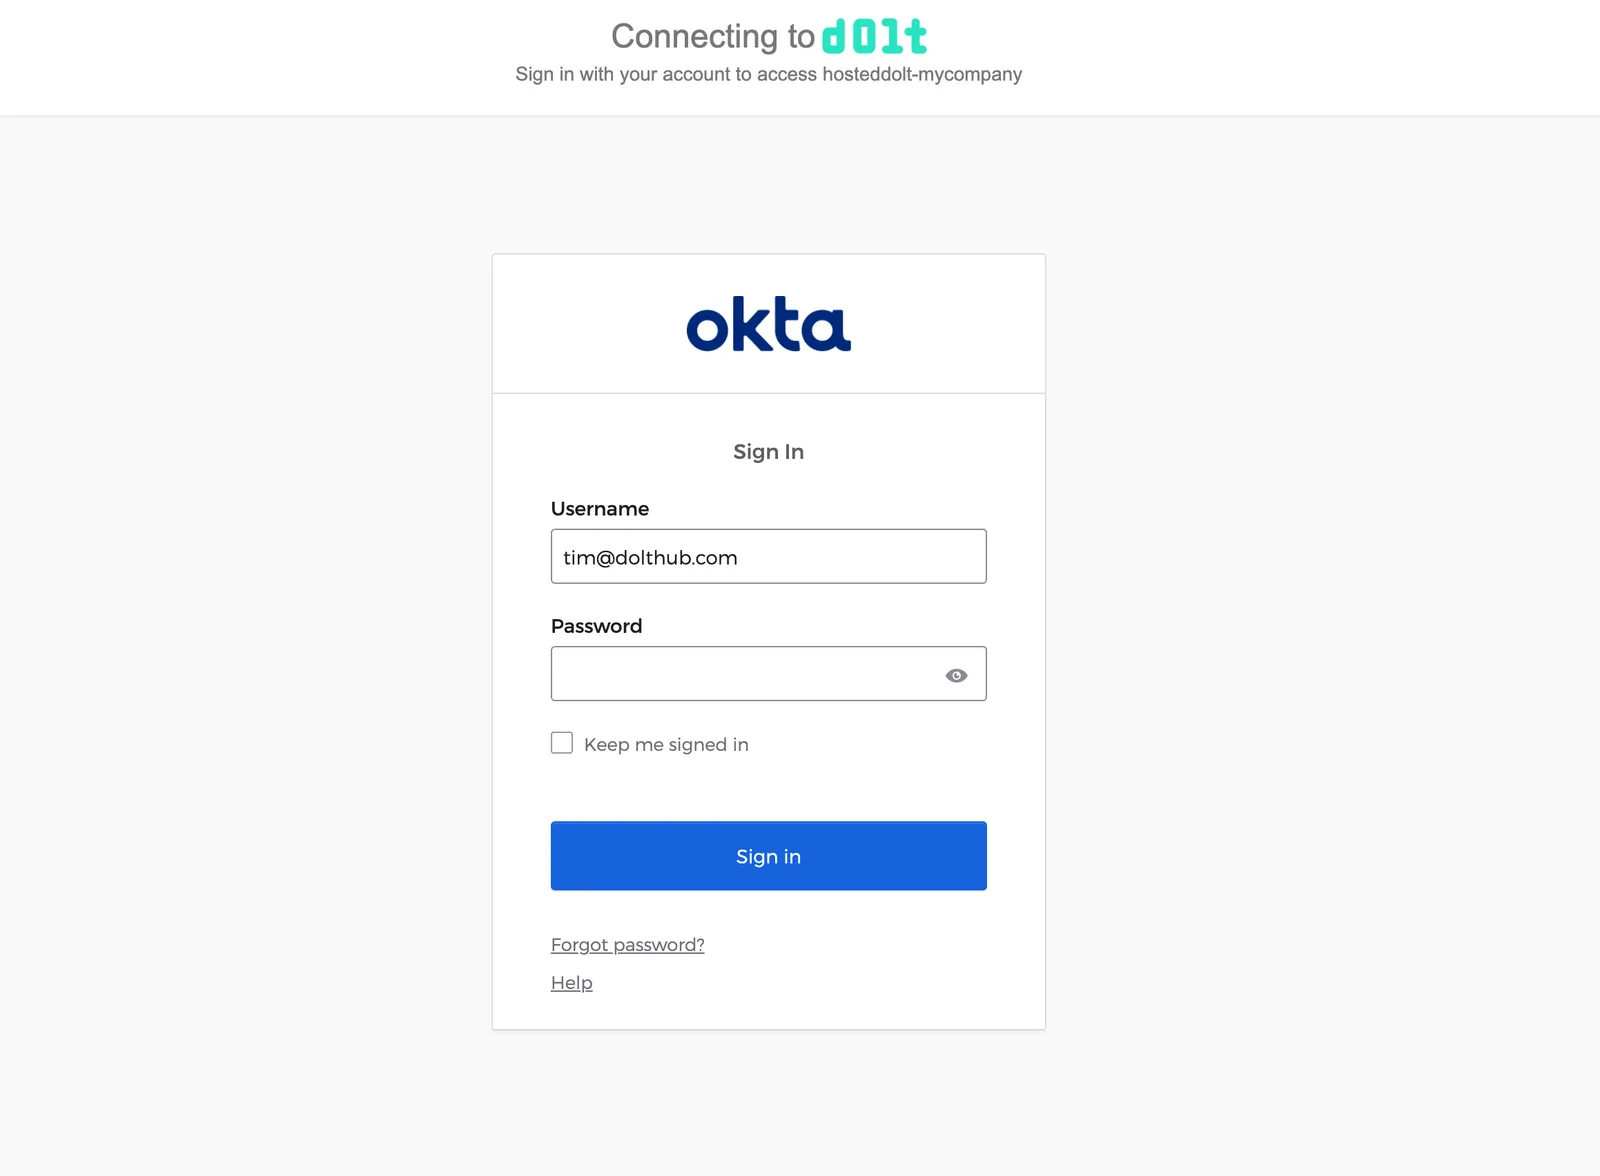
/>
</>If the identity provider is properly configured, the user will be able to log in via the IdP. This is what the form looks like for Okta:
If the user does not exist in the third-party IdP, the login will fail. If the user is
successfully authenticated by the IdP, the IdP will post a SAMLResponse to the
configured ACS URL on the SP.
Assertion Consumer Service (ACS) URL#
The SAMLResponse is sent to our ACS URL (in our case
/organizations/[orgName]/sso/callback), which is set up to accept a POST request.
export async function POST(req: NextRequest, { orgName }: { orgName: string }) {
  const formData = await req.formData();
  const fd = formData.get("SAMLResponse");
  const samlRes = fd?.toString();
  if (!samlRes) {
    return NextResponse.json({ error: "No SAMLResponse" });
  }
  const url = new URL(
    `/organizations/${orgName}/sso/login#${samlRes}`,
    req.nextUrl.protocol + req.headers.get("host"),
  );
  return NextResponse.redirect(url, { status: 302 });
}
If the SAMLResponse exists, we redirect to another page that sends a request to our API
to parse and verify the SAMLResponse. It checks the Name ID in the SAMLResponse
against our identity_links table, which has this schema:
CREATE TABLE identity_links (
    id varchar(36) primary key,
    provider_user_id varchar(256) not null, -- SAMLResponse Name ID
    saml_provider_id_fk VARCHAR(36), -- Configured SAML IdP on the organization
    user_id_fk varchar(36) not null,
    updated_at timestamp(6),
    created_at timestamp(6),

    FOREIGN KEY (user_id_fk) REFERENCES users(id) ON DELETE CASCADE,
    FOREIGN KEY (saml_provider_id_fk) REFERENCES saml_identity_providers(id) ON DELETE CASCADE
);
If an identity link exists for the SAMLResponse Name ID (provider_user_id) for the
organization’s configured SAML IdP (saml_provider_id_fk), then we create a session for
the user.
If an identity link does not exist for the SAMLResponse Name ID (provider_user_id) for
the organization’s configured SAML IdP (saml_provider_id_fk), we prompt the user for a
username and email. We create a user and identity link entry so we can recognize this user in
the future.
Once the user has been created or if the identity link already exists, we create a session for the user and they are routed to the organization page. They now have read permissions to all the assets within an organization.
Conclusion#
Single sign-on is a popular enterprise feature for web applications. This blog goes over how to set up a simple SAML SSO solution and gives examples of some important pieces of the authentication workflow on the Service Provider.
As always, you can reach us on Discord with any questions or make a feature request on GitHub.