How to Run DoltLab on Hosted Dolt

In June of this year we released DoltLab v1.0.0 which uses Dolt as its default application database instead of PostgreSQL, providing out-of-the-box, version-controlled data for all of our DoltLab customers.
Today, I'll cover how you can supercharge a DoltLab instance even more by replacing the default Dolt database with a Hosted Dolt database. For those unfamiliar with Hosted Dolt, it's the fully-managed version of Dolt where you can deploy a Dolt server with the click of a button, and leave the management and maintenance to us. You can think of Hosted Dolt like DoltHub's version of AWS RDS.
You might be wondering why you'd want to do this for DoltLab at all. After all, it's not a requirement for running DoltLab, so what are the benefits?
I'm glad you asked!
DoltLab ships with a default Dolt server that runs alongside DoltLab's other services as a Docker container on the same host. The main interface for interacting with this server is with a shell script called shell-db.sh included with DoltLab. Although this setup is absolutely fine for DoltLab administrators and provides sufficient functionality, it lacks the features and UI that have made the DoltHub suite of products best-in-class in the database community.
Often times, DoltLab administrators will prefer to run DoltLab's application database on a separate host as way to avoid a single point of failure, and they'll configure backups to ensure they never lose their application data. The DoltLab administrator guide provides steps for doing this on your own, but going this route still limits the UI and features available to you when you really want to take advantage of the power of Dolt.
Instead, by backing DoltLab with Hosted Dolt, you avoid having to manage and maintain the Dolt server yourself, and unlock the sleek, feature-rich UI Hosted Dolt provides on top of your deployment. Hosted Dolt allows you to easily edit server configuration, view logs, monitor server health, and interact directly with the data using Hosted Workbench. It also takes backups of your data regularly, allows you to easily create replica servers, and lets you view live diffs of the changes to the database, which no other database on earth can do!
Let's dive right into how you can set up DoltLab to use Hosted Dolt right away!
Create a Hosted Dolt Deployment
To begin, you'll need to create a Hosted Dolt deployment that your DoltLab instance will connect to. We've created a video tutorial for how to create your first Hosted Dolt deployment, but briefly, you'll need to create an account on hosted.doltdb.com and then click the "Create Deployment" button.
You will then see a form where you can specify details about the host you need for your DoltLab instance. In this blog we'll walkthrough creating a deployment called my-doltlab-db-1 and connecting a DoltLab instance to it.
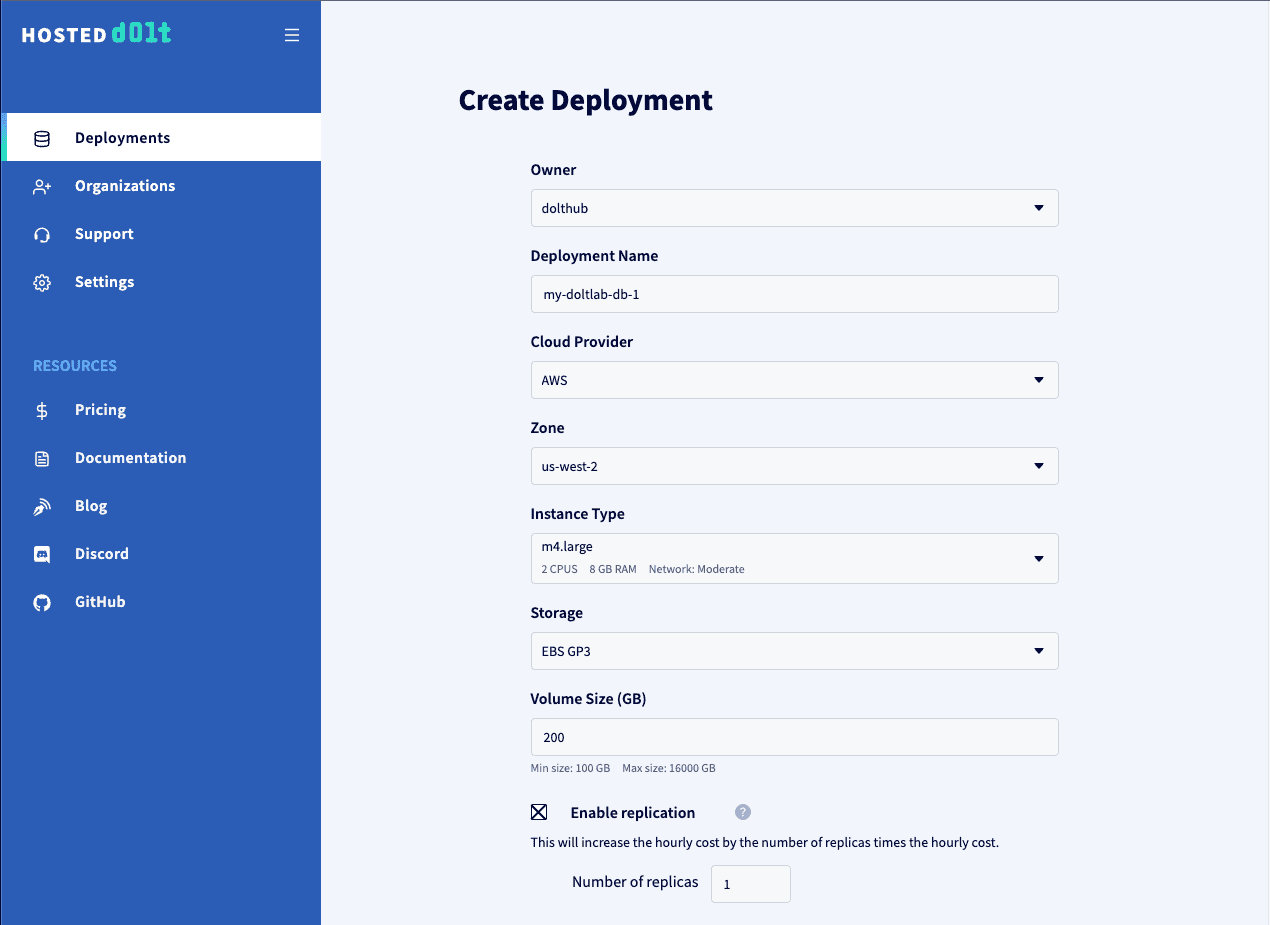
In the image above you can see that we defined our Hosted Dolt deployment name as my-doltlab-db-1, selected an AWS EC2 host with 2 CPU and 8 GB of RAM in region us-west-2. We've also requested 200 GB of disk. For DoltLab, these settings should be more than sufficient.
We have also requested a replica instance by checking the "Enable Replication" box, and specifying 1 replica, although replication is not required for DoltLab.
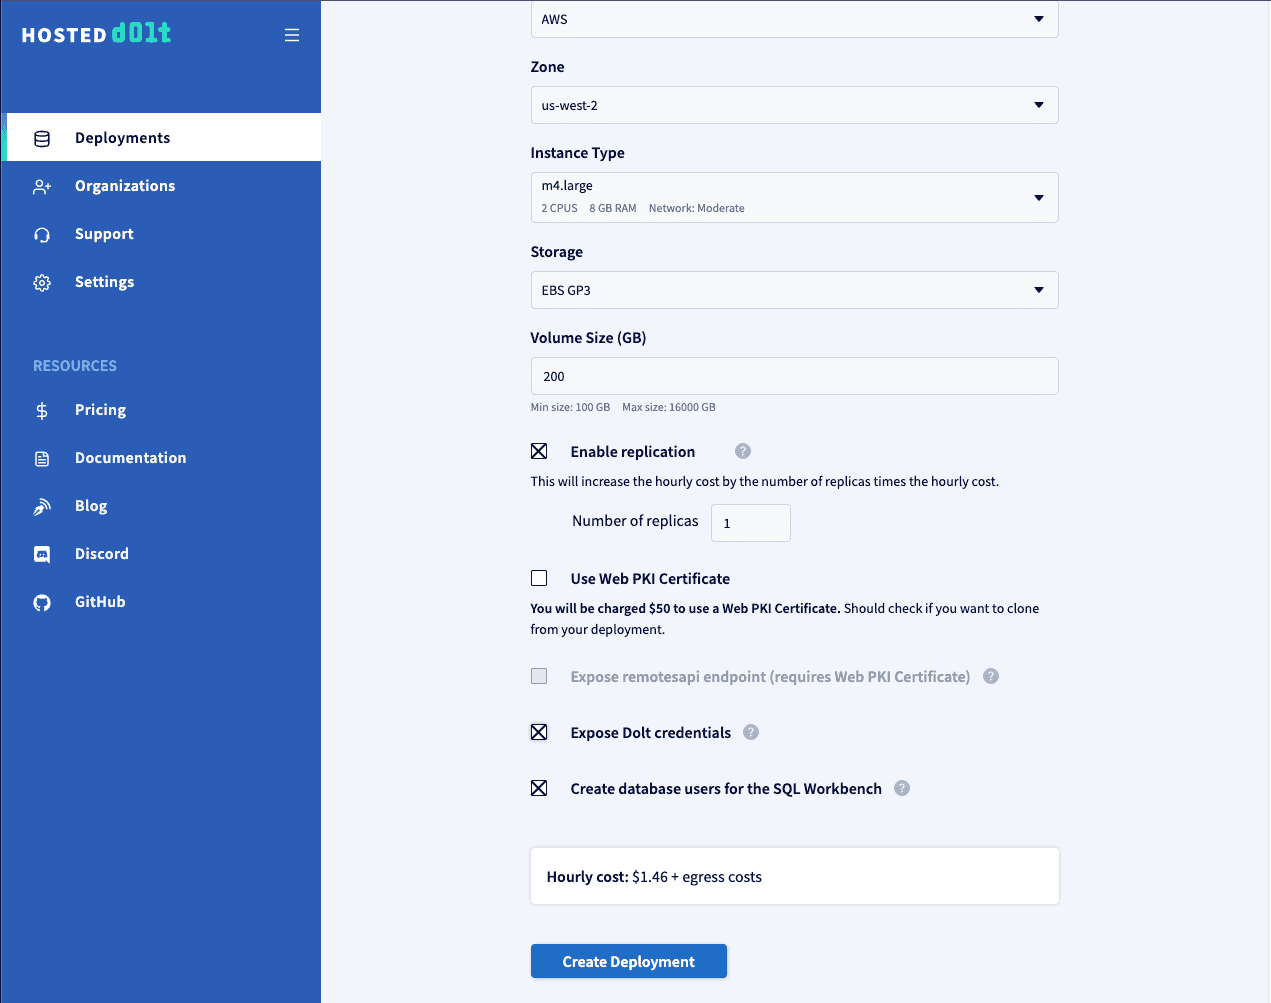
If you want the ability to clone this Hosted Dolt instance, check the box "Enable Dolt Credentials". And finally, if you want to use the Hosted Workbench feature for this instance (which we recommend) you should also check the box "Create database users for the SQL Workbench".
You will see the hourly cost of running the Hosted Dolt instance displayed above the "Create Deployment" button. Click it, and wait for the deployment to reach the "Started" state.
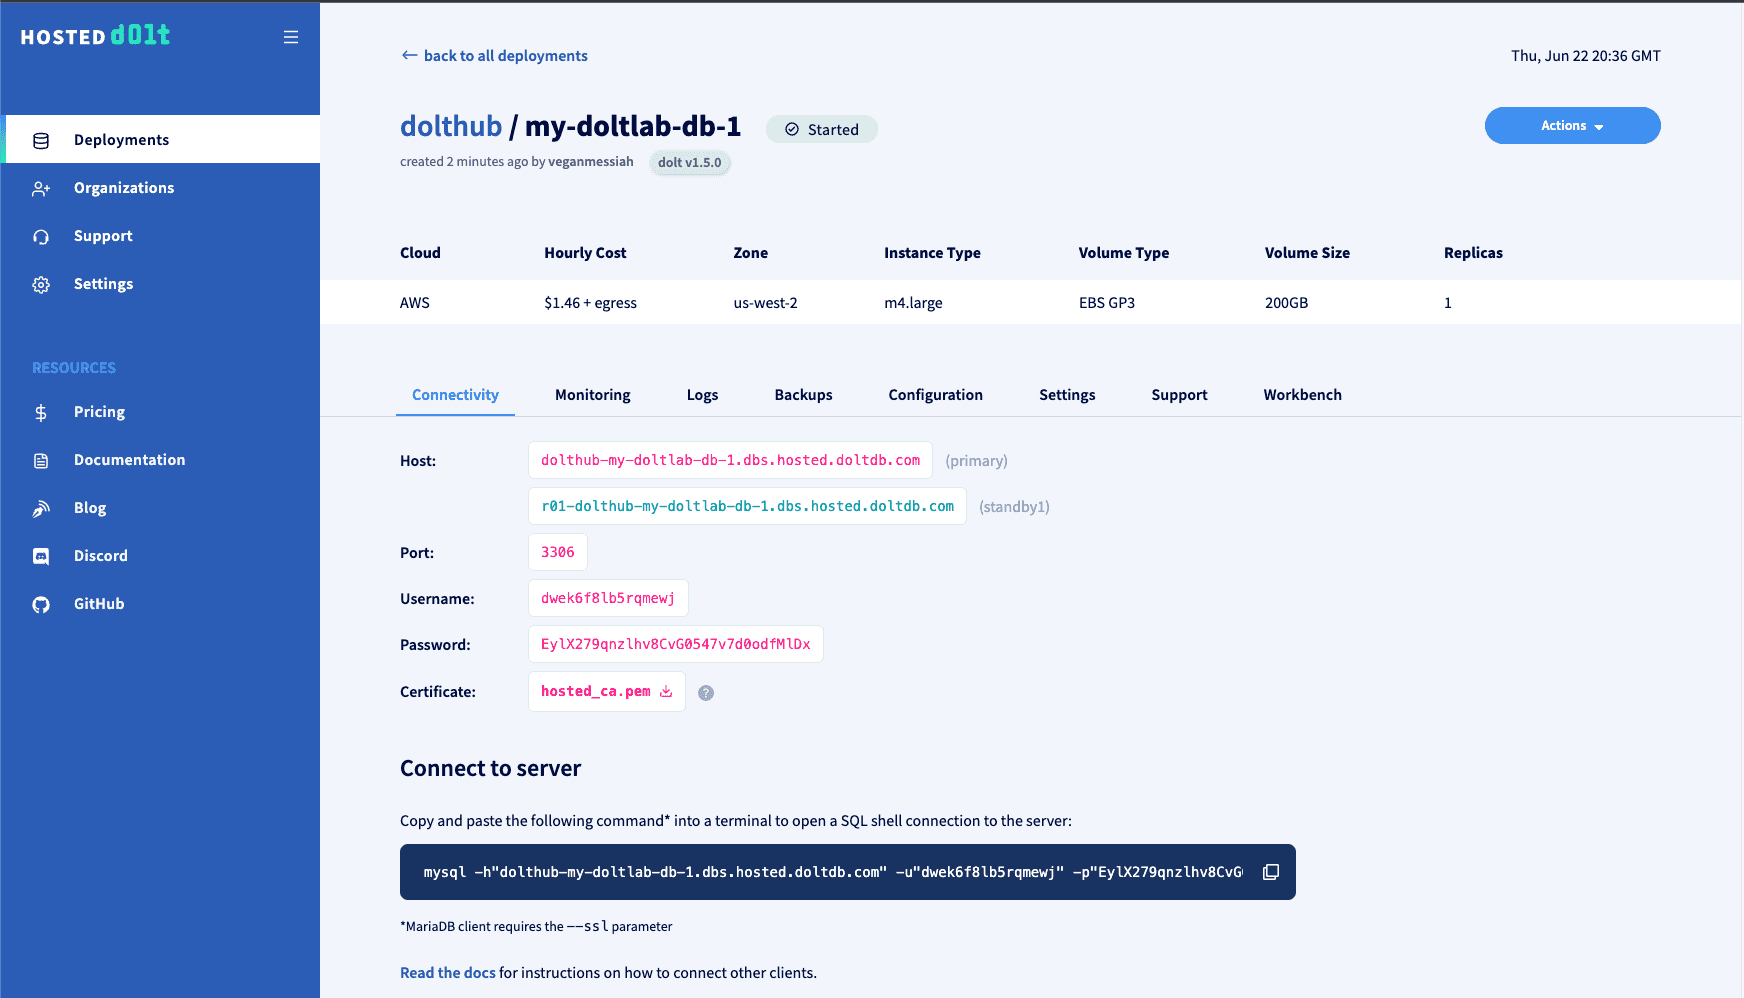
Once the deployment has come up, the deployment page will display the connection information for both the primary host and the replica, and each will be ready to use. Before connecting a DoltLab instance to the primary host, there are a few remaining steps to take to ensure the host has the proper state.
First, click the "Configuration" tab and uncheck the box "behavior_disable_multistatements". DoltLab will need to execute multiple statements against this database when it starts up, so multistatements should not be disabled. You can also, optionally, change the log_level to "debug". This log level setting will make sure that processed queries appear in the database logs, which is helpful for debugging if you ever need to.
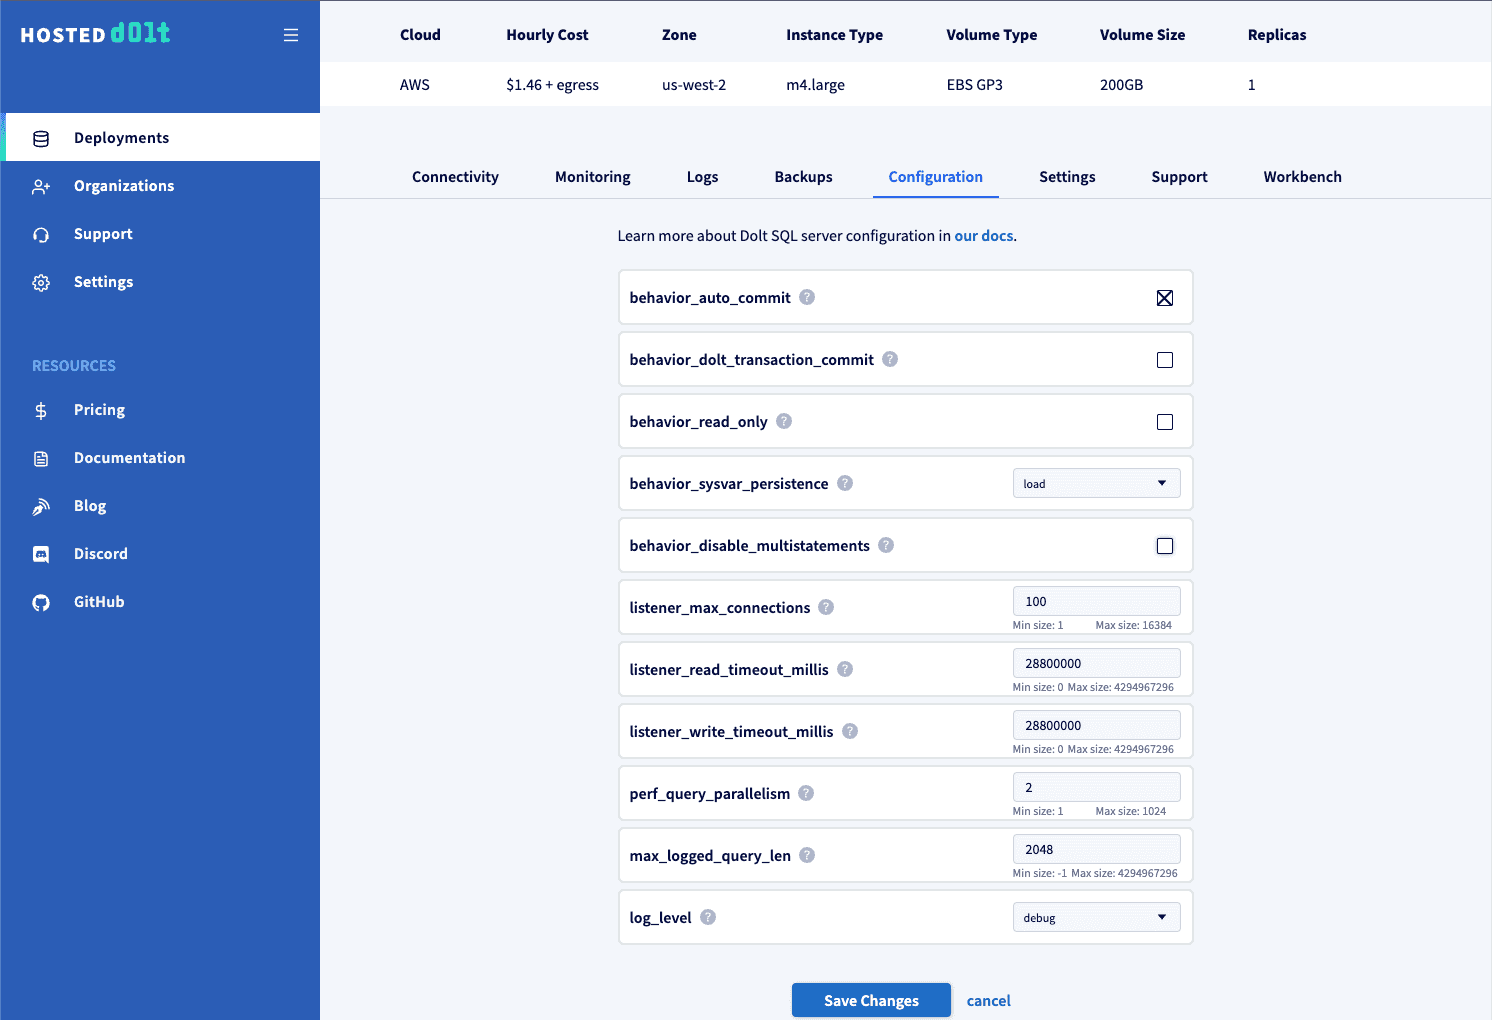
Click "Save Changes".
Next, navigate to the "Workbench" tab and check the box "Enable Writes". This will allow you to execute writes against this instance from the Hosted Workbench.
Click "Update".
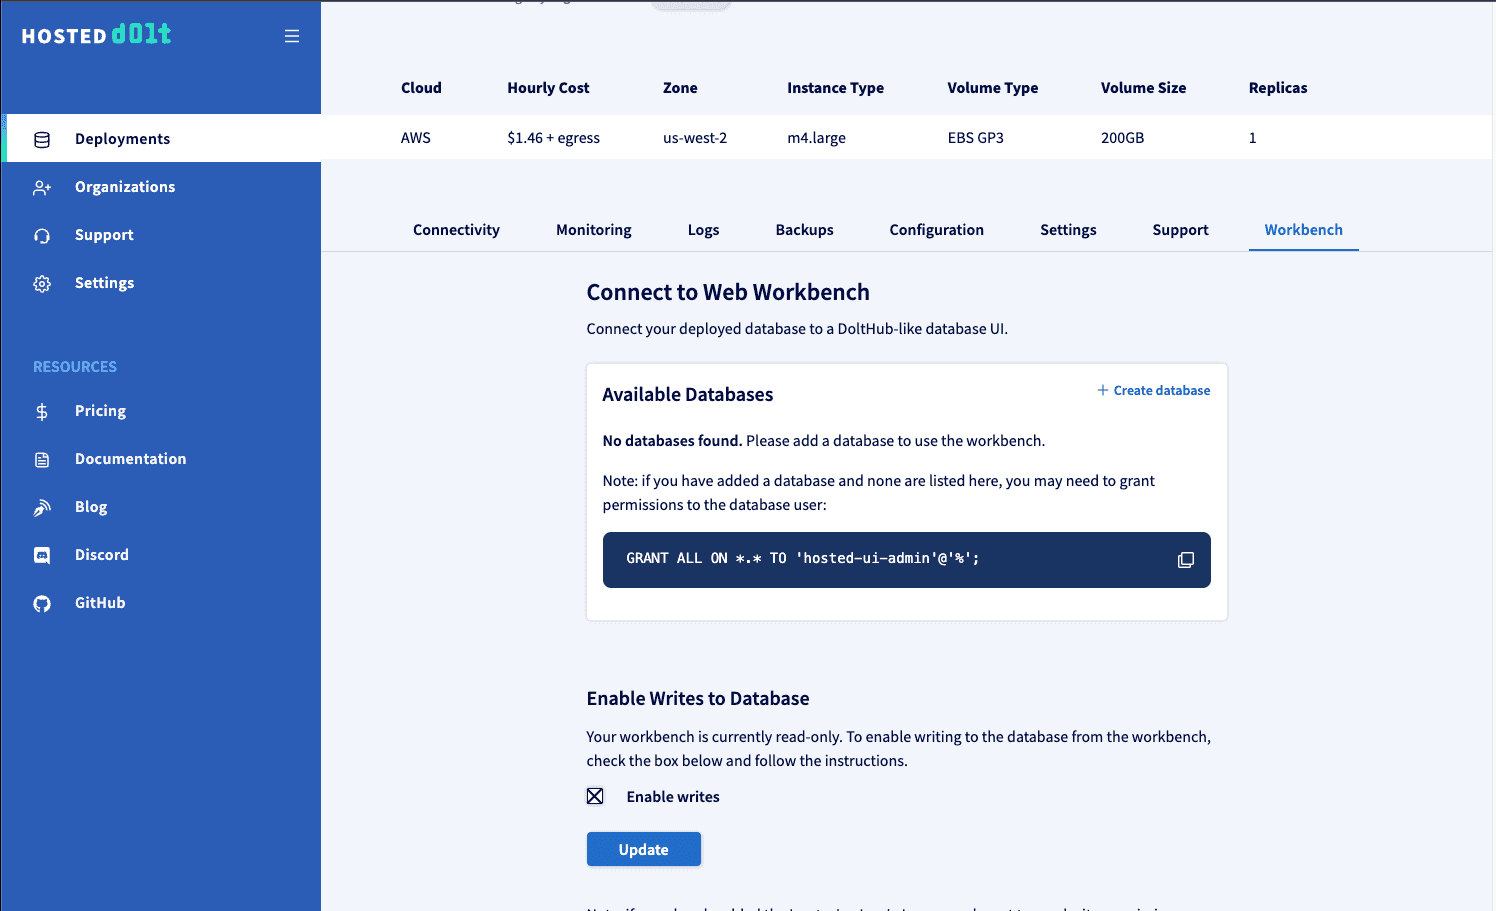
Then, with writes enabled, on this same page, click "Create database" to create the database that DoltLab expects, called dolthubapi.
Finally, create the required users and grants that DoltLab requires by connecting to this deployment and running the following statements:
CREATE USER 'dolthubadmin' IDENTIFIED BY '<password>';
CREATE USER 'dolthubapi' IDENTIFIED BY '<password>';
GRANT ALL ON *.* TO 'dolthubadmin';
GRANT ALL ON dolthubapi.* TO 'dolthubapi';
You can do this by running these statements from the Hosted Workbench SQL console, or by connecting to the database using the mysql client connection command on the "Connectivity" tab, and executing these statements from the SQL shell.
This deployment is now ready for a DoltLab connection.
Edit DoltLab's docker-compose.yaml
To connect DoltLab v1.0.0 or higher to my-doltlab-db-1, ensure that your DoltLab instance is stopped, and remove references to doltlabdb in DoltLab's docker-compose.yaml file.
You can also remove references to doltlabdb-dolt-data, doltlabdb-dolt-root, doltlabdb-dolt-configs, and doltlabdb-dolt-backups from the volumes section, as these were only necessary for DoltLab's default Dolt server.
  # commenting out all references to doltlabdb
  #
  #
  # doltlabdb:
  #  image: public.ecr.aws/dolthub/doltlab/dolt-sql-server:v1.0.2
  #  command:
  #    -l debug
  #  environment:
  #    DOLT_PASSWORD: "${DOLT_PASSWORD}"
  #    DOLTHUBAPI_PASSWORD: "${DOLTHUBAPI_PASSWORD}"
  #  networks:
  #    - default
  #  volumes:
  #    - doltlabdb-dolt-data:/var/lib/dolt
  #    - doltlabdb-dolt-root:/.dolt
  #    - doltlabdb-dolt-configs:/etc/dolt
  #    - doltlabdb-dolt-backups:/backups
  doltlabenvoy:
     image: envoyproxy/envoy-alpine:v1.18-latest
     command:
       -c /envoy.yaml
...
 # be sure the remove all doltlabdb from the depends_on blocks
...
  doltlabui:
    depends_on:
      # - doltlabdb
      - doltlabenvoy
      - doltlabremoteapi
      - doltlabapi
      - doltlabgraphql
      - doltlabfileserviceapi
...
    networks:
      - default
networks:
  default:
    external:
      name: doltlab
volumes:
  # doltlabdb-dolt-data:
  # doltlabdb-dolt-root:
  # doltlabdb-dolt-configs:
  # doltlabdb-dolt-backups:
  doltlab-remote-storage:
  doltlab-user-uploads:
There's one additional edit to the docker-compose.yaml file to make before we can start DoltLab. Edit the value of the -doltHost argument in the doltlabapi.command section to match the host of the primary my-doltlab-db-1 host. In our example, this would be dolthub-my-doltlab-db-1.dbs.hosted.doltdb.com.
...
  doltlabapi:
...
    command:
      -doltlab
      -outboundInternalServiceEndpointHost doltlabenvoy
      -iterTokenEncKeysFile /iter_token.keys
      -iterTokenDecKeysFile /iter_token.keys
      -doltUser dolthubapi
      -doltHost dolthub-my-doltlab-db-1.dbs.hosted.doltdb.com # update the host to point to the primary deployment
      -doltPort 3306
      -tlsSkipVerify # hosted dolt requires TLS, but we will skip verification for now
...
You will also need to add the argument -tlsSkipVerify to the doltlabapi.command section. Save these changes to the file, and you can now start DoltLab using the start-doltlab.sh script.
Make sure that the DOLT_PASSWORD environment variable matches the password you used when creating user dolthubadmin, and DOLTHUBAPI_PASSWORD matches the password you used when creating user dolthubapi.
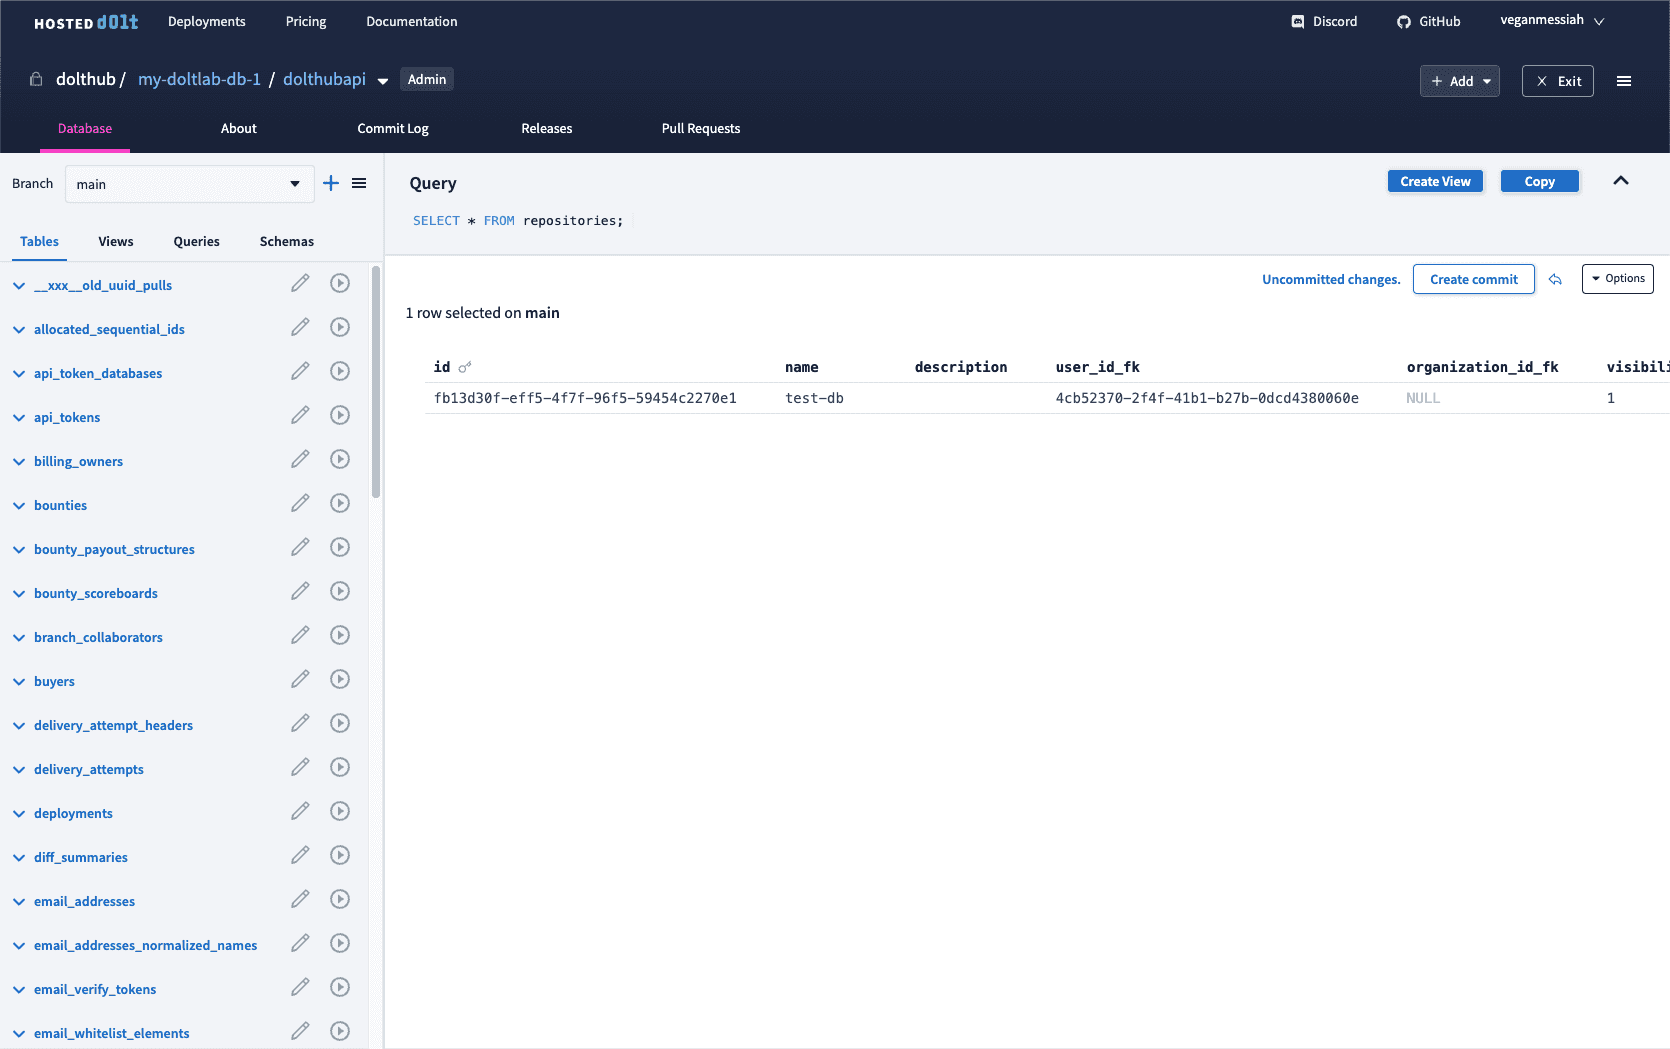
Once DoltLab is running successfully against my-doltlab-db-1, you can create a database on DoltLab, for example called test-db, and you will see live changes to the database reflected in the Hosted Workbench:
Conclusion
DoltHub's suite of products and integrations continues to improve everyday. DoltHub.com was the first product we migrated to Hosted Dolt, and now, you can run Hosted Dolt with DoltLab. One of the most exciting things about integrating our various products together is that it enables even more powerful features and functionality so you can safely operate on data like never before.
One exciting feature we've discussed internally has been integrating the deployment of Hosted Dolt instances into DoltHub and DoltLab, so that when you create a database from those UI's, you instantly get a corresponding Hosted Dolt deployment!
We hope you give DoltLab a try, and let us know about how you're using it to improve your data workflows. We love getting feedback, questions, and feature requests from our community so if there's anything you'd like to see added in DoltHub, DoltLab or one of our other products, please don't hesitate to reach out.
You can check out each of our different product offerings below, to find which ones are right for you:
- Dolt—it's Git for data.
- DoltHub—it's GitHub for data.
- DoltLab—it's GitLab for data.
- Hosted Dolt—it's RDS for Dolt databases.