
DoltHub is a Next.js application written in Typescript and backed by a GraphQL server. We use Apollo’s built-in integration with React to manage our GraphQL data within our React components. If you want to know more about DoltHub’s architecture, start with these blogs:
- Our front-end architecture
- Why we switched from gRPC to GraphQL
- Delivering declarative data with GraphQL
A few months ago I wrote a blog about how we use Apollo Client to manage GraphQL data on DoltHub. It goes through setting up Apollo Client, using GraphQL Code Generator to convert our GraphQL schema to Typescript, and how we use Apollo’s query hooks in our components. This is a follow up blog that covers how we manage state within our components using a combination of Apollo Client and React hooks and contexts. I’d also highly recommend looking into Apollo’s state management series on this topic.
TL;DR#
We use Apollo Client and hooks to query and mutate data throughout DoltHub. There are
three different ways we update fetched data after a mutation: using the refetchQueries
option in the useMutation hook, reusing fragments, and manually updating the cache.
We use a combination of custom hooks and contexts to share query logic among components. Custom hooks are best for reusing common queries and extracting complex component logic. Context is best for sharing information throughout different levels of the component tree.
Configuring the cache#
To most effectively use Apollo Client within your application, you should use Apollo’s
highly configurable cache. We
use the
InMemoryCache,
which maintains a flat lookup table of objects that can reference each other. Our
configuration looks like this:
import { ApolloClient, HttpLink, InMemoryCache } from "@apollo/client";
import { NormalizedCacheObject } from "@apollo/client/cache";
import { IncomingMessage } from "http";
import fragmentTypes from "../gen/fragmentTypes.json";

export function createApolloClient(
  uri: string,
  initialState?: NormalizedCacheObject,
  req?: IncomingMessage,
): ApolloClient<NormalizedCacheObject> {
  const cache = new InMemoryCache({
    possibleTypes: fragmentTypes.possibleTypes,
  }).restore(initialState || {});

  return new ApolloClient({
    cache,
    link: new HttpLink({
      fetch,
      credentials: "include",
      uri,
      headers,
    }),
  });
}
You can learn more about the possibleTypes option and fragment types
here
and here.
We pass the result of our createApolloClient function to ApolloProvider, which wraps
our custom App page component.
Handling queries#
Now that our cache is configured, we can use Apollo’s
useQuery hook to
fetch data within our components, as well as manage loading and error states. Every query
we define has a unique corresponding useQuery hook (generated via GraphQL Code
Generator). I’m going to use our Dolt database star button
component (DatabaseStarButton) to demonstrate how we manage state for one of our simpler
components. The component looks like this on our
website:

You can see the button accomplishes two things: show the total database star count and
show whether the calling user has starred the database or not. So in order to render the
button, we need to fetch this data. This is the query definition for a database, which
includes the relevant fields starCount and starredByCaller:
export const DATABASE_STARS_QUERY = gql`
  fragment DatabaseStarsDatabase on Database {
    _id
    dbName
    ownerName
    starredByCaller
    starCount
  }
  query DatabaseForStars($ownerName: String!, $dbName: String!) {
    database(ownerName: $ownerName, dbName: $dbName) {
      ...DatabaseStarsDatabase
    }
  }
`;
And when we run our GraphQL Code Generator, we end up with a custom useQuery hook.
/**
 * __useDatabaseForStarsQuery__
 *
 * To run a query within a React component, call `useDatabaseForStarsQuery` and pass it any options that fit your needs.
 * When your component renders, `useDatabaseForStarsQuery` returns an object from Apollo Client that contains loading, error, and data properties
 * you can use to render your UI.
 *
 * @param baseOptions options that will be passed into the query, supported options are listed on: https://www.apollographql.com/docs/react/api/react-hooks/#options;
 *
 * @example
 * const { data, loading, error } = useDatabaseForStarsQuery({
 *   variables: {
 *      ownerName: // value for 'ownerName'
 *      dbName: // value for 'dbName'
 *   },
 * });
 */
export function useDatabaseForStarsQuery(
  baseOptions: Apollo.QueryHookOptions<
    DatabaseForStarsQuery,
    DatabaseForStarsQueryVariables
  >,
) {
  const options = { ...defaultOptions, ...baseOptions };
  return Apollo.useQuery<DatabaseForStarsQuery, DatabaseForStarsQueryVariables>(
    DatabaseForStarsDocument,
    options,
  );
}
For components with queries, we use an “inner”/“outer” component pattern to handle loading
and error states. We can use this useDatabaseForStarsQuery hook in our
DatabaseStarButton component.
type Props = {
  params: {
    ownerName: string;
    dbName: string;
  };
};

export default function DatabaseStarButton({ params }: Props) {
  const { data, loading, error } = useDatabaseForStarsQuery({
    variables: params,
  });

  if (loading) return <Loader loaded={false} />;

  if (error) return <ErrorMsg err={error} />;

  if (!data) return <ErrorMsg errString="No database star data found" />;

  return <Inner database={data.database} />;
}
We often check for loading and error states this way before rendering our “inner”
component with the resulting data, so we refactored this logic to a component called
QueryHandler.
export default function DatabaseStarButton({ params }: Props) {
  const res = useDatabaseForStarsQuery({ variables: params });

  return (
    <QueryHandler
      result={res}
      render={data => <Inner database={data.database} />}
    />
  );
}
Now that our loading and error states are handled, the Inner component renders the data
returned by the query.
type Props = {
  database: DatabaseStarsDatabaseFragment;
};

function Inner({ database }: Props) {
  return (
    <button type="button">
      <span>
        {database.starredByCaller ? <AiTwotoneStar /> : <AiOutlineStar />}
      </span>
      <span>Star</span>
      <span>{getFormattedCount(database.starCount)}</span>
    </button>
  );
}
Our button is successfully rendering with the correct information!
Mutations and updating data#
Now we want our button to actually do something when we click on it. We will use Apollo’s
useMutation
hook to add or remove a star when the button is clicked. Similarly to how we defined our
query to fetch database data, we will define our two star mutations.
export const CREATE_STAR = gql`
  mutation CreateStar(
    $ownerName: String!
    $dbName: String!
    $username: String!
  ) {
    createStar(ownerName: $ownerName, dbName: $dbName, username: $username)
  }
`;

export const DELETE_STAR = gql`
  mutation DeleteStar(
    $ownerName: String!
    $dbName: String!
    $username: String!
  ) {
    deleteStar(ownerName: $ownerName, dbName: $dbName, username: $username)
  }
`;
We’ll again generate types for our two custom mutations, so that we’ll end up with
useCreateStarMutation and useDeleteStarMutation. We can use these in our Inner
component, making sure to handle their resulting loading and error states.
function Inner({ database, username }: Props) {
  const [createStar, createStarRes] = useCreateRepoStarMutation();
  const [deleteStar, deleteStarRes] = useDeleteRepoStarMutation();

  const onClick = async () => {
    const variables = { ...database, username };
    if (database.starredByCaller) {
      await deleteStar({ variables });
    } else {
      await createStar({ variables });
    }
  };

  return (
    <div>
      <Loader loaded={!(createStarRes.loading && deleteStarRes.loading)} />
      <ErrorMsg err={createStarRes.error || deleteStarRes.error} />
      <button type="button" onClick={onClick}>
        <span>
          {database.starredByCaller ? <AiTwotoneStar /> : <AiOutlineStar />}
        </span>
        <span>Star</span>
        <span>{getFormattedCount(database.starCount)}</span>
      </button>
    </div>
  );
}
Now that our button can add and remove a star, we need to ensure
database.starredByCaller and database.starCount are always showing up-to-date
information. There are a few different ways we handle this throughout our application.
1. The refetchQueries option#
We often utilize the refetchQueries
array in the
useMutation options. For the mutations above, including the DatabaseForStarsQuery
document in the refetchQueries array will refetch the database star data once the
mutation is called.
const refetchQueries = [{ query: DatabaseForStarsQueryDocument }];
const [createStar, createStarRes] = useCreateRepoStarMutation({
  refetchQueries,
});
const [deleteStar, deleteStarRes] = useDeleteRepoStarMutation({
  refetchQueries,
});
The refetched query is executed with its most recent provided set of variables, but if
needed we could also add the variables to the corresponding object in the refetchQueries
array.
Now when we click on our button, it will automatically update the button star count and the star icon so that the user sees the correct state of the button.
The downside of updating data this way is that as your application grows it can become unmanageable to track which queries need to be updated at different times.
2. Fragments#
We can use fragments to
automatically change which fields are included in operations that use the fragment. This
strategy won’t work for the above example in its current state, but we can make it work
by changing the createStar and deleteStar mutations to return the same
DatabaseStarsDatabase fragment that we used in the DatabaseForStars query (this would
also require changing what these mutations return in our GraphQL server).
export const CREATE_STAR = gql`
  mutation CreateStar(
    $ownerName: String!
    $dbName: String!
    $username: String!
  ) {
    createStar(ownerName: $ownerName, dbName: $dbName, username: $username) {
      ...DatabaseStarsDatabase
    }
  }
  ${DatabaseStarsDatabaseFragmentDoc}
`;

export const DELETE_STAR = gql`
  mutation DeleteStar(
    $ownerName: String!
    $dbName: String!
    $username: String!
  ) {
    deleteStar(ownerName: $ownerName, dbName: $dbName, username: $username) {
      ...DatabaseStarsDatabase
    }
  }
  ${DatabaseStarsDatabaseFragmentDoc}
`;
Now when the star button is clicked, the DatabaseStarsDatabase fragment will update and
keep the database query results consistent throughout.
3. Updating the cache directly#
Providing an update
function to
useMutation will update all modified fields in your cache. We haven’t utilized the cache
this way in our application, mostly because we started using GraphQL before Apollo
3
came out and the first two options are less verbose and have been working well for us so
far. However, using update is a highly customized way to update data using the cache and
could work well for many applications.
Without using refetchQueries or returning the database fragment from the mutations,
createStar and deleteStar would not update the button star count and icon. This is how
we could use update to do so:
function updateCacheForStars(
  cache: ApolloCache<NormalizedCacheObject>,
  create: boolean,
) {
  const existingDatabase = cache.readQuery<
    DatabaseForStarsQuery,
    DatabaseForStarsQueryVariables
  >({
    query: DatabaseForStarsDocument,
    variables: database,
  });

  if (existingDatabase) {
    cache.writeQuery({
      query: DatabaseForStarsDocument,
      data: {
        database: {
          ...existingDatabase.database,
          starredByCaller: create,
          starCount: create
            ? existingDatabase.database.starCount + 1
            : existingDatabase.database.starCount - 1,
        },
      },
    });
  }
}

const [createStar, createStarRes] = useCreateStarMutation({
  update(cache) {
    updateCacheForStars(cache, true);
  },
});
const [deleteStar, deleteStarRes] = useDeleteStarMutation({
  update(cache) {
    updateCacheForStars(cache, false);
  },
});
Testing queries and mutations#
We use React unit tests to ensure our queries and mutations are behaving as expected. I
wrote a blog about mocking Apollo queries and
mutations and testing expected behavior using this same DatabaseStarButton (formerly
RepoStarButton) component. It includes solutions to errors I was getting as I was
writing the mocks and tests that could be helpful.
Using custom hooks and contexts#
We use both custom hooks and contexts to abstract query hook logic and make data accessible at different points within the component tree.
Hooks#
Hooks are functions that let you “hook into” React state and lifecycle features from function components.
We often move our query logic within a component to a custom hook. Custom
hooks start with use and call other hooks.
This helps with organization, separation of concerns, and reusability.
Our database star button is one of our simpler components, but moving the mutation logic
to a hook makes both the component and the hook easier to read. I created a custom hook
called useDatabaseStar to handle our mutations.
type ReturnType = {
  onClick: () => void;
  loading: boolean;
  error: ApolloError | undefined;
};

export default function useDatabaseStar({
  database,
  username,
}: Props): ReturnType {
  const variables = { ...params, username };
  const refetchQueries = [{ query: DatabaseForStarsQueryDocument, variables }];
  const [createStar, createStarRes] = useCreateRepoStarMutation({
    refetchQueries,
  });
  const [deleteStar, deleteStarRes] = useDeleteRepoStarMutation({
    refetchQueries,
  });

  const onClick = async () => {
    if (repo.starredByCaller) {
      await deleteStar({ variables });
    } else {
      await createStar({ variables });
    }
  };

  return {
    onClick,
    loading: createStarRes.loading || deleteStarRes.loading,
    error: createStarRes.error || deleteStarRes.error,
  };
}
And Inner would be simplified to:
function Inner(props: Props) {
  const { onClick, loading, error } = useDatabaseStar(props);

  return (
    <div>
      <Loader loaded={!loading} />
      <ErrorMsg err={error} />
      <button type="button" className={css.button} onClick={onClick}>
        [...]
      </button>
    </div>
  );
}
Hooks are also useful for creating reusable query logic. This includes commonly used
queries, like getting current user information (useCurrentUser) or separating commonly
used hook logic (custom useMutation hook that allows you to reset errors). However, if
you want the same information to be accessible throughout more components without prop
drilling,
it’s better to use a context.
Contexts#
Context provides a way to pass data through the component tree without having to pass props down manually at every level.
We try to avoid using contexts when possible, but sometimes it’s an optimal solution for providing certain information at different levels in the component tree. Our database star button’s query logic is contained to that component, and therefore is not a good candidate for a context.
However, our notifications system is a great example for when to use context. We display notifications when the current user has a database collaborator or organization member invitation. These invitation notifications are displayed both in our top navbar (visible on all pages) and on our settings page.
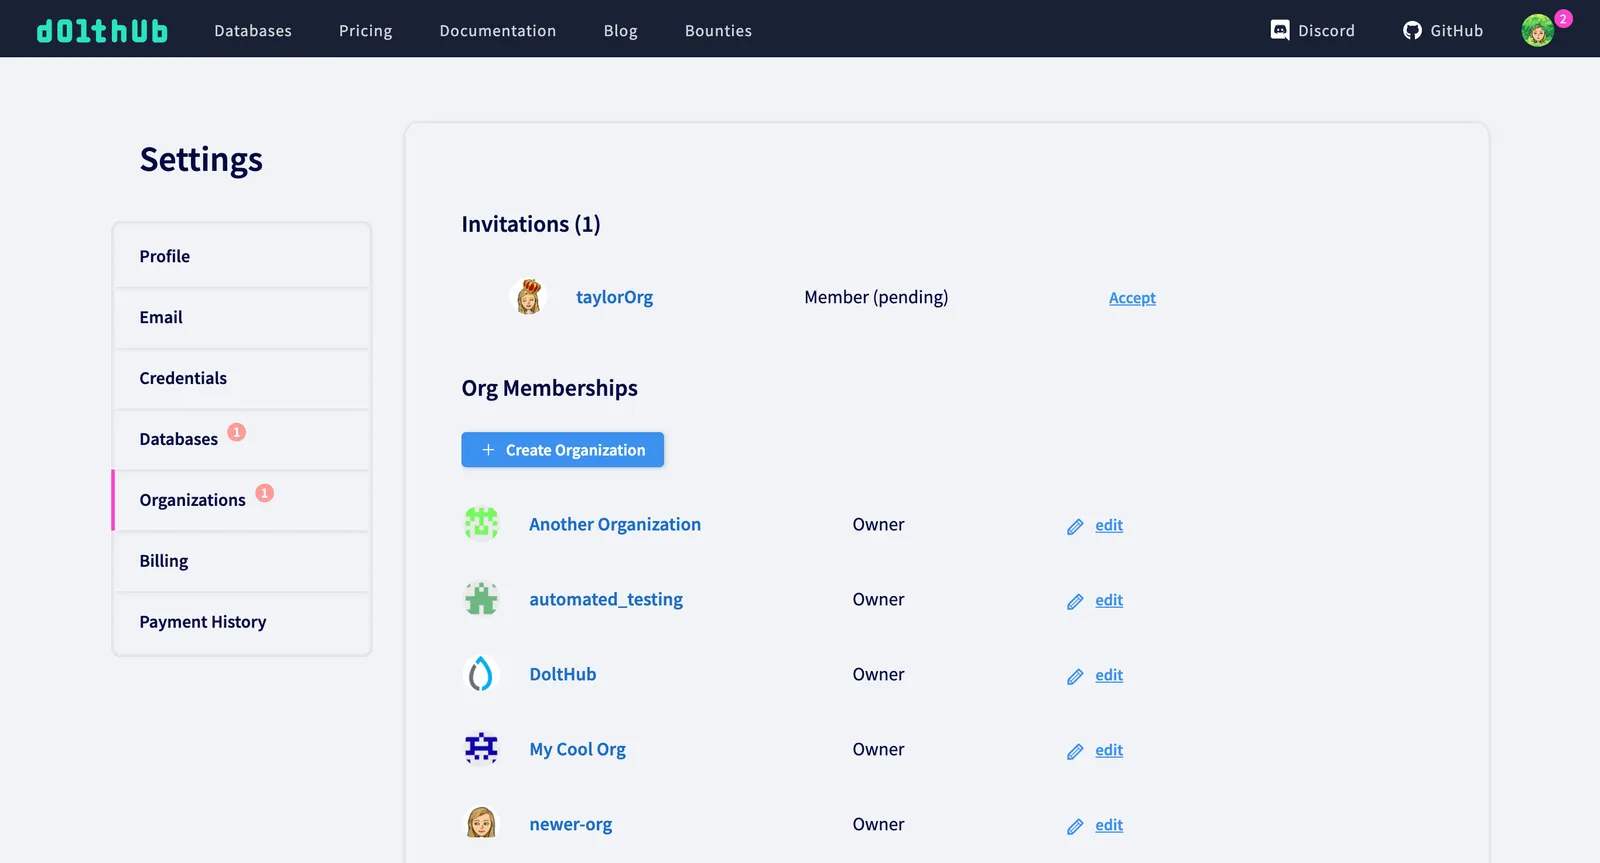
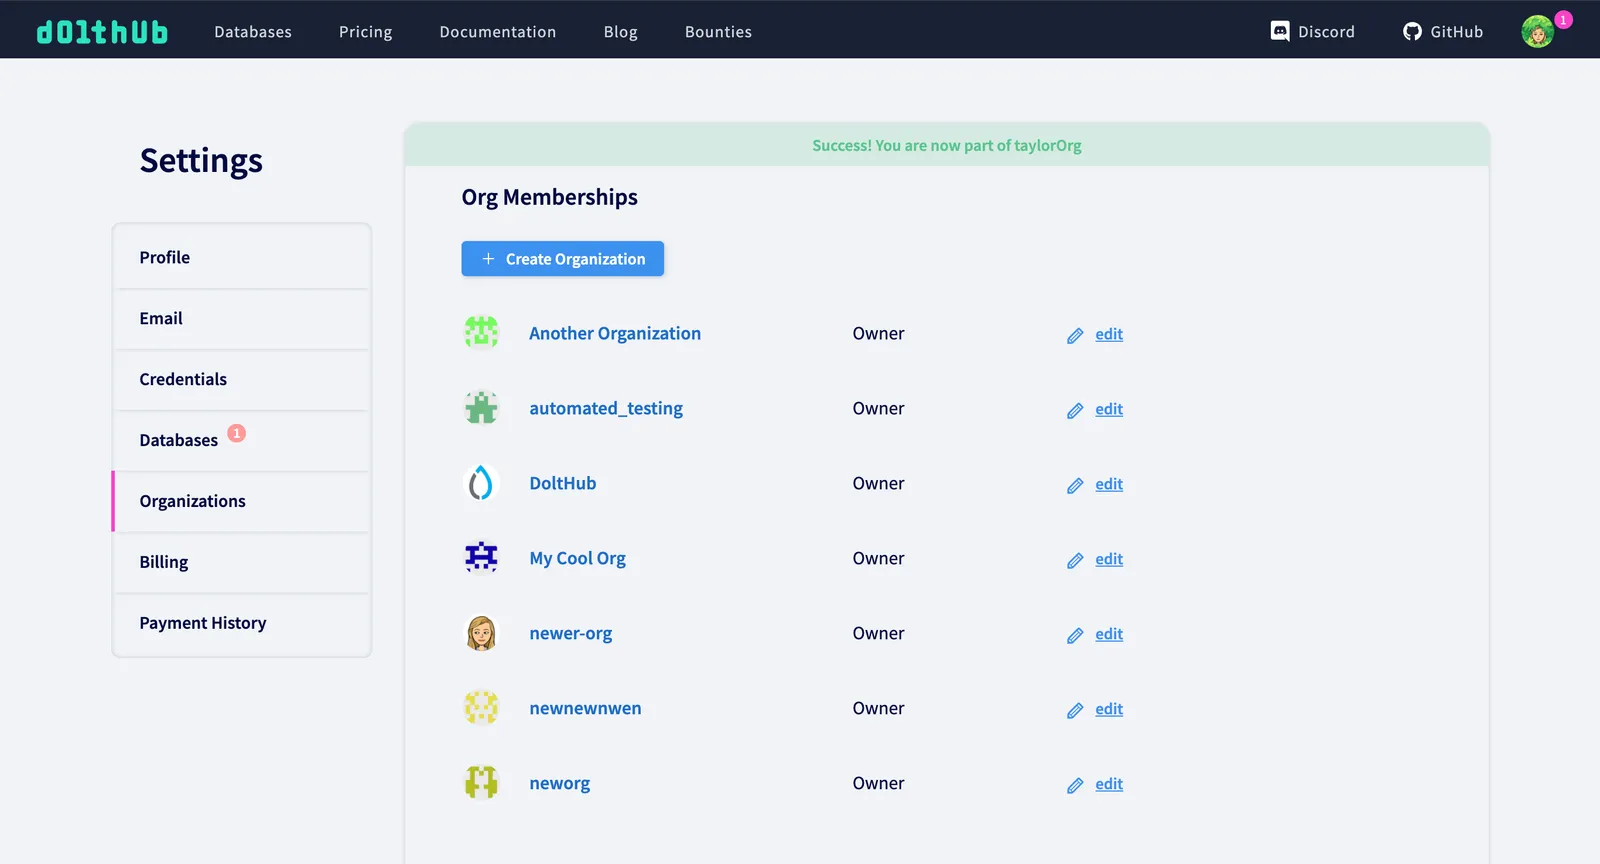
When the invitation is accepted in the settings page, we display a green banner to notify the user their invitation was successfully accepted.
The components affected (NavbarMenu, SettingsLayout, DatabaseInvitationList,
OrganizationInvitationList) exist at various levels within the component tree, so a
custom hook will not work without some serious prop drilling. Context is the ideal way to
share data and hook logic throughout these components.
A simplified version of the invitation context would look like this:
// contexts/invitations.tsx

import React from "react";
import { useInvitationsForCurrentUserQuery } from "../../gen/graphql-types";
import { InvitationsContextType } from "./types";

export const InvitationsContext = React.createContext<InvitationsContextType>(
  {} as any,
);

export function InvitationsProvider(props: { children: React.ReactNode }) {
  const { data, loading } = useInvitationsForCurrentUserQuery();
  const [numOrgInvitations, setNumOrgInvitations] = React.useState(
    data?.orgInvitations.length ?? 0,
  );
  const [numDatabaseInvitations, setNumDatabaseInvitations] = React.useState(
    data?.databaseInvitations.length ?? 0,
  );
  const [successMsg, setSuccessMsg] = React.useState("");

  React.useEffect(() => {
    if (!data) return;
    setNumOrgInvitations(data.orgInvitations.length);
    setNumDatabaseInvitations(data.databaseInvitations.length);
  }, [data]);

  return (
    <InvitationsContext.Provider
      value={{
        numOrgInvitations,
        numDatabaseInvitations,
        successMsg,
        setSuccessMsg,
        loading,
      }}
    >
      {props.children}
    </InvitationsContext.Provider>
  );
}

export function useInvitationsContext(): InvitationsContextType {
  return React.useContext(InvitationsContext);
}
The navbar menu is available on every authenticated page, so we need to wrap all these
pages in InvitationsProvider to make the useInvitationsContext hook available to the
components that need it. AppLayout is the most specific parent component we can
use, since all components that need to access our context will be children of this
component.
// components/layouts/AppLayout.tsx

export default function AppLayout(props: Props) {
  return (
    <InvitesProvider>
      <div>
        <Navbar />
        {props.children}
      </div>
    </InvitesProvider>
  );
}
Now we can use the useInvitationsContext hook to obtain the values from our context
within all our components.
// components/NavbarMenu.tsx

export default function NavbarMenu({ user }: NavbarMenuProps) {
  const { numRepoInvites, numOrgInvites } = useInvitesContext();
  const totalNumInvites = numRepoInvites + numOrgInvites;
  return (
    <div>
      <Popup trigger={<ProfilePicWithNotifications user={user} />}>
        <Links user={user} totalNumInvites={totalNumInvites} />
      </Popup>
    </div>
  );
}
// components/OrgInvitationsList/ListItem.tsx
export default function OrgInvitationsListItem({ invite, username }: Props) {
const { setSuccessMsg, success } = useInvitesContext();
const [acceptInvitation] = useAcceptOrgInviteMutation();
const onAccept = async () => {
await acceptInvitation({ variables: invite });
setSuccessMsg(`Success! You are now part of ${invite.orgName}`);
};
return (
<tr>
<td>
<img src={invite.org?.profPicUrl} alt="" />
</td>
<td>
<OrgLink params={invite}>{invite.orgName}</OrgLink>
</td>
<td>{invite.role} (pending)</td>
<td>
<Button.Underlined onClick={onAccept}>Accept</Button.Underlined>
</td>
</tr>
);
}// components/layouts/SettingsLayout/RightPanel.tsx
export default function RightPanel(props: Props) {
const { successMsg } = useInvitesContext();
return (
<div>
{successMsg && <SuccessMsg>{successMsg}</SuccessMsg>}
<main>{props.children}</main>
</div>
);
}Conclusion#
Have any questions, comments, or feedback? Come chat with me in our Discord server in the #dolthub channel.
Interested in working on DoltHub? We’re currently looking for full stack software engineers! Check out the job posting here.