
Today we’re excited to announce the release of DoltLab Enterprise v2.4.0 which manages multihost deployments via Docker Swarm. Prior to this release, DoltLab Enterprise only supported multihost deployments using Docker Compose, which required much more manual configuration, orchestration, and maintenance.
Now, using Docker Swarm, DoltLab Enterprise in multihost mode can run replicated services with automatic failover, all orchestrated and managed by the Docker engine. Docker Swarm also allow services to be scaled up or down independently, and even performs rolling service upgrades with little service interruption.
In today’s post I’ll cover how you can get started running your own DoltLab Enterprise multihost cluster.
Prerequisites#
Before you begin running a multihost DoltLab Enterprise cluster, there is some important service and scaling information to be mindful of.
In multihost mode, DoltLab will deploy the following services:
doltlabdb, DoltLab’s application database.doltlabremoteapi, DoltLab’s remote database API.doltlabapi, DoltLab’s main API.doltlabfileserviceapi, DoltLab’s user uploaded file API.doltlabgraphql, DoltLab’s GraphQL data API.doltlabui, DoltLab’s front end.doltlabenvoy, DoltLab’s reverse proxy.
When you run DoltLab in multihost mode, at least one of each of these services will be deployed as part of the cluster. Each service can be scaled independently from the others in order to meet the needs of your particular use case, with the exception of the “writer” services. A “writer” service is one that persists data to a storage device.
The scaling of writer services is limited in order to prevent data corruption that may occur unexpected concurrent writes occur from multiple service replicas.
Whether you plan to use cloud-backed storage in your DoltLab deployment will determine the scaling limitations of DoltLab’s “writer” services. When cloud-backed storage is configured, most writer
service can be scaled freely, with the exception of doltlabdb which must always be a single replica instance.
The following are considered “writer” services:
doltlabdbdoltlabfileserviceapidoltlabremoteapi
When not using cloud-backed storage, which is the default configuration of DoltLab Enterprise, the doltlabfileserviceapi, can only have a single replica.
However if cloud-backed storage is configured, this service will be removed from the deployment altogether, since it is not needed with cloud-storage.
Similarly, doltlabremoteapi, by default, can at most have a single replica. But, if cloud-backed storage is configured, it can be scaled as needed without issue.
All other services are safe to scale as needed.
Provisioning hosts#
The first step to creating your multihost DoltLab Enterprise deployment is to provision all the hosts you’ll need to run your cluster.
For the example deployment in this blog, we’ll use AWS EC2 hosts for our cluster, and plan to deploy a single DoltLab service on each host.
This will require us to launch eight hosts from the EC2 console. Seven hosts we will designate as “workers” which will run our service replicas, and the eighth will be our Swarm “manager”. This manager node won’t run any replicas itself, instead we will use it only for managing the cluster.
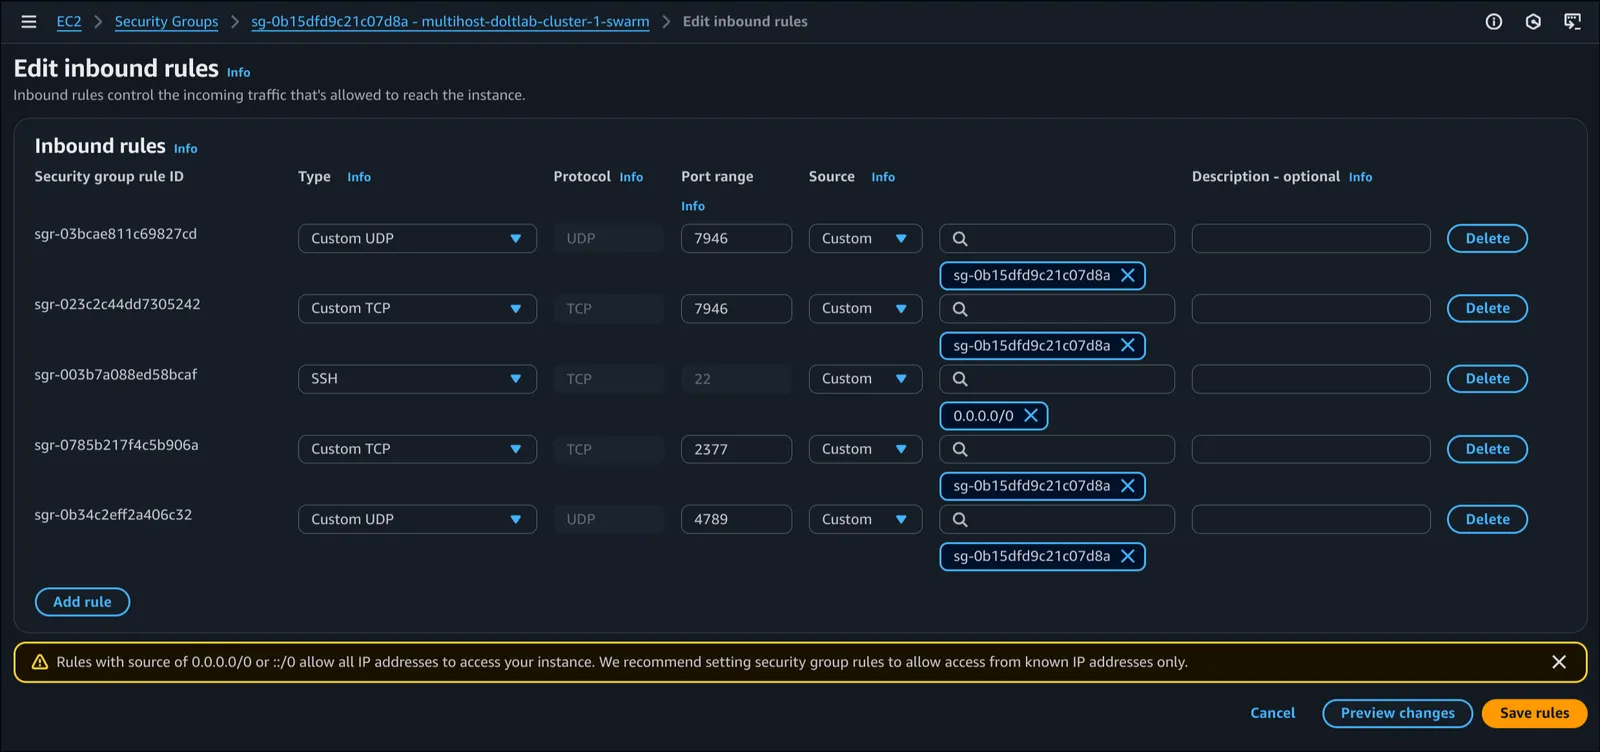
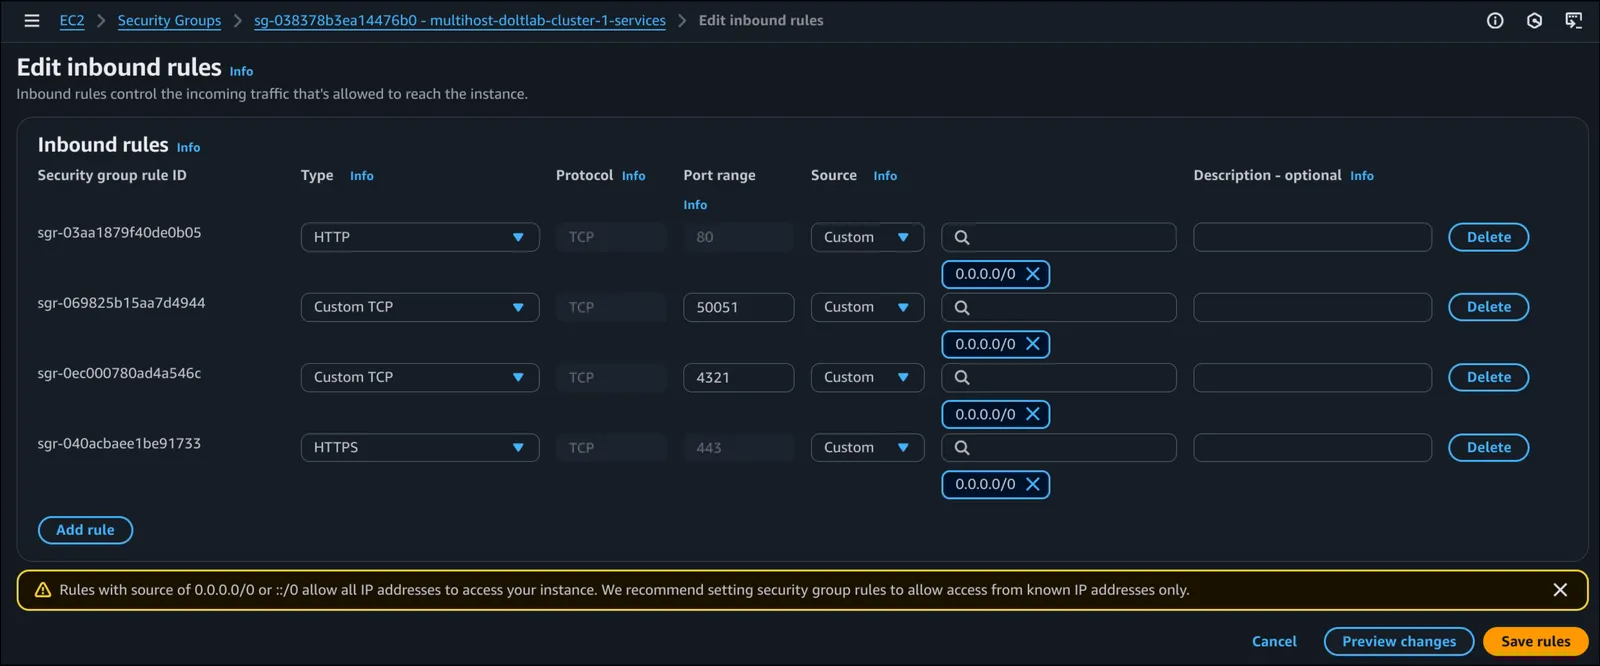
When provisioning hosts to use in a DoltLab Enterprise multihost deployment, ALL hosts in the cluster must be linux amd64, running either Ubuntu or Centos. They should also use the same filesystem and directory structures. For all hosts in your DoltLab cluster, On every host, you will need SSH access and MUST have the following ports open:
2377TCP, for Docker Swarm. This port should only be accessible from within the DoltLab cluster.4789UDP, for Docker Swarm. This port should only be accessible from within the DoltLab cluster.7946TCP, for Docker Swarm. This port should only be accessible from within the DoltLab cluster.7946UDP, for Docker Swarm. This port should only be accessible from within the DoltLab cluster.80TCP, for DoltLab Enterprise services (if serving over HTTP).443TCP, for DoltLab Enterprise services (if serving over HTTPS).50051TCP, for DoltLab Enterprise services.4321TCP, for DoltLab Enterprise services (if not using cloud-backed storage).
I found the easiest way to do this on EC2 is to create two distinct security groups. One for the ports required by Docker Swarm and one for the ports required by DoltLab’s services. Importantly, the ports in the security group for Docker Swarm should only be reachable from within this same security group. This will ensure that the data ports are not exposed to the public in error.
The security group for DoltLab’s services on the other hand should be reachable, as these are how clients will use DoltLab.
In the images below you can see these basic security group configurations. The first is the security group for Docker Swarm, and the second is the security group for DoltLab.
Once the security groups are created, we can launch eight new hosts and attach both security groups to each one.
After the eight hosts come online, we need to install Docker on each host and install DoltLab Enterprise, fully, on the Manager node. The best way to accomplish both of these requirements,
is to SSH into each host, download the latest DoltLab version, then use the installer tool to generate a dependency installation script, which will install Docker automatically during its execution.
# install unzip for unzipping DoltLab
root@ip-10-2-2-252:/home/ubuntub# sudo apt update -y && sudo apt install unzip -y

# download DoltLab
root@ip-10-2-2-252:/home/ubuntu# curl -LO https://doltlab-releases.s3.us-east-1.amazonaws.com/linux/amd64/doltlab-v2.4.0.zip

# unzip contents
root@ip-10-2-2-252:/home/ubuntu# unzip doltlab-v2.4.0.zip -d doltlab
root@ip-10-2-2-252:/home/ubuntu# cd doltlab

# generate dependency installation script
root@ip-10-2-2-252:/home/ubuntu/doltlab# ./installer --ubuntu

# run script
root@ip-10-2-2-252:/home/ubuntu/doltlab# ./ubuntu_install.sh
After Docker is installed on all eight hosts, we can SSH into the node you want to be the Swarm manager and configure DoltLab Enterprise for multihost mode using the installer_config.yaml.
In order to run in multihost mode, you’ll need to supply your DoltLab Enterprise license credentials and set enterprise.multihost_deployment: true.
Below is the config we’ll use on our example manager node.
version: "v2.4.0"

host: "18.209.4.63"
services:
  doltlabdb:
    admin_password: "DoltLab1234"
    dolthubapi_password: "DoltLab1234"

default_user:
  name: "admin"
  password: "DoltLab1234"
  email: "admin@localhost"

enterprise:
  online_product_code: "${DOLTLAB_ENTERPRISE_ONLINE_PRODUCT_CODE}"
  online_shared_key: "${DOLTLAB_ENTERPRISE_ONLINE_SHARED_KEY}"
  online_api_key: "${DOLTLAB_ENTERPRISE_ONLINE_API_KEY}"
  online_license_key: "${DOLTLAB_ENTERPRISE_ONLINE_LICENSE_KEY}"
  multihost_deployment: true
Using the config above we can now run the installer to generate DoltLab’s multihost assets.
root@ip-10-2-2-252:/home/ubuntu/doltlab# ./installer
2025-07-08T17:52:06.777Z        INFO    metrics/emitter.go:111  Successfully sent DoltLab usage metrics

2025-07-08T17:52:06.777Z        INFO    cmd/main.go:682 Successfully configured DoltLab Enterprise      {"version": "v2.4.0"}

2025-07-08T17:52:06.777Z        INFO    cmd/main.go:691 To start DoltLab, use:  {"script": "/home/ubuntu/doltlab/start.sh"}
2025-07-08T17:52:06.777Z        INFO    cmd/main.go:696 To stop DoltLab, use:   {"script": "/home/ubuntu/doltlab/stop.sh"}
Next, we need to initialize the swarm cluster on our manager node. Here it is essential that we use the IP or hostname of our manager node that is accessible by all other nodes in our cluster. In our case, that is the private IP of our manager node.
root@ip-10-2-2-252:/home/ubuntu# docker swarm init --advertise-addr 10.2.2.252
Swarm initialized: current node (pa0tat6n1ucmr1n5nuypfjvlm) is now a manager.

To add a worker to this swarm, run the following command:

    docker swarm join --token SWMTKN-1-05pzsu494x80888k5dkhmh4sc5crsoi8xrl9awmsfiypowu6zo-4xwey27l1hfxqt12ont2u6g57 10.2.2.252:2377

To add a manager to this swarm, run 'docker swarm join-token manager' and follow the instructions.
You can see from the output above that running this will also generate a join-token we’ll use to register all our worker nodes in the swarm. And this is what we will do next.
After copying the printed command and join-token above, we will SSH into the remaining seven nodes in the cluster and execute the following command. Just like we did with the manager node, we’ll need to ensure we are using the IP or hostname of the respective worker node that is reachable by all other nodes.
docker swarm join --token <token> --advertise-addr <worker ip/hostname> <manager ip/hostname>:2377And like with the manager node, on each of our worker nodes, we’ll use the private IP of each node to register it with the swarm.
ubuntu@ip-10-2-2-56:~$ sudo newgrp docker
root@ip-10-2-2-56:/home/ubuntu# docker swarm join --token SWMTKN-1-05pzsu494x80888k5dkhmh4sc5crsoi8xrl9awmsfiypowu6zo-4xwey27l1hfxqt12ont2u6g57 --advertise-addr 10.2.2.56 10.2.2.252:2377
This node joined a swarm as a worker.
Once we’ve registered all nodes to the swarm, if we SSH back into our manager node, we can easily view all nodes in the cluster:
ubuntu@ip-10-2-2-252:~$ sudo newgrp docker
root@ip-10-2-2-252:/home/ubuntu# docker node ls
ID                            HOSTNAME        STATUS    AVAILABILITY   MANAGER STATUS   ENGINE VERSION
bf0lwl4h6tiw6je4lo3tgrj7m     ip-10-2-2-56    Ready     Active                          28.3.1
dryr0aspuhouhhu526hhf9791     ip-10-2-2-72    Ready     Active                          28.3.1
rpzn8er98pcd6orbu2nf81zgi     ip-10-2-2-116   Ready     Active                          28.3.1
a3ooo5wjkxuo5b0oziycjxelk     ip-10-2-2-150   Ready     Active                          28.3.1
pfhmsms97b2xkazz4yt5qvbgw     ip-10-2-2-166   Ready     Active                          28.3.1
tx6li9tnvnzsimvc7qm4ka1jk     ip-10-2-2-192   Ready     Active                          28.3.1
6oi9xacsq57bwk7lkq09bl10z     ip-10-2-2-242   Ready     Active                          28.3.1
pa0tat6n1ucmr1n5nuypfjvlm *   ip-10-2-2-252   Ready     Active         Leader           28.3.1
Once all the nodes in our cluster are part of the swarm, we need to label the nodes we want to run each service. By default, DoltLab in multihost mode will expect you to label nodes, indicating which services you want running on
which node. The format for this is <service name>=true. We listed all service names earlier, but they can also be found in the generated docker-compose.yaml file on the manager node.
Let’s label each of our nodes now for our example deployment, starting with the doltlabdb service.
Using the following command:
docker node update --label-add <key>=<value> <node id>We can label the node with id bf0lwl4h6tiw6je4lo3tgrj7m to be our doltlabdb node:
root@ip-10-2-2-252:/home/ubuntu# docker node update --label-add doltlabdb=true bf0lwl4h6tiw6je4lo3tgrj7m
bf0lwl4h6tiw6je4lo3tgrj7m
Now that the node has the label, when our deployment goes live, doltlabdb will only run on this node.
We perform this same process for every worker node in our cluster, so each one is labeled for each one of the remaining DoltLab services:
root@ip-10-2-2-252:/home/ubuntu# docker node update --label-add doltlabremoteapi=true dryr0aspuhouhhu526hhf9791
dryr0aspuhouhhu526hhf9791
root@ip-10-2-2-252:/home/ubuntu# docker node update --label-add doltlabapi=true rpzn8er98pcd6orbu2nf81zgi
rpzn8er98pcd6orbu2nf81zgi
root@ip-10-2-2-252:/home/ubuntu# docker node update --label-add doltlabfileserviceapi=true pfhmsms97b2xkazz4yt5qvbgw
pfhmsms97b2xkazz4yt5qvbgw
root@ip-10-2-2-252:/home/ubuntu# docker node update --label-add doltlabgraphql=true a3ooo5wjkxuo5b0oziycjxelk
a3ooo5wjkxuo5b0oziycjxelk
root@ip-10-2-2-252:/home/ubuntu# docker node update --label-add doltlabui=true tx6li9tnvnzsimvc7qm4ka1jk
tx6li9tnvnzsimvc7qm4ka1jk
root@ip-10-2-2-252:/home/ubuntu# docker node update --label-add doltlabenvoy=true 6oi9xacsq57bwk7lkq09bl10z
6oi9xacsq57bwk7lkq09bl10z
Distributing assets#
After designating which nodes will run which services, we need to copy any file assets required by the service, over to its respective worker(s) node.
The file assets I’m referring to are the files generated by the installer on the manager node which a service expects to be mounted into its container.
To view which file assets each service requires, open the docker-compose.yaml file on the manager node and look for any service that has a volume definition mapped to a local file path.
These local files are what we’ll need to copy from the manager node to each worker node that runs the corresponding service. These files will also need to exist on the worker at the exact same file path they have on the manager.
For example, this is the doltlabdb section from the docker-compose.yaml file in our example deployment:
doltlabdb:
  deploy:
    replicas: 1
    placement:
      constraints:
        - node.labels.doltlabdb == true
      preferences:
        - spread: node.labels.doltlabdb
    update_config:
      order: stop-first
  image: quay.io/doltlab/dolt-sql-server:v2.4.0
  command: |-
    -l debug
  environment:
    DOLT_ADMIN_PASSWORD: "${DOLT_ADMIN_PASSWORD}"
    DOLT_DOLTHUBAPI_PASSWORD: "${DOLT_DOLTHUBAPI_PASSWORD}"
    DOLTHUB_METRICS_ENABLED: "true"
  networks:
    - default
  volumes:
    - doltlabdb-dolt-data:/var/lib/dolt
    - doltlabdb-dolt-root:/root/dolt
    - /home/ubuntu/doltlab/doltlabdb/config.yaml:/etc/dolt/servercfg.d/config.yaml # This is the local volume mount we need on the worker node
    - doltlabdb-dolt-backups:/backups
In the volumes section of this service definition are four volume mounts, where only the third one is a local file, /home/ubuntu/doltlab/doltlabdb/config.yaml.
In order for our doltlabdb worker node to successfully run the service, we need to copy this file from the manager, and place it on our worker (bf0lwl4h6tiw6je4lo3tgrj7m) at the same path.
To do so, we can use scp to copy the file from the manager to our local environment, the copy it from our local environment up to the worker.
➜  ✗ scp -i ~/.ssh/dustin_dev_us_east_1.pem ubuntu@18.209.4.63:/home/ubuntu/doltlab/doltlabdb/config.yaml ./config.yaml
config.yaml                                                                                    100%  228     1.5KB/s   00:00
➜  ✗ scp -i ~/.ssh/dustin_dev_us_east_1.pem ./config.yaml ubuntu@23.21.24.234:/home/ubuntu/config.yaml
config.yaml
After copying the file to the worker, we can then SSH into the worker and move the file to the path Docker will expect the file to be at:
ubuntu@ip-10-2-2-56:~$ mkdir -p doltlab/doltlabdb
ubuntu@ip-10-2-2-56:~$ mv config.yaml doltlab/doltlabdb/
We will follow this same process for all services defined in the docker-compose.yaml that have local file mounts. NOTE: you do not need to copy the /var/run/docker.sock file
that is mounted for the doltlabapi service, since the worker host will already have this file, at this path.
In our example deployment we copied the following files from the manager to there respective worker nodes:
/home/ubuntu/doltlab/doltlabdb/config.yaml/home/ubuntu/doltlab/envoy.json/home/ubuntu/doltlabremoteapi/iter_token.keys/home/ubuntu/doltlabapi/iter_token.keys/home/ubuntu/doltlabfileserviceapi/iter_token.keys
Deploy services#
Once the worker nodes have their copy of each service’s required assets, we can safely deploy our multihost DoltLab Docker swarm cluster!
To do so, SSH into the manager node and run the generated start.sh script produced by the installer.
Running this will deploy the doltlab swarm service, and progress of the deployment can be observed by running docker service ls.
Please note, it may take several minutes for all DoltLab services/replicas to come online.
Once all services come online, the output will appear like so:
root@ip-10-2-2-252:/home/ubuntu/doltlab# docker service ls
ID             NAME                            MODE         REPLICAS   IMAGE                                              PORTS
e0ixncmfo7eu   doltlab_doltlabapi              replicated   1/1        quay.io/doltlab/dolthubapi-server:v2.4.0
y3yopb0e6ah2   doltlab_doltlabdb               replicated   1/1        quay.io/doltlab/dolt-sql-server:v2.4.0
minsjz5od9r3   doltlab_doltlabenvoy            replicated   1/1        envoyproxy/envoy:v1.33-latest                      *:80->80/tcp, *:2001->2001/tcp, *:4321->4321/tcp, *:7770->7770/tcp, *:50051->50051/tcp
51if0bhyiuio   doltlab_doltlabfileserviceapi   replicated   1/1        quay.io/doltlab/fileserviceapi-server:v2.4.0
0wcfh4hjwmpe   doltlab_doltlabgraphql          replicated   1/1        quay.io/doltlab/dolthubapi-graphql-server:v2.4.0
swc5xn27px2c   doltlab_doltlabremoteapi        replicated   1/1        quay.io/doltlab/doltremoteapi-server:v2.4.0
p5w420n364uh   doltlab_doltlabui               replicated   1/1        quay.io/doltlab/dolthub-server:v2.4.0
Once everything is running, you can access the running DoltLab cluster from the Manager node’s IP/hostname on port 80 or 443 if you’ve configured HTTPS.
To tear down the deployment, simply run the generated ./stop.sh script.
Upgrading a running multihost deployment#
When upgrading a multihost DoltLab deployment, it is not necessary to teardown the deployment with the stop.sh script prior to upgrading. Instead,
you can simply upgrade the DoltLab version on the manager node by downloading the latest zip file, and running the new installer tool to generate the upgraded assets.
After that, while the old version of DoltLab continues to run, execute the newly generated ./start.sh script.
Docker will perform a rolling upgrade across all services and hosts. NOTE: you will have brief service interruption as DoltLab’s writer services, like doltlabdb will stop before the new version is started.
Conclusion#
We’re really excited about this upgrade to DoltLab Enterprise and we hope this encourages you to give DoltLab a try within your organization.
We’re always making improvements to our products and if there’s a feature or use-case you want supported in DoltLab don’t hesitate to let us know by joining our Discord server and give us a shout.
Stay tuned for more updates coming your way soon, and don’t forget to check out each of our cool products below:
- Dolt—it’s Git for data.
- Doltgres—it’s Dolt + PostgreSQL.
- DoltHub—it’s GitHub for data.
- DoltLab—it’s GitLab for data.
- Hosted Dolt—it’s RDS for Dolt databases.
- Dolt Workbench—it’s a SQL workbench for Dolt databases.