
ProxySQL is an open source high performance, high availability, database-protocol-aware proxy for MySQL and PostgreSQL servers. As a reverse proxy, ProxySQL sits between client applications and backend SQL database servers, acting as an intermediary between the two.
In this role, ProxySQL is able to provide advanced traffic management from clients to backend server clusters, advanced routing and load-balancing based on specific SQL queries, and fine-grained access control to both itself and the backend server clusters. It really is a powerful tool that I encourage you to check out if you’ve not done so before.
Recently, a customer reached out to us asking if a Dolt read replication cluster could run behind a ProxySQL server instance. Of course, since Dolt is a drop-in replacement for MySQL, we absolutely expect Dolt to work with ProxySQL, and if it does not, that’s a Dolt bug we’ll go out and squash right away 🐞🤏.
But, Dolt does work with ProxySQL and we created an example repo you can use as a reference to easily set up your own Dolt cluster behind ProxySQL.
In this blog, I’ll walk through the steps of getting a simple read-replication cluster running behind ProxySQL. To follow along with me, clone the example repo now.
git clone https://github.com/dolthub/proxysql_example
cd proxysql_example
Dolt and ProxySQL#
The example repo we created contains the static resources needed to run a local ProxySQL instance and a Dolt read-replication cluster, consisting of a single read-replica instance, with Docker Compose. You may notice that it also contains static resources to run a similar local deployment of ProxySQL with a MySQL read-replication cluster, but for today, we’ll be working from the Dolt section of the README onward.
Before we begin, one difference to note about replication in Dolt versus that in MySQL, is that Dolt can be configured to replicate to remotes, which is the type of replication we’ll be configuring in our local deployment. A remote is a concept borrowed from Git, and it’s an offline copy of your local Dolt server that is hosted elsewhere (“remotely”). To replicate data written to our primary Dolt instance in our read-replica instance, we’ll use “push-on-write”, “pull-on-read” configuration.
Before I break that down a bit more, here’s a quick illustration of what this looks like at a high-level.
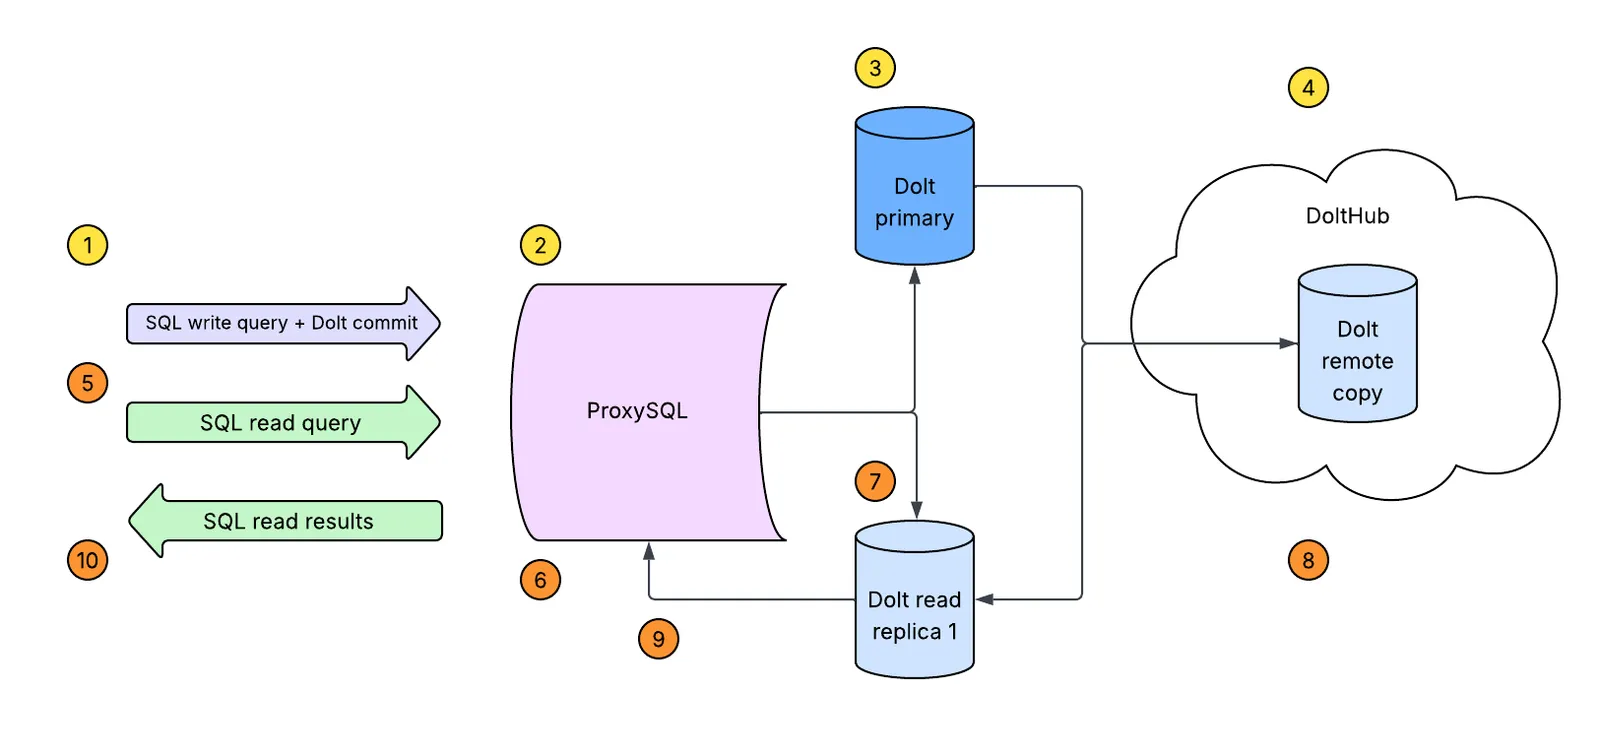
In the above illustration, you can follow the encircled numbers to understand the flow of how data will be replicated in this configuration.
Starting at 1, a SQL write query, like INSERT into ..., and an accompanying call to the DOLT_COMMIT stored procedure, are sent to ProxySQL, step 2, which will forward the query to our primary Dolt instance.
If you’re familiar with MySQL’s replication and wondering why we need to include a stored procedure call here, it is because replication in Dolt, in this replication configuration, replicates data based on Dolt commits and not on SQL transaction commits. This is why whenever you want data replicated, you’ll need to follow it with a call to DOLT_COMMIT.
Getting back to the illustration, the query and procedure call will run on the primary in step 3, and after the procedure call, our primary instance will automatically push these changes to our configured remote database. This is indicated by the arrow drawn to DoltHub, which we are using in our local setup, step 4. This is where the phrase “push-on-write” originates.
Then, step 5, when a read query comes in, like a SELECT * from ..., this too is routed through ProxySQL, step 6, and sent to the read-replica instance, step 7. Before the read query is executed, the replica, internally, pulls the latest changes from the configured remote, step 8, that has the latest changes from the primary. This is where “pull-on-read” comes from.
Lastly, step 9, runs the query against the read replica that now has the latest changes, and the results of the read are returned, step 10.
Cool, with this in mind as our final replication setup, we can now start working on implementing it using the resources we have in our example repo.
Preparing the remote database#
Since our plan is to use DoltHub as the remote to replicate to, we’ll need to create a corresponding database on DoltHub.com, and make sure we have local credentials to push to this database.
To start, ensure you have local Dolt credentials by running dolt creds new and dolt creds use. This will generate new credentials you can use to make writes to remote databases hosted on DoltHub.
proxysql_example % dolt creds new
Credentials created successfully.
pub key: omttg68tuuruf3f6ebclkgu5t35vu0ghktt776o6ia3utghrp87g
dolt creds use omttg68tuuruf3f6ebclkgu5t35vu0ghktt776o6ia3utghrp87g
Next, login to your DoltHub account and create a new database to use as the remote. For this example we will use coffeegodd/read_replication_example, but you will need to use your own DoltHub database, on which you have the permissions to make writes.
Because this example also relies on cloning the remote database to the Dolt servers running in Docker Compose, you will need to ensure the DoltHub database you create has been initialized and is not completely empty. We will do this step after making sure we have write permissions on this database.
To enable your locally generated Dolt credentials to push to the DoltHub database you just created, navigate on DoltHub to Profile > Settings > Credentials. Enter the public key of the credentials into the form along with a description and click “Add”. You now have permissions to write to this remote database.
Now let’s initialize the database. Locally, run the following commands:
mkdir read_replication_example
cd read_replication_example
dolt init
dolt remote add origin coffeegoddd/read_replication_example
dolt push origin main
proxysql_example % mkdir read_replication_example
proxysql_example % cd read_replication_example
read_replication_example % dolt init
dolt remote add origin coffeegoddd/read_replication_example
dolt push origin main
Successfully initialized dolt data repository.
\ Uploading...
To https://doltremoteapi.dolthub.com/coffeegoddd/read_replication_example
* [new branch] main -> mainSince all we needed to do in this step was initialize and push our local database to the remote, you can now remove this local copy of the database, as the remote contains the necessary initialization data.
cd ../
rm -rf read_replication_example
Once these steps are complete, our remote database on DoltHub is ready to use in our local replication deployment. Now let’s start working with the resources in our local example repo.
The resource dolt-docker-compose.yaml defines our compose setup for our local ProxySQL server and Dolt read-replica cluster. Additionally, the primary-init-db.sh and replica-1-init-db.sh files are mounted to their respective Dolt server containers, and will take care of, not only configuring read replication for us, but also creating the proper users and grants needed for allowing ProxySQL to monitor and configure these servers as “backends”.
Let’s take a look briefly at the contents of these files.
Click to see the full dolt-docker-compose.yaml file
version: "3.9"

services:
  proxysql:
    image: proxysql/proxysql:latest
    container_name: proxysql
    ports:
      - "6033:6033" # client port
      - "6032:6032" # admin interface
    depends_on:
      - primary
      - replica-1
    volumes:
      - ./proxysql.cnf:/etc/proxysql.cnf:ro
      - proxysql_data:/var/lib/proxysql
    command: ["proxysql", "--initial", "-f", "-c", "/etc/proxysql.cnf"]
    networks:
      - replication_example

  primary:
    image: dolthub/dolt-sql-server:latest
    container_name: primary
    ports:
      - "3307:3306" # exposes primary on localhost:3307
    volumes:
      - /path/to/your/.dolt/creds:/root/.dolt/creds # replace with the real path to your local $HOME/.dolt/creds
      - dolt_primary_data:/var/lib/dolt
      - dolt_primary_dolt_config:/etc/dolt/doltcfg.d
      - dolt_primary_server_config:/etc/dolt/servercfg.d
      - ./primary-init-db.sh:/docker-entrypoint-initdb.d/init-db.sh:ro
    command: ["-l", "debug"]
    environment:
      DOLT_CREDS_PUBLIC_KEY: ${DOLT_CREDS_PUBLIC_KEY}
    networks:
      - replication_example

  replica-1:
    image: dolthub/dolt-sql-server:latest
    depends_on:
      - primary
    container_name: replica-1
    ports:
      - "3308:3306" # exposes primary on localhost:3308
    volumes:
      - /path/to/your/.dolt/creds:/root/.dolt/creds # replace with the real path to your local $HOME/.dolt/creds
      - dolt_replica_1_data:/var/lib/dolt
      - dolt_replica_1_dolt_config:/etc/dolt/doltcfg.d
      - dolt_replica_1_server_config:/etc/dolt/servercfg.d
      - ./replica-1-init-db.sh:/docker-entrypoint-initdb.d/init-db.sh:ro
    command: ["--readonly", "-l", "debug"]
    environment:
      DOLT_CREDS_PUBLIC_KEY: ${DOLT_CREDS_PUBLIC_KEY}
    networks:
      - replication_example

networks:
  replication_example:
    driver: bridge

volumes:
  proxysql_data:

  dolt_primary_data:
  dolt_primary_dolt_config:
  dolt_primary_server_config:

  dolt_replica_1_data:
  dolt_replica_1_dolt_config:
  dolt_replica_1_server_config:
In the above compose file, you can see that when the deployment comes up, three services will be started: proxysql, primary, and replica-1. The proxysql instance gets the configuration file ./proxysql.cnf mounted in it, which contains definitions for our initial mysql_users, “root”, and mysql_servers, primary and replica-1.
And, as mentioned before, each Dolt instance gets an initialization script mounted that will run when the Dolt server is first initialized, and automates some steps in the process that we’d otherwise need to perform manually. On the primary, the initialization script is running the following:
Click to see the full primary-init-db.sh file
#!/bin/bash
set -e

dolt config --global --add user.name "myprimary"
dolt config --global --add user.email "myprimary@me.com"
dolt creds use "$DOLT_CREDS_PUBLIC_KEY"

dolt sql <<-EOSQL
    CREATE USER root@'%' IDENTIFIED BY 'root';
    GRANT ALL ON *.* TO root@'%';
    CREATE USER 'monitor'@'%' IDENTIFIED BY 'monitor';
    GRANT SELECT ON sys.* TO 'monitor'@'%';
    GRANT SELECT ON performance_schema.* TO 'monitor'@'%';
    GRANT USAGE, REPLICATION CLIENT ON *.* TO 'monitor'@'%';
    CALL DOLT_CLONE('coffeegoddd/read_replication_example', 'read_replication_example');
    USE read_replication_example;
    SET @@PERSIST.dolt_replicate_to_remote = 'origin';
EOSQL
This script sets the Dolt user and email information that will be credited for commits. Then, it ensures that the container is using the local Dolt creds we created before, by running dolt creds use followed by the public key for our local credentials. If you look back at the dolt-docker-compose.yaml file above, you’ll notice that these local creds are also mounted into the container so that the Dolt server can use them and subsequently write to the remote database we created on DoltHub. This is a very important step in working with containerized Dolt servers.
Lastly, the initialization script executes a number of SQL statements that configure remote replication and create the monitor users that ProxySQL will authenticate as in order to manage this instance. After calling the stored procedure DOLT_CLONE which clones the remote database from DoltHub down to this server, we execute SET @@PERSIST.dolt_replicate_to_remote = 'origin';. This statement tells Dolt to enable remote replication and makes this instance the primary.
On the other side, here’s what is running during the initialization of our read-replica Dolt server, replica-1.
Click to see the full replica-1-init-db.sh file
#!/bin/bash
set -e

dolt config --global --add user.name "myreplica1"
dolt config --global --add user.email "myreplica1@me.com"
dolt creds use "$DOLT_CREDS_PUBLIC_KEY"

dolt sql <<-EOSQL
    CREATE USER root@'%' IDENTIFIED BY 'root';
    GRANT ALL ON *.* TO root@'%';
    CREATE USER 'monitor'@'%' IDENTIFIED BY 'monitor';
    GRANT SELECT ON sys.* TO 'monitor'@'%';
    GRANT SELECT ON performance_schema.* TO 'monitor'@'%';
    GRANT USAGE, REPLICATION CLIENT ON *.* TO 'monitor'@'%';
    CALL DOLT_CLONE('coffeegoddd/read_replication_example', 'read_replication_example');
    USE read_replication_example;
    SET @@PERSIST.dolt_read_replica_remote = 'origin';
    SET @@PERSIST.dolt_replicate_all_heads = 1;
    SET @@PERSIST.read_only=1;
EOSQL
It’s nearly identical to what’s run in the primary’s init script, but with a few important similarities and differences.
First, regarding similarities, it’s important for all of your replicas to also create a monitor user with the grants shown above, since this is how ProxySQL will connect to and manage each replica.
Second, regarding differences, we execute SET @@PERSIST.dolt_read_replica_remote = 'origin'; which tells Dolt that this instance is a remote replica of the remote origin and SET @@PERSIST.dolt_replicate_all_heads = 1;, which tells Dolt we want all heads/branches replicated.
Finally, but equally as important, we need to run SET @@PERSIST.read_only=1; in all of our read-replicas. This variable will be used by ProxySQL to manage which servers are read-only.
We’re almost ready to boot up our local deployment, but before we do, we need to edit the ./dolt-docker-compose.yaml file so that the local path to your Dolt credentials folder is correctly defined and mounted on startup. These are credentials normally found at $HOME/.dolt/creds:
volumes:
  - /path/to/your/.dolt/creds:/root/.dolt/creds # replace with the real path to your local $HOME/.dolt/creds
For me, this would be:
   volumes:
     - /Users/dustin/.dolt/creds:/root/.dolt/creds
Save these edits and start ProxySQL with a simple Dolt read replica cluster using Docker Compose by running the following command:
DOLT_CREDS_PUBLIC_KEY=omttg68tuuruf3f6ebclkgu5t35vu0ghktt776o6ia3utghrp87g docker compose -f dolt-docker-compose.yaml upAfter the servers come online, there are a couple more manual steps we need to take in order to complete our configuration of ProxySQL with our little Dolt cluster. But first, let’s test replication to make sure it’s all working correctly outside of ProxySQL.
To do so, connect directly to primary with a standard MySQL client and execute a write query followed by a Dolt commit, as shown in our illustration earlier:
proxysql_example % mysql --host 0.0.0.0 --port 3307 -uroot -proot
mysql: [Warning] Using a password on the command line interface can be insecure.
Welcome to the MySQL monitor.  Commands end with ; or \g.
Your MySQL connection id is 2
Server version: 8.0.33 Dolt

Copyright (c) 2000, 2025, Oracle and/or its affiliates.

Oracle is a registered trademark of Oracle Corporation and/or its
affiliates. Other names may be trademarks of their respective
owners.

Type 'help;' or '\h' for help. Type '\c' to clear the current input statement.

mysql> use read_replication_example;
Database changed
mysql> create table t1 (pk int primary key);
Query OK, 0 rows affected (0.00 sec)

mysql> call dolt_commit('-Am', 'create table t1');
+----------------------------------+
| hash                             |
+----------------------------------+
| gvj1a2vns3c8k6rqon476gjepngv804j |
+----------------------------------+
1 row in set (2.25 sec)
Then head back to DoltHub and view the Commit Log for your remote database. You should see the corresponding commit successfully pushed to the remote.

And, if you then connect directly to the replica-1 instance, you should also see this same replicated data available here:
proxysql_example % mysql --host 0.0.0.0 --port 3308 -uroot -proot
mysql: [Warning] Using a password on the command line interface can be insecure.
Welcome to the MySQL monitor.  Commands end with ; or \g.
Your MySQL connection id is 2
Server version: 8.0.33 Dolt

Copyright (c) 2000, 2025, Oracle and/or its affiliates.

Oracle is a registered trademark of Oracle Corporation and/or its
affiliates. Other names may be trademarks of their respective
owners.

Type 'help;' or '\h' for help. Type '\c' to clear the current input statement.

mysql> use read_replication_example;
Reading table information for completion of table and column names
You can turn off this feature to get a quicker startup with -A

Database changed
mysql> show tables;
+------------------------------------+
| Tables_in_read_replication_example |
+------------------------------------+
| t1                                 |
+------------------------------------+
1 row in set (0.23 sec)
With replication confirmed, we can now finish setting up ProxySQL.
ProxySQL has a requirement that admins connect directly on its host or container in order to modify configuration. For this reason, since this is running in Docker, we will need to docker exec into the running ProxySQL container in order to open a shell to its admin database.
proxysql_example % docker ps
CONTAINER ID   IMAGE                            COMMAND                  CREATED         STATUS         PORTS                               NAMES
7e64122c92f8   proxysql/proxysql:latest         "proxysql --initial …"   2 minutes ago   Up 2 minutes   0.0.0.0:6032-6033->6032-6033/tcp    proxysql
3f1ca186cf64   dolthub/dolt-sql-server:latest   "tini -- docker-entr…"   2 minutes ago   Up 2 minutes   33060/tcp, 0.0.0.0:3308->3306/tcp   replica-1
2a23add7dac9   dolthub/dolt-sql-server:latest   "tini -- docker-entr…"   2 minutes ago   Up 2 minutes   33060/tcp, 0.0.0.0:3307->3306/tcp   primary
proxysql_example % docker exec -it 7e64122c92f8 /bin/bash
root@7e64122c92f8:/# mysql -u admin -padmin -h 127.0.0.1 -P6032 --prompt 'ProxySQL Admin> '
Welcome to the MariaDB monitor.  Commands end with ; or \g.
Your MySQL connection id is 1
Server version: 8.0.11 (ProxySQL Admin Module)

Copyright (c) 2000, 2018, Oracle, MariaDB Corporation Ab and others.

Type 'help;' or '\h' for help. Type '\c' to clear the current input statement.

ProxySQL Admin>
Once we are connected, we’ll need to execute the following statements to finalize ProxySQL’s monitoring of the backend servers and load this new configuration into its runtime:
UPDATE global_variables SET variable_value='monitor' WHERE variable_name='mysql-monitor_username';
UPDATE global_variables SET variable_value='monitor' WHERE variable_name='mysql-monitor_password';
UPDATE global_variables SET variable_value='2000' WHERE variable_name IN ('mysql-monitor_connect_interval','mysql-monitor_ping_interval','mysql-monitor_read_only_interval');
LOAD MYSQL VARIABLES TO RUNTIME;
SAVE MYSQL VARIABLES TO DISK;
LOAD MYSQL SERVERS TO RUNTIME;
After we execute these statements, we can check the health of our backend servers with the following:
ProxySQL Admin> SELECT * FROM mysql_servers;
+--------------+-----------+------+-----------+--------+--------+-------------+-----------------+---------------------+---------+----------------+---------+
| hostgroup_id | hostname  | port | gtid_port | status | weight | compression | max_connections | max_replication_lag | use_ssl | max_latency_ms | comment |
+--------------+-----------+------+-----------+--------+--------+-------------+-----------------+---------------------+---------+----------------+---------+
| 10           | primary   | 3306 | 0         | ONLINE | 1      | 0           | 100             | 0                   | 0       | 0              |         |
| 20           | replica-1 | 3306 | 0         | ONLINE | 1      | 0           | 100             | 0                   | 0       | 0              |         |
+--------------+-----------+------+-----------+--------+--------+-------------+-----------------+---------------------+---------+----------------+---------+
2 rows in set (0.001 sec)

ProxySQL Admin> SHOW TABLES FROM monitor;
+--------------------------------------+
| tables                               |
+--------------------------------------+
| mysql_server_aws_aurora_check_status |
| mysql_server_aws_aurora_failovers    |
| mysql_server_aws_aurora_log          |
| mysql_server_connect_log             |
| mysql_server_galera_log              |
| mysql_server_group_replication_log   |
| mysql_server_ping_log                |
| mysql_server_read_only_log           |
| mysql_server_replication_lag_log     |
+--------------------------------------+
9 rows in set (0.001 sec)

ProxySQL Admin> SELECT * FROM monitor.mysql_server_connect_log ORDER BY time_start_us DESC LIMIT 3;
+-----------+------+------------------+-------------------------+---------------+
| hostname  | port | time_start_us    | connect_success_time_us | connect_error |
+-----------+------+------------------+-------------------------+---------------+
| replica-1 | 3306 | 1744920205884452 | 1371                    | NULL          |
| primary   | 3306 | 1744920205854288 | 2896                    | NULL          |
| replica-1 | 3306 | 1744920203888731 | 7385                    | NULL          |
+-----------+------+------------------+-------------------------+---------------+
3 rows in set (0.001 sec)

ProxySQL Admin> SELECT * FROM monitor.mysql_server_ping_log ORDER BY time_start_us DESC LIMIT 3;
+-----------+------+------------------+----------------------+------------+
| hostname  | port | time_start_us    | ping_success_time_us | ping_error |
+-----------+------+------------------+----------------------+------------+
| replica-1 | 3306 | 1744920211964675 | 584                  | NULL       |
| primary   | 3306 | 1744920211964304 | 906                  | NULL       |
| replica-1 | 3306 | 1744920209963009 | 517                  | NULL       |
+-----------+------+------------------+----------------------+------------+
3 rows in set (0.001 sec)
If we’ve been doing things correctly so far, we should see both primary and replica-1 showing as healthy, with no connect_errors or ping_errors.
Our final configuration step before we can start defining end-users of our ProxySQL instance is to configure the replication hostgroups. These hostgroups tell ProxySQL how to manage and promote servers in your backend cluster. To do this, we execute the following statement:
INSERT INTO mysql_replication_hostgroups (writer_hostgroup,reader_hostgroup,comment) VALUES (10,20,'cluster1');
LOAD MYSQL SERVERS TO RUNTIME;
This statement, and similar ones included in this post, are taken directly from this ProxySQL documentation page which explain how to configure a deployment for the first time. It details additional information about the mysql_replication_hostgroups table definition, and highlights more options for writing to it.
Then, we can verify that replica-1 is successfully running in read_only mode based on its hostgroup inclusion.
ProxySQL Admin> SELECT * FROM monitor.mysql_server_read_only_log ORDER BY time_start_us DESC LIMIT 3;
+-----------+------+------------------+-----------------+-----------+-------+
| hostname  | port | time_start_us    | success_time_us | read_only | error |
+-----------+------+------------------+-----------------+-----------+-------+
| primary   | 3306 | 1744920300184814 | 1890            | 0         | NULL  |
| replica-1 | 3306 | 1744920299975185 | 211603          | 1         | NULL  |
| primary   | 3306 | 1744920298179238 | 2364            | 0         | NULL  |
+-----------+------+------------------+-----------------+-----------+-------+
3 rows in set (0.002 sec)

ProxySQL Admin> SELECT * FROM mysql_servers;
+--------------+-----------+------+-----------+--------+--------+-------------+-----------------+---------------------+---------+----------------+---------+
| hostgroup_id | hostname  | port | gtid_port | status | weight | compression | max_connections | max_replication_lag | use_ssl | max_latency_ms | comment |
+--------------+-----------+------+-----------+--------+--------+-------------+-----------------+---------------------+---------+----------------+---------+
| 10           | primary   | 3306 | 0         | ONLINE | 1      | 0           | 100             | 0                   | 0       | 0              |         |
| 20           | replica-1 | 3306 | 0         | ONLINE | 1      | 0           | 100             | 0                   | 0       | 0              |         |
+--------------+-----------+------+-----------+--------+--------+-------------+-----------------+---------------------+---------+----------------+---------+
2 rows in set (0.001 sec)

ProxySQL Admin> SAVE MYSQL SERVERS TO DISK;
Query OK, 0 rows affected (0.032 sec)

ProxySQL Admin> SAVE MYSQL VARIABLES TO DISK;
Query OK, 167 rows affected (0.011 sec)
It’s important to note here that currently, as of Dolt v1.53.2, ProxySQL can be used to proxy and route queries to the appropriate backends, but Dolt supports limited manipulation of the @@read_only system variable. This may prevent ProxySQL’s server promotion functionality from working correctly, since we specifically hard-code this variable’s value during replica initialization.
Now that we have our deployment running successfully, let’s add an end user who can connect to our ProxySQL instance and start running queries!
To do so, connect directly to the primary and run the following SQL to create a sample user:
CREATE USER 'stnduser'@'%' IDENTIFIED BY 'stnduser';
GRANT ALL PRIVILEGES ON *.* TO 'stnduser'@'%';
proxysql_example % mysql --host 0.0.0.0 --port 3307 -uroot -proot
mysql: [Warning] Using a password on the command line interface can be insecure.
Welcome to the MySQL monitor. Commands end with ; or \g.
Your MySQL connection id is 106
Server version: 8.0.33 Dolt
Copyright (c) 2000, 2025, Oracle and/or its affiliates.
Oracle is a registered trademark of Oracle Corporation and/or its
affiliates. Other names may be trademarks of their respective
owners.
Type 'help;' or '\h' for help. Type '\c' to clear the current input statement.
mysql> CREATE USER 'stnduser'@'%' IDENTIFIED BY 'stnduser';
Query OK, 0 rows affected (0.01 sec)
mysql> GRANT ALL PRIVILEGES ON *.* TO 'stnduser'@'%';
Query OK, 0 rows affected (0.01 sec)Then return to the ProxySQL admin shell, and run the following SQL to register this user:
INSERT INTO mysql_users(username,password,default_hostgroup) VALUES ('stnduser','stnduser',1);
LOAD MYSQL USERS TO RUNTIME;
SAVE MYSQL USERS TO DISK;
ProxySQL Admin> INSERT INTO mysql_users(username,password,default_hostgroup) VALUES ('stnduser','stnduser',1);
Query OK, 1 row affected (0.004 sec)
ProxySQL Admin> LOAD MYSQL USERS TO RUNTIME;
Query OK, 0 rows affected (0.001 sec)
ProxySQL Admin> SAVE MYSQL USERS TO DISK;
Query OK, 0 rows affected (0.012 sec)With the new user registered, they can now connect to the ProxySQL server on the end user port 6033 and start running queries:
proxysql_example % mysql --host 0.0.0.0 --port 6033 -ustnduser -pstnduser
mysql: [Warning] Using a password on the command line interface can be insecure.
Welcome to the MySQL monitor.  Commands end with ; or \g.
Your MySQL connection id is 2
Server version: 8.0.11 (ProxySQL)

Copyright (c) 2000, 2025, Oracle and/or its affiliates.

Oracle is a registered trademark of Oracle Corporation and/or its
affiliates. Other names may be trademarks of their respective
owners.

Type 'help;' or '\h' for help. Type '\c' to clear the current input statement.

mysql> show tables;
+------------------------------------+
| Tables_in_read_replication_example |
+------------------------------------+
| t1                                 |
+------------------------------------+
1 row in set (0.01 sec)

mysql> create table t2 (pk int primary key);
Query OK, 0 rows affected (0.01 sec)

mysql> call dolt_commit('-Am', 'create table t2');
+----------------------------------+
| hash                             |
+----------------------------------+
| 4mmjaev3vbeh5m8cqp3mehlt4jcsivlv |
+----------------------------------+
1 row in set (1.95 sec)
And, whenever the user runs DOLT_COMMIT, their changes will be accessible in primary, the remote database coffeegoddd/read_replication_example, and replica-1.
proxysql_example % mysql --host 0.0.0.0 --port 6033 -ustnduser -pstnduser
mysql: [Warning] Using a password on the command line interface can be insecure.
Welcome to the MySQL monitor.  Commands end with ; or \g.
Your MySQL connection id is 2
Server version: 8.0.11 (ProxySQL)

Copyright (c) 2000, 2025, Oracle and/or its affiliates.

Oracle is a registered trademark of Oracle Corporation and/or its
affiliates. Other names may be trademarks of their respective
owners.

Type 'help;' or '\h' for help. Type '\c' to clear the current input statement.

mysql> show tables;
+------------------------------------+
| Tables_in_read_replication_example |
+------------------------------------+
| t1                                 |
+------------------------------------+
1 row in set (0.01 sec)

mysql> create table t2 (pk int primary key);
Query OK, 0 rows affected (0.01 sec)

mysql> call dolt_commit('-Am', 'create table t2');
+----------------------------------+
| hash                             |
+----------------------------------+
| 4mmjaev3vbeh5m8cqp3mehlt4jcsivlv |
+----------------------------------+
1 row in set (1.95 sec)
Here is the change visible on the primary:
proxysql_example % mysql --host 0.0.0.0 --port 3307 -uroot -proot
mysql: [Warning] Using a password on the command line interface can be insecure.
Welcome to the MySQL monitor.  Commands end with ; or \g.
Your MySQL connection id is 176
Server version: 8.0.33 Dolt

Copyright (c) 2000, 2025, Oracle and/or its affiliates.

Oracle is a registered trademark of Oracle Corporation and/or its
affiliates. Other names may be trademarks of their respective
owners.

Type 'help;' or '\h' for help. Type '\c' to clear the current input statement.

mysql> use read_replication_example;
Reading table information for completion of table and column names
You can turn off this feature to get a quicker startup with -A

Database changed
mysql> show tables;
+------------------------------------+
| Tables_in_read_replication_example |
+------------------------------------+
| t1                                 |
| t2                                 |
+------------------------------------+
2 rows in set (0.00 sec)
Here is the commit visible on the remote:

And here is the commit visible in the replica:
proxysql_example % mysql --host 0.0.0.0 --port 3308 -uroot -proot
mysql: [Warning] Using a password on the command line interface can be insecure.
Welcome to the MySQL monitor.  Commands end with ; or \g.
Your MySQL connection id is 203
Server version: 8.0.33 Dolt

Copyright (c) 2000, 2025, Oracle and/or its affiliates.

Oracle is a registered trademark of Oracle Corporation and/or its
affiliates. Other names may be trademarks of their respective
owners.

Type 'help;' or '\h' for help. Type '\c' to clear the current input statement.

mysql> use read_replication_example;
Reading table information for completion of table and column names
You can turn off this feature to get a quicker startup with -A

Database changed
mysql> show tables;
+------------------------------------+
| Tables_in_read_replication_example |
+------------------------------------+
| t1                                 |
| t2                                 |
+------------------------------------+
2 rows in set (0.23 sec)Conclusion#
We certainly covered a LOT in today’s blog, but hopefully it encouraged you to check out ProxySQL and other integrations out there that can work with Dolt, right out of the box. We’re always looking to improve our products and make sure our users have an excellent, smooth experience.
If you’d like to see a tutorial blog for how a different tool or product works with Dolt, please come by our Discord and give us a shout. We’re happy to help you get things working, and then share our journey with the world!
Don’t forget to check out each of our cool products below:
- Dolt—it’s Git for data.
- Doltgres—it’s Dolt + PostgreSQL.
- DoltHub—it’s GitHub for data.
- DoltLab—it’s GitLab for data.
- Hosted Dolt—it’s RDS for Dolt databases.
- Dolt Workbench—it’s a SQL workbench for Dolt databases.