
We’re on a mission to show that Dolt, the world’s first version controlled SQL database, works with all your favorite tools in all your favorite languages. Today we head to Ruby-land and show you how to integrate Dolt with Rails, a popular website builder with a built in Object Relational Mapper (ORM) called Active Record.

TLDR; The Code#
If you don’t want to run through the tutorial and just want the Blog with branches sample app to play with, it is available in this GitHub repository.
To get it to work, follow these steps which should be pretty familiar to Rails users.
- Install dependencies
- Start a Dolt SQL Server and create a database named
blog_development - Clone the GitHub Repository
cd dolt_railsbundle installrake db:migraterails server- Hit http://127.0.0.1:3000/ with your favorite web browser
Install Dolt, Ruby, Rails, and the Ruby MySQL client.#
To get this demo going, we’re going to need Dolt, Ruby, Rails and the Ruby MySQL Client.
Dolt is a single ~103 megabyte program.
$ du -h ~/go/bin/dolt
103M	/Users/timsehn/go/bin/dolt
It’s really easy to install. Download it and put it on your PATH. We have a bunch of ways to make this even easier for most platforms.
Here is a convenience script that does that for *NIX platforms. Open a terminal and run it.
sudo bash -c 'curl -L https://github.com/dolthub/dolt/releases/latest/download/install.sh | sudo bash'For the rest of this blog entry, I’m going to assume you are on a *NIX based system and use bash when interacting on the command line.
$ brew install rubyI needed to do some shell tomfoolery to get ruby and gem to work correctly. I ended up adding this to my .zshrc:
export PATH="/opt/homebrew/opt/ruby/bin:/opt/homebrew/lib/ruby/gems/3.3.0/bin/:$PATH"Without that, gem install would not put stuff in the right place. Now, I install rails:
$ gem install rails
Successfully installed rails-7.1.3
Parsing documentation for rails-7.1.3
Done installing documentation for rails after 0 seconds
1 gem installed
And finally, I install the mysql2 gem. I first tried mysql but couldn’t get it to install. The internet seems to think it’s old and deprecated.
$ gem install mysql2
Fetching mysql2-0.5.5.gem
Building native extensions. This could take a while...
Successfully installed mysql2-0.5.5
Parsing documentation for mysql2-0.5.5
Installing ri documentation for mysql2-0.5.5
Done installing documentation for mysql2 after 0 seconds
1 gem installed
Set up Your Rails Project#
Now, we’re going to set up the sample Rails web app from the tutorial. It’s a blog with comments. We create a new project called blog.
$ bin/rails new blogThen we start the start the rails server.
$ bin/rails server
=> Booting Puma
=> Rails 7.1.3 application starting in development
=> Run `bin/rails server --help` for more startup options
Puma starting in single mode...
* Puma version: 6.4.2 (ruby 3.3.0-p0) ("The Eagle of Durango")
* Min threads: 5
* Max threads: 5
* Environment: development
* PID: 10730
* Listening on http://127.0.0.1:3000
* Listening on http://[::1]:3000
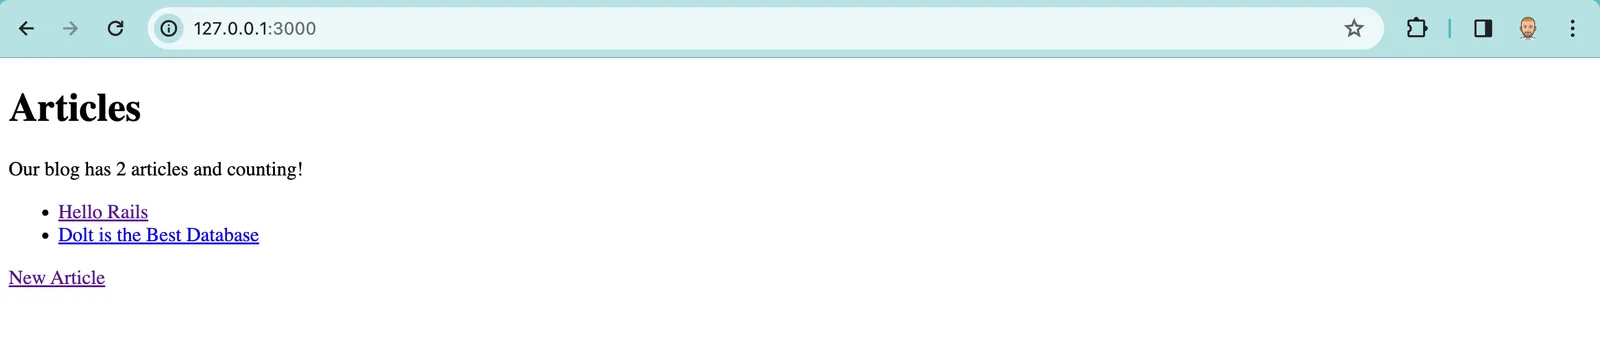
Use Ctrl-C to stopAnd…We’re in business!
Make Dolt Your Database#
The Rails default database is sqlite. Let’s switch that to Dolt so we can take advantage of the version control features.
First, we need to make a place for our Dolt database to live and start a dolt sql-server.
$ mkdir railsdb
$ cd railsdb
$ dolt sql-server
Starting server with Config HP="localhost:3306"|T="28800000"|R="false"|L="info"|S="/tmp/mysql.sock"
Leave that shell open and open a new shell. In the new shell we connect the dolt sql client to our running server and create a database named blog_development, the name of the database suggested in the tutorial.
$ cd railsdb
$ dolt sql
# Welcome to the DoltSQL shell.
# Statements must be terminated with ';'.
# "exit" or "quit" (or Ctrl-D) to exit.
> create database blog_development;
> use blog_development;
I would leave that client terminal open just in case you want to inspect what’s going on in Dolt at any time. So at this point you should have three terminals open each running:
bin/rails serverdolt sql-serverdolt sql
You’ll probably want an additional terminal or editor open to edit files.
Then in our database configuration file, config/database.yml, we point rails at our new Dolt database.
default: &default
  adapter: mysql2
  encoding: utf8
  database: blog_development
  pool: 5
  username: root
  password:
  socket: /tmp/mysql.sock

development:
  adapter: mysql2
  encoding: utf8
  database: blog_development
  pool: 5
  username: root
  password:
  socket: /tmp/mysql.sock
Finally, don’t forget to add mysql2 to your Gemfile so Rails has access to a MySQL client.
+ gem "mysql2"You’re all set.
Continue Tutorial Until you run your first Migration#
Now, we continue the tutorial until we hit our first migration. We are generating the Article model.
bin/rails generate model Article title:string body:text

      invoke  active_record
      create    db/migrate/20240126212739_create_articles.rb
      create    app/models/article.rb
      invoke    test_unit
      create      test/models/article_test.rb
      create      test/fixtures/articles.yml
Then we run the migration and it will create tables in our Dolt database.
$ bin/rails db:migrate
== 20240126212739 CreateArticles: migrating ===================================
-- create_table(:articles)
   -> 0.0076s
== 20240126212739 CreateArticles: migrated (0.0077s) ==========================
Now head over to the dolt sql terminal and check out what you’ve done in Dolt.
blog_development/main> show tables;
+----------------------------+
| Tables_in_blog_development |
+----------------------------+
| ar_internal_metadata       |
| articles                   |
| schema_migrations          |
+----------------------------+
blog_development/main> describe articles;
+------------+--------------+------+-----+---------+----------------+
| Field      | Type         | Null | Key | Default | Extra          |
+------------+--------------+------+-----+---------+----------------+
| id         | bigint       | NO   | PRI | NULL    | auto_increment |
| title      | varchar(255) | YES  |     | NULL    |                |
| body       | text         | YES  |     | NULL    |                |
| created_at | datetime(6)  | NO   |     | NULL    |                |
| updated_at | datetime(6)  | NO   |     | NULL    |                |
+------------+--------------+------+-----+---------+----------------+
5 rows in set (0.00 sec)
Now is a good time to make a Dolt commit, just in case we ever want to go back to this point in time. Dolt commits are just like Git commits. They preserve the state of your database at that point in time.
In SQL, Dolt version control functionality is exposed as procedures, system tables, or functions. They are names after their Git command line equivalent and follow the same command line convention for arguments. If you know how to use Git, you already know how to use Dolt.
In this case we’re looking for call dolt_commit.
blog_development/main> call dolt_commit('-Am', 'Initial Dolt commit');
+----------------------------------+
| hash                             |
+----------------------------------+
| gvfg0rnucfbd2k4ev9l89orbdctnkul7 |
+----------------------------------+
1 row in set (0.01 sec)
We can inspect our commit graph by looking at the dolt_log system table.
blog_development/main> select * from dolt_log;
+----------------------------------+---------------------+-------------------------------+---------------------+----------------------------+
| commit_hash                      | committer           | email                         | date                | message                    |
+----------------------------------+---------------------+-------------------------------+---------------------+----------------------------+
| gvfg0rnucfbd2k4ev9l89orbdctnkul7 | __dolt_local_user__ | __dolt_local_user__@localhost | 2024-01-29 23:54:41 | Initial Dolt commit        |
| so2aoal6mc9150gvjdvvedl3cs54b3vb | timsehn             | tim@dolthub.com               | 2024-01-26 21:30:48 | Initialize data repository |
+----------------------------------+---------------------+-------------------------------+---------------------+----------------------------+
2 rows in set (0.00 sec)
Finish the Tutorial#
Now, it’s time to write some code. It took me about two hours to work through the rest of the Rails tutorial. At the end I had a fancy Blog website complete with comments.
Check out out the source code at this commit to see where I was at code-wise.
Add Commits#
Whenever someone modifies a blog or comment using the blog website, we would like to make a Dolt Commit.
As I mentioned earlier, Dolt version control functionality is exposed as procedures, system tables, or functions. Version control write operations, like DOLT_COMMIT(), are procedures. So we need to execute a stored procedure using raw SQL in Rails. This can be done with the following code:
ActiveRecord::Base.connection.execute(<SQL STATEMENT HERE>)We must execute that code whenever Rails makes a database modification. Rails exposes functionality called Callbacks which allow you to execute code after certain Rails events. In our case, we would like to execute code after_commit for both articles and comments. This can be accomplished with the following simple diff:
diff --git a/app/models/article.rb b/app/models/article.rb
index 81aa358..19f4a90 100644
--- a/app/models/article.rb
+++ b/app/models/article.rb
@@ -5,4 +5,11 @@ class Article < ApplicationRecord
validates :title, presence: true
validates :body, presence: true, length: { minimum: 10 }
+
+ after_commit :dolt_commit
+
+ private
+ def dolt_commit
+ ActiveRecord::Base.connection.execute("CALL DOLT_COMMIT('-am', 'Changed an Article')")
+ end
end
diff --git a/app/models/comment.rb b/app/models/comment.rb
index 50d77da..6c3767e 100644
--- a/app/models/comment.rb
+++ b/app/models/comment.rb
@@ -2,4 +2,11 @@ class Comment < ApplicationRecord
include Visible
belongs_to :article
+
+ after_commit :dolt_commit
+
+ private
+ def dolt_commit
+ ActiveRecord::Base.connection.execute("CALL DOLT_COMMIT('-am', 'Changed a Comment')")
+ end
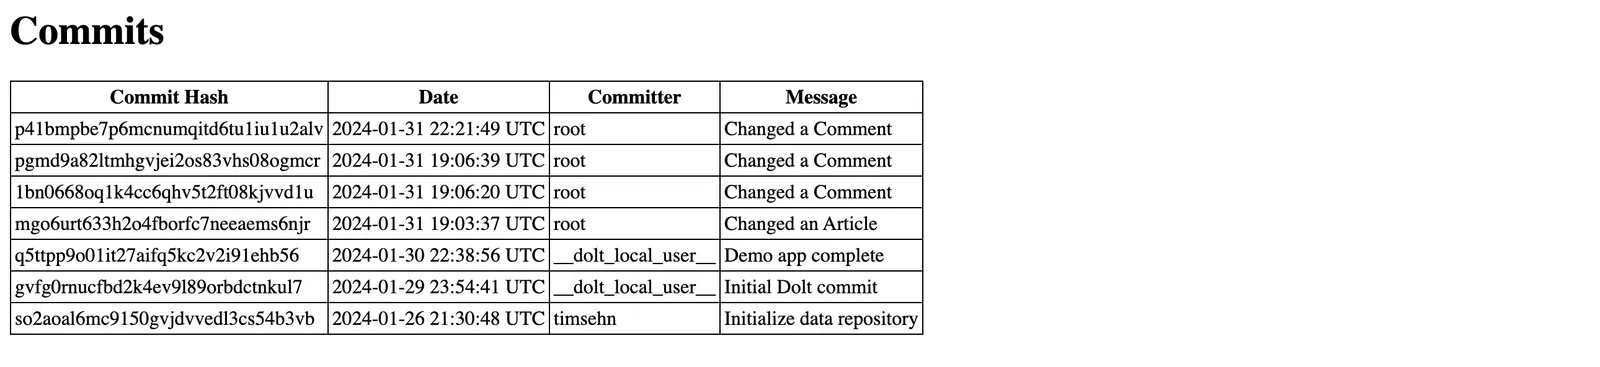
endAnd after making a few changes on the website, I can see those changes in Dolt’s commit log:
blog_development/main> select * from dolt_log;
+----------------------------------+---------------------+-------------------------------+---------------------+----------------------------+
| commit_hash                      | committer           | email                         | date                | message                    |
+----------------------------------+---------------------+-------------------------------+---------------------+----------------------------+
| pgmd9a82ltmhgvjei2os83vhs08ogmcr | root                | root@%                        | 2024-01-31 19:06:39 | Changed a Comment          |
| 1bn0668oq1k4cc6qhv5t2ft08kjvvd1u | root                | root@%                        | 2024-01-31 19:06:20 | Changed a Comment          |
| mgo6urt633h2o4fborfc7neeaems6njr | root                | root@%                        | 2024-01-31 19:03:37 | Changed an Article         |
| q5ttpp9o01it27aifq5kc2v2i91ehb56 | __dolt_local_user__ | __dolt_local_user__@localhost | 2024-01-30 22:38:56 | Demo app complete          |
| gvfg0rnucfbd2k4ev9l89orbdctnkul7 | __dolt_local_user__ | __dolt_local_user__@localhost | 2024-01-29 23:54:41 | Initial Dolt commit        |
| so2aoal6mc9150gvjdvvedl3cs54b3vb | timsehn             | tim@dolthub.com               | 2024-01-26 21:30:48 | Initialize data repository |
+----------------------------------+---------------------+-------------------------------+---------------------+----------------------------+
6 rows in set (0.00 sec)
Commit Log#
Now, let’s add a commit log to our website so we can examine who changed what when.
First we make a model of the dolt_log system table. We make a file called app/models/dolt_commits.rb. We have to call this model “DoltCommit” because “Commit” is already taken by the system. We have to tell ActiveRecord the name of the table and primary key.
class DoltCommit < ApplicationRecord
  self.primary_key = 'commit_hash'
  self.table_name  = 'dolt_log'
end
Then, we make a controller in app/controllers/ calleddolt_commits_controller.rb. It’s really simple. It just has an index method.
class DoltCommitsController < ApplicationController
  def index
    @dolt_commits = DoltCommit.all
  end
end
Then, we make a simple view to show the commits and some commit metadata in a table.
<h1>Commits</h1>

<table>
  <tr>
    <th>Commit Hash</td>
    <th>Date</td>
    <th>Committer</td>
    <th>Message</td>
  </tr>
  <% @dolt_commits.each do |dolt_commit| %>
    <tr>
      <td><%= dolt_commit.commit_hash %></td>
      <td><%= dolt_commit.date %></td>
      <td><%= dolt_commit.committer %></td>
      <td><%= dolt_commit.message %></td>
    </tr>
    </li>
  <% end %>
</table>
Finally, we add a route to config/routes.rb so we can see what we’ve built.
+ get "/commits", to: "dolt_commits#index"It’s pretty ugly so we’ll add a stylesheet to make the table a bit more pleasing and voila.
Add Navigation#
The tutorial blog website does not come with a header so we’ll add one now. We’re going to have a commit log and some branch/merge functionality to build and we need a place to control the flow.
In app/views/layouts/application.html.erb we add the following:
+ <header>
+ <a href=<%= root_path %>>
+ <%=image_tag("dolt-rails.png", alt: "Dolt on Rails", height: 50, width: "auto")%>
+ </a>
+
+ <%= link_to "New Article", new_article_path %>
+ <%= link_to "Commit Log", "/commits" %>
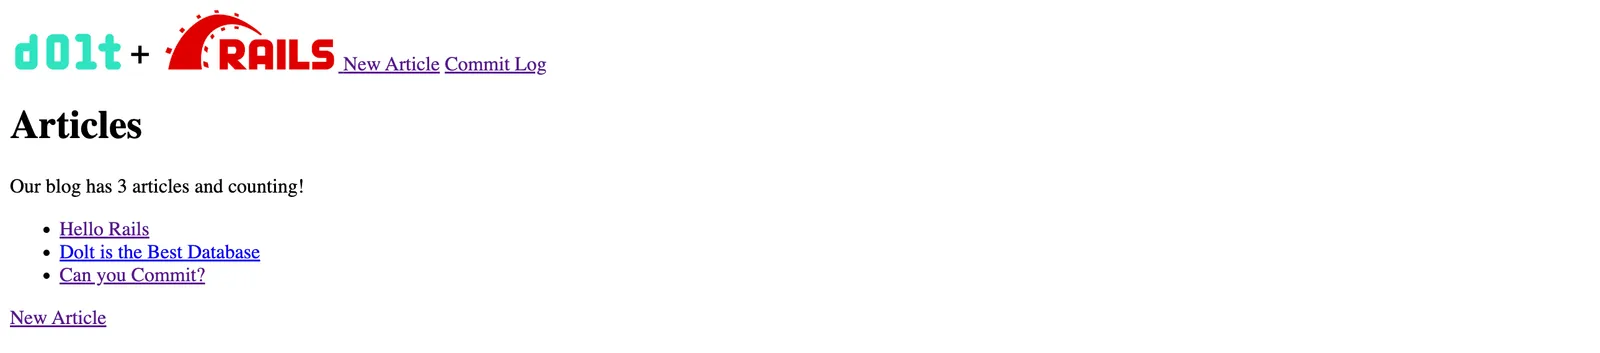
+ </header>And now we have a way to navigate around our website.
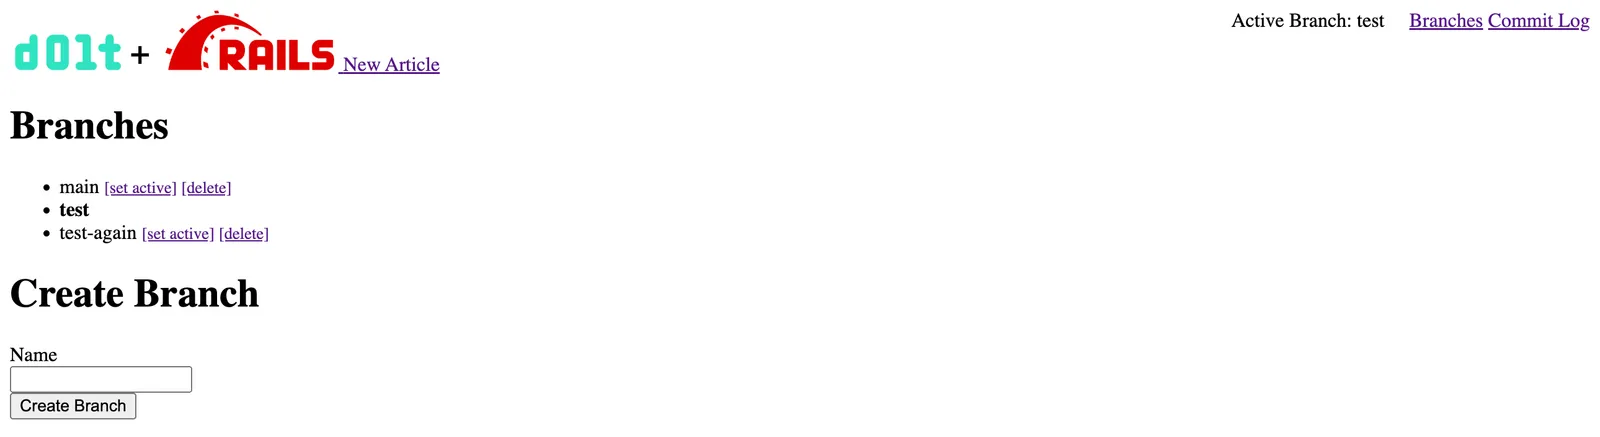
Branches#
To get a page that displays Dolt branches, we follow the same model as Dolt commits. We make a model, controller and view. Finally, we add a route to the page.
diff --git a/app/controllers/branch_controller.rb b/app/controllers/branch_controller.rb
new file mode 100644
index 0000000..f7e2aa6
--- /dev/null
+++ b/app/controllers/branch_controller.rb
@@ -0,0 +1,5 @@
+class BranchController < ApplicationController
+  def index
+    @branches = Branch.all
+  end
+end
diff --git a/app/models/branch.rb b/app/models/branch.rb
new file mode 100644
index 0000000..abb2f7b
--- /dev/null
+++ b/app/models/branch.rb
@@ -0,0 +1,4 @@
+class Branch < ApplicationRecord
+  self.primary_key = 'name'
+  self.table_name  = 'dolt_branches'
+end
diff --git a/app/views/branch/index.html.erb b/app/views/branch/index.html.erb
new file mode 100644
index 0000000..b568e0e
--- /dev/null
+++ b/app/views/branch/index.html.erb
@@ -0,0 +1,12 @@
+<%= stylesheet_link_tag "styles.css" %>
+
+<h1>Branches</h1>
+
+<ul>
+  <% @branches.each do |branch| %>
+    <li>
+      <%= branch.name %>
+    </li>
+  <% end %>
+</table>
+
diff --git a/config/routes.rb b/config/routes.rb
index a939fee..52146cc 100644
--- a/config/routes.rb
+++ b/config/routes.rb
@@ -7,6 +7,7 @@ Rails.application.routes.draw do
   end

   get "/commits", to: "dolt_commits#index"
+  get "/branches", to: "branch#index"

   # Reveal health status on /up that returns 200 if the app boots with no exceptions, otherwise 500.
   # Can be used by load balancers and uptime monitors to verify that the app is live.
And there we have it.

Create a Branch#
First, we need to change our branch model. In branch.rb, we must override the save method to instead of inserting into the dolt_branches table, to call the DOLT_BRANCH() procedure to create the branch. Again procedure syntax follows Git syntax exactly so if you know Git, you know Dolt.
class Branch < ApplicationRecord
    self.primary_key = 'name'
    self.table_name  = 'dolt_branches'

    def save
        branch_name = self.name
        ActiveRecord::Base.connection.execute("CALL DOLT_BRANCH('" + branch_name + "')")
    end
end
Then we modify the controller, branch_controller.rb, and make a create method. We follow the pattern in the Rails tutorial that they used to make articles.
class BranchController < ApplicationController
    def index
    @branches = Branch.all
    @branch   = Branch.new(name: "")
    end

    def create
        @branch = Branch.new(branch_params)

        if @branch.save
            redirect_to index
        else
            render :new, status: :unprocessable_entity
        end
    end

    private
        def branch_params
            params.require(:branch).permit(:name)
        end
    end
end
We add a form to the view so we have the UI to access our model and controller.
@@ -8,5 +8,16 @@
       <%= branch.name %>
     </li>
   <% end %>
   </ul>

+<h1>Create Branch</h1>
+<%= form_with model: @branch do |form| %>
+  <div>
+    <%= form.label :name %><br>
+    <%= form.text_field :name %>
+  </div>
+
+  <div>
+    <%= form.submit %>
+  </div>
+<% end %>
And finally, we add a POST route for create to routes.rb.
   get "/commits", to: "dolt_commits#index"
   get "/branches", to: "branch#index"
+  post "/branches", to: "branch#create"

   # Reveal health status on /up that returns 200 if the app boots with no exceptions, otherwise 500.
   # Can be used by load balancers and uptime monitors to verify that the app is live.
Delete a Branch#
Deleting a branch is very similar to create except we override the destroy/delete methods. As you can see the diff below is very similar to create.
diff --git a/app/controllers/branch_controller.rb b/app/controllers/branch_controller.rb
index d98be68..59f7821 100644
--- a/app/controllers/branch_controller.rb
+++ b/app/controllers/branch_controller.rb
@@ -14,6 +14,13 @@ class BranchController < ApplicationController
     end
   end

+  def destroy
+    @branch = Branch.find(params[:name])
+    @branch.destroy
+
+    redirect_to branches_path
+  end
+
   private
     def branch_params
       params.require(:branch).permit(:name)
diff --git a/app/models/branch.rb b/app/models/branch.rb
index 7701aa7..5cc9c2c 100644
--- a/app/models/branch.rb
+++ b/app/models/branch.rb
@@ -6,4 +6,14 @@ class Branch < ApplicationRecord
     branch_name = self.name
     ActiveRecord::Base.connection.execute("CALL DOLT_BRANCH('" + branch_name + "')")
   end
+
+  def destroy
+    branch_name = self.name
+    ActiveRecord::Base.connection.execute("CALL DOLT_BRANCH('-D', '" + branch_name + "')")
+  end
+
+  def delete
+    branch_name = self.name
+    ActiveRecord::Base.connection.execute("CALL DOLT_BRANCH('-D', '" + branch_name + "')")
+  end
 end
diff --git a/app/views/branch/index.html.erb b/app/views/branch/index.html.erb
index b8287a7..7f69096 100644
--- a/app/views/branch/index.html.erb
+++ b/app/views/branch/index.html.erb
@@ -5,7 +5,10 @@
 <ul>
   <% @branches.each do |branch| %>
     <li>
-      <%= branch.name %>
+      <%= branch.name %> <small><%= link_to "[delete]", "/branches/" + branch.name, data: {
+                            turbo_method: :delete,
+                            turbo_confirm: "Are you sure?"
+                            } %></small>
     </li>
   <% end %>
 </ul>
diff --git a/config/routes.rb b/config/routes.rb
index 7d83cb9..63b2fa3 100644
--- a/config/routes.rb
+++ b/config/routes.rb
@@ -7,8 +7,10 @@ Rails.application.routes.draw do
   end

   get "/commits", to: "dolt_commits#index"
+
   get "/branches", to: "branch#index"
   post "/branches", to: "branch#create"
+  delete "/branches/:name", to: "branch#destroy"

   # Reveal health status on /up that returns 200 if the app boots with no exceptions, otherwise 500.
   # Can be used by load balancers and uptime monitors to verify that the app is live.
Switch Branches#
Now we need to switch branches in our application. This will allow us to create and test articles on a branch before we merge them to production.
Display Active Branch#
First we add an is_active method to our branches model to tell us whether the current branch is the active branch. We do this by using the Dolt function active_branch().
@@ -16,4 +16,14 @@ class Branch < ApplicationRecord
     branch_name = self.name
     ActiveRecord::Base.connection.execute("CALL DOLT_BRANCH('-D', '" + branch_name + "')")
   end
+
+  def is_active
+    result = ActiveRecord::Base.connection.exec_query("select active_branch()")
+    active_branch = result.rows[0][0]
+    if self.name.eql? active_branch
+      return true
+    else
+      return false
+    end
+  end
 end
Then, we add bolding to our view to tell us which branch is active.
 <ul>
   <% @branches.each do |branch| %>
-    <li>
-      <%= branch.name %> <small><%= link_to "[delete]", "/branches/" + branch.name, data: {
-                            turbo_method: :delete,
-                            turbo_confirm: "Are you sure?"
-                            } %></small>
+  <li>
+    <% if branch.is_active %>
+      <b><%= branch.name %></b>
+    <% else %>
+      <%= branch.name %>
+    <% end %>
+      <small><%= link_to "[delete]", "/branches/" + branch.name, data: {
+                turbo_method: :delete,
+                turbo_confirm: "Are you sure?"
+                } %></small>
     </li>
   <% end %>
 </ul>
Change Active Branch#
Now to change the active branch we’re going to rely on Middleware and the DOLT_CHECKOUT() procedure. We build a simple middleware called DoltBranchSelector that changes the branch for every request. We’ll start by hardcoding the branch to test to make sure it works.
class DoltBranchSelector
  def initialize(app)
    @app = app
  end

  def call(env)
    ActiveRecord::Base.connection.execute("CALL DOLT_CHECKOUT('test')")
    @app.call(env)
  end
end
Then, we need to register our middleware. Don’t forget to restart your server after you make this change.
diff --git a/config/application.rb b/config/application.rb
index 94ad5b7..ca287fe 100644
--- a/config/application.rb
+++ b/config/application.rb
@@ -2,6 +2,8 @@ require_relative "boot"

 require "rails/all"

+require_relative '../lib/middleware/dolt_branch_selector'
+
 # Require the gems listed in Gemfile, including any gems
 # you've limited to :test, :development, or :production.
 Bundler.require(*Rails.groups)
@@ -14,7 +16,7 @@ module Blog
     # Please, add to the `ignore` list any other `lib` subdirectories that do
     # not contain `.rb` files, or that should not be reloaded or eager loaded.
     # Common ones are `templates`, `generators`, or `middleware`, for example.
-    config.autoload_lib(ignore: %w(assets tasks))
+    config.autoload_lib(ignore: %w(assets tasks middleware))

     # Configuration for the application, engines, and railties goes here.
     #
@@ -23,5 +25,6 @@ module Blog
     #
     # config.time_zone = "Central Time (US & Canada)"
     # config.eager_load_paths << Rails.root.join("extras")
+    config.middleware.use DoltBranchSelector
   end
 end
Now, we also add an active branch display to our header in application.html.erb.
@@ -19,6 +19,8 @@
</span>
<span style="float:right;">
+ Active Branch: <%= session[:active_branch] %>
+
<%= link_to "Branches", "/branches" %>
<%= link_to "Commit Log", "/commits" %>
</header>And, everything seems to be working!

Set Active Branch in your Application#
Now, we need a way to preserve the active branch across requests. Usually in web applications, this is done using sessions. Rails comes with a built-in session interface.
In our branch controller, we define a set_active method that sets the active branch for the session.
     redirect_to branches_path
   end

+  def set_active
+    @branch = Branch.find(params[:name])
+    session[:active_branch] = @branch.name
+
+    redirect_to branches_path
+  end
+
   private
     def branch_params
       params.require(:branch).permit(:name)
Then, we add some UI to control this method.
diff --git a/app/views/branch/index.html.erb b/app/views/branch/index.html.erb
index 8fe2ee3..4de9b66 100644
--- a/app/views/branch/index.html.erb
+++ b/app/views/branch/index.html.erb
@@ -9,11 +9,15 @@
<b><%= branch.name %></b>
<% else %>
<%= branch.name %>
+ <small>
+ <%= link_to "[set active]", "/branches/" + branch.name %>
+ <%= link_to "[delete]", "/branches/" + branch.name, data: {
+ turbo_method: :delete,
+ turbo_confirm: "Are you sure?"
+ } %>
+
+ </small>
<% end %>
- <small><%= link_to "[delete]", "/branches/" + branch.name, data: {
- turbo_method: :delete,
- turbo_confirm: "Are you sure?"
- } %></small>
</li>
<% end %>
</ul>We add a route.
@@ -9,6 +9,7 @@ Rails.application.routes.draw do
   get "/commits", to: "dolt_commits#index"

   get "/branches", to: "branch#index"
+  get "/branches/:name", to: "branch#set_active"
   post "/branches", to: "branch#create"
   delete "/branches/:name", to: "branch#destroy"
Finally, we modify our middleware to checkout the branch in the session instead of being hardcoded to test.
diff --git a/lib/middleware/dolt_branch_selector.rb b/lib/middleware/dolt_branch_selector.rb
index e92106a..3f42041 100644
--- a/lib/middleware/dolt_branch_selector.rb
+++ b/lib/middleware/dolt_branch_selector.rb
@@ -1,10 +1,17 @@
+
+
 class DoltBranchSelector
   def initialize(app)
     @app = app
   end

   def call(env)
-    ActiveRecord::Base.connection.execute("CALL DOLT_CHECKOUT('test')")
+    session = env['rack.session']
+    active_branch = 'main'
+    if session[:active_branch]
+      active_branch = session[:active_branch]
+    end
+    ActiveRecord::Base.connection.execute("CALL DOLT_CHECKOUT('" + active_branch + "')")
     @app.call(env)
   end
 end
And now for a quick tour. We create an article on a branch.
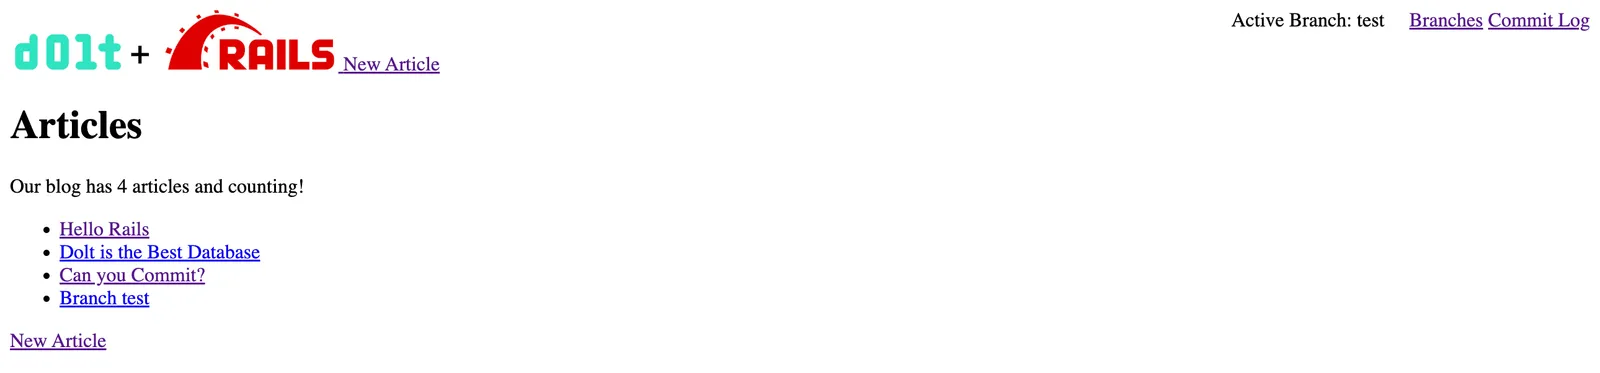
Then we switch the branch to main.
And the article isn’t there.
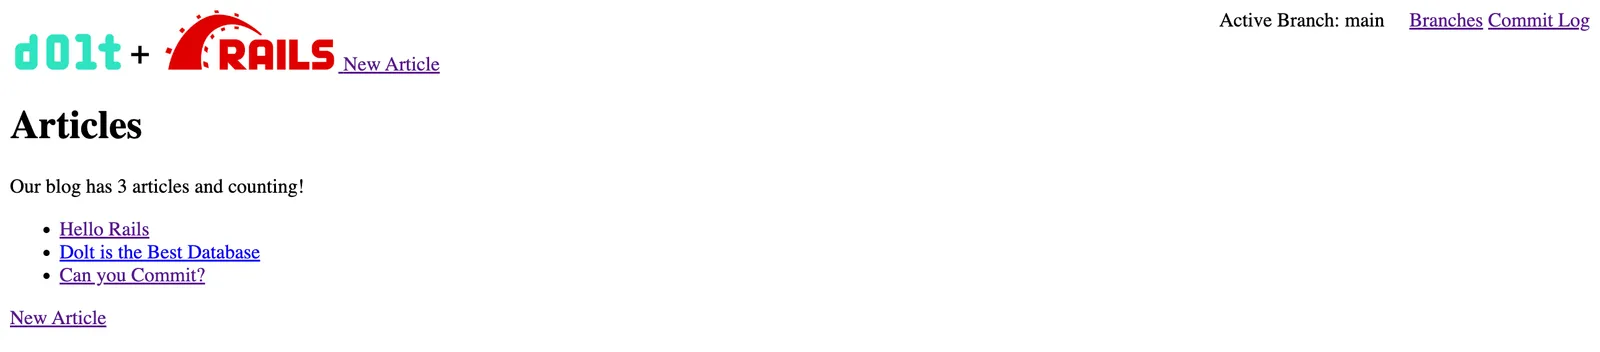
Branching gives your application or users powerful test capabilities.
Merge Branches#
Now for merge. Dolt can merge branches just like Git.
First, we define a merge method in our branch controller. It takes the base branch from the session and the merge branch is passed in in the URL.
     redirect_to branches_path
   end

+  def merge
+    base_branch_name = session[:active_branch]
+    @base_branch  = Branch.find(base_branch_name)
+    @merge_branch = Branch.find(params[:name])
+    @base_branch.merge(@merge_branch)
+
+    redirect_to branches_path
+  end
+
   private
     def branch_params
       params.require(:branch).permit(:name)
Now in our model we define a merge method that calls the DOLT_MERGE() procedure.
       return false
     end
   end
+
+  def merge(merge_branch)
+    merge_branch_name = merge_branch.name
+    ActiveRecord::Base.connection.execute("CALL DOLT_MERGE('" + merge_branch_name + "')")
+  end
+
 end
Then, we add some UI to trigger merges.
       <%= branch.name %>
       <small>
        <%= link_to "[set active]", "/branches/" + branch.name %>
+       <%= link_to "[merge]", "/branches/merge/" + branch.name %>
        <%= link_to "[delete]", "/branches/" + branch.name, data: {
            turbo_method: :delete,
            turbo_confirm: "Are you sure?"
And finally add a route.
   get "/branches", to: "branch#index"
   get "/branches/:name", to: "branch#set_active"
+  get "/branches/merge/:name", to: "branch#merge"
   post "/branches", to: "branch#create"
   delete "/branches/:name", to: "branch#destroy"
This works but there is no feedback to the user that anything is happening. Let’s add some user feedback. We’ll pass status via a URL parameter.
iff --git a/app/controllers/branch_controller.rb b/app/controllers/branch_controller.rb
index fec8265..4215a43 100644
--- a/app/controllers/branch_controller.rb
+++ b/app/controllers/branch_controller.rb
@@ -2,6 +2,7 @@ class BranchController < ApplicationController
   def index
     @branches = Branch.all
     @branch   = Branch.new(name: "")
+    @status   = params[:status]
   end

   def create
@@ -34,7 +35,7 @@ class BranchController < ApplicationController
     @merge_branch = Branch.find(params[:name])
     @base_branch.merge(@merge_branch)

-    redirect_to branches_path
+    redirect_to branches_path + "/Merged " + @merge_branch.name + " into " + base_branch_name, allow_other_host: true
   end

   private
And display the parameter at the top of our branches page if it exists.
 <%= stylesheet_link_tag "styles.css" %>

+<% if @status %>
+  <h2><%= @status %></h2>
+<% end %>
+
 <h1>Branches</h1>
We used this URL pattern to set the active branch so let’s change that URL to branches/activate/<branch> with the diff below:
 <ul>
     <% else %>
       <%= branch.name %>
       <small>
-       <%= link_to "[set active]", "/branches/" + branch.name %>
+       <%= link_to "[set active]", "/branches/activate/" + branch.name %>
        <%= link_to "[merge]", "/branches/merge/" + branch.name %>
        <%= link_to "[delete]", "/branches/" + branch.name, data: {
            turbo_method: :delete,
And in routes.rb:
   get "/commits", to: "dolt_commits#index"

   get "/branches", to: "branch#index"
-  get "/branches/:name", to: "branch#set_active"
+  get "/branches/:status", to: "branch#index"
+  get "/branches/activate/:name", to: "branch#set_active"
   get "/branches/merge/:name", to: "branch#merge"
   post "/branches", to: "branch#create"
   delete "/branches/:name", to: "branch#destroy"
Merge functionality is best played with. A set of screenshots does not do it justice. Get the sample app working using the instructions at the start of this blog. Make a new branch. Add an article or comment. Switch your branch back to main and merge the branch you added a new article on. Magic! Imagine getting everything ready on a test branch and merging your changes into main to deploy to production.
Conclusion#
Wow. That was a a lot of Rails. If you made it this far, thank you. If you just downloaded the code and played with the app, you got a good idea how a version controlled database can supercharge Ruby on Rails by adding branches and merges.
You are now ready to build your own Dolt-powered application using Rails. If this wasn’t enough to get you started, come by our Discord and someone will help you out. If you want to talk to me, just @timsehn.