
We’re on a mission to show that Dolt, the world’s first version controlled database, works with all your favorite tools in all your favorite languages. Today we head back to Python-land and show you how to integrate Dolt with Django, a popular website builder with a built in ORM.

We integrated Dolt with Django and blogged about it twice as part of our Nautobot integration. We also showed off Dolt with another popular Python library, SQLAlchemy. But we haven’t done a proper Getting Started blog complete with example code to show Dolt works with Django. So, buckle up. Here we go.
TLDR; The Code#
If you don’t want to run through the tutorial and just want the Polls code with branches implemented to play with, it is available in this GitHub repository.
To get it to work, follow these steps which should be pretty familiar to Django users.
- Install dependencies
- Clone the sample repository from GitHub
- Start a
dolt sql-serverand create a database calledmydatabase - Run migrations using
python manage.py migrateto create the required database tables - Create an admin user using
python manage.py createsuperuser - Start the webserver using
python manage.py runserver - Hit http://localhost:8000/polls or http://localhost:8000/admin
NOTE: For a couple of my colleagues, the migration step failed with
NameError: name '_mysql' is not defined. This was fixed by runningexport DYLD_LIBRARY_PATH=/usr/local/mysql/lib. There are some other solutions in this blog if you get the same error.
Install Dolt, Python, Django, and the Python MySQL client.#
To get this demo going, we’re going to need Dolt, Python, Django, and the Python MySQL client (ie. mysqlclient).
Let’s start with Dolt. Dolt is a single ~103 megabyte program.
$ du -h ~/go/bin/dolt
103M	/Users/timsehn/go/bin/dolt
It’s really easy to install. Download it and put it on your PATH. We have a bunch of ways to make this even easier for most platforms.
Here is a convenience script that does that for *NIX platforms. Open a terminal and run it.
sudo bash -c 'curl -L https://github.com/dolthub/dolt/releases/latest/download/install.sh | sudo bash'For the rest of this blog entry, I’m going to assume you are on a *NIX based system and use bash when interacting on the command line.
I already had Python on my Mac, installed via Homebrew. I also take care to make sure it is the default Python used when I type python in a terminal.
$ which python
python: aliased to /opt/homebrew/bin/python3
From there, I need Django. The Django install docs recommend running:
$ python -m pip install Djangowhich did the trick for me. The last thing I needed was the mysqlclient package which can be installed with:
$ python -m pip install mysqlclientAdditionally, I needed to point the installer at the right OpenSSL to link at like so:
$ LDFLAGS="-L$(brew --prefix openssl)/lib" pip install mysqlclientBut you may not need to do that. Note, I also have MySQL installed on this machine and the client C++ libraries may also be required for this Python library install. On Mac, if you use Homebrew, brew install mysql should install MySQL if you need it.
With that you should be good to go on dependencies for the rest of this article.
Django Sample App#
The Django Documentation has a tutorial which has you build a Polling application. We’re going to use that and add some cool version control features to it, leveraging Dolt. I just showed off Dolt working with PHP’s Laravel and this approach worked really well.
Start with the Tutorial#
The Django Tutorial has eight steps at the end of which you will have a functioning Polling application. The only thing off script you need to do is switch from SQLite to MySQL for your database and have a running Dolt acting as your MySQL instance.
First, I create a project name dolt_django using:
$ django-admin startproject dolt_djangoLet’s make sure it works by running:
$ python manage.py runserver
Watching for file changes with StatReloader
Performing system checks...

System check identified no issues (0 silenced).

You have 18 unapplied migration(s). Your project may not work properly until you apply the migrations for app(s): admin, auth, contenttypes, sessions.
Run 'python manage.py migrate' to apply them.
January 18, 2024 - 22:00:37
Django version 5.0.1, using settings 'dolt_django.settings'
Starting development server at http://127.0.0.1:8000/
Quit the server with CONTROL-C.
Let’s check http://127.0.0.1:8000/ to make sure it worked.
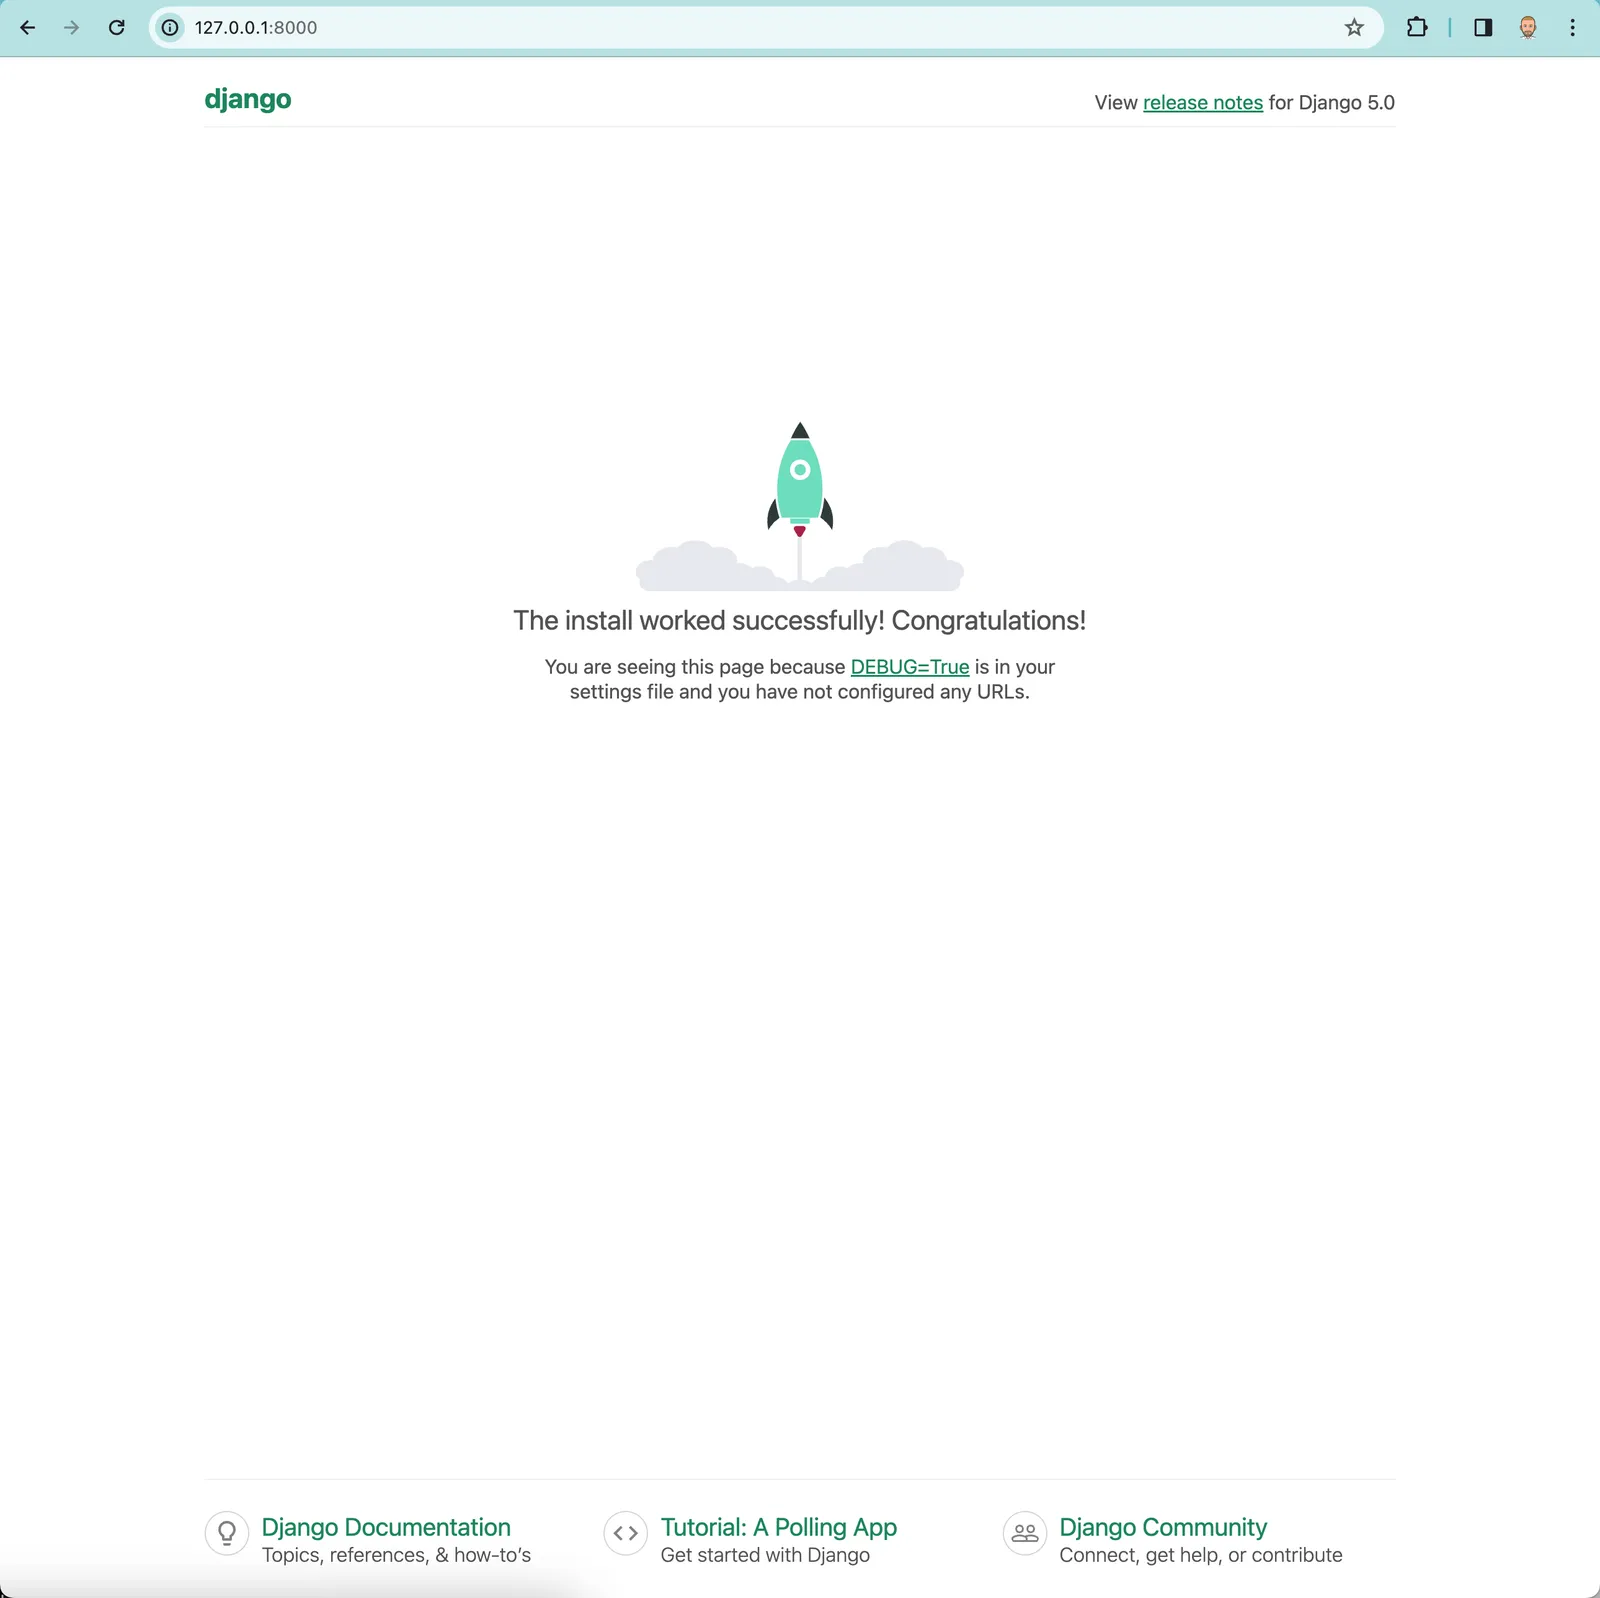
Seems like we’re on the right track.
Now, I’m going to version this project using Git and push it to GitHub so you all can use it later. To do this, I create the repository on GitHub, git init, set GitHub as my remote, and push. The dolt_django GitHub repo is born.
From the tutorial, I also have to set up the polls app. To do this I kill my running server and run:
$ python manage.py startapp pollsThen, I commit the results to Git.
$ git status
On branch main
Your branch is up to date with 'origin/main'.

Untracked files:
  (use "git add <file>..." to include in what will be committed)
	db.sqlite3
	dolt_django/__pycache__/
	polls/

nothing added to commit but untracked files present (use "git add" to track)
$ git add polls/*
$ git commit -am "Created Polls app using \`python manage.py startapp polls\`"
[main 1a22422] Created Polls app using `python manage.py startapp polls`
 7 files changed, 18 insertions(+)
 create mode 100644 polls/__init__.py
 create mode 100644 polls/admin.py
 create mode 100644 polls/apps.py
 create mode 100644 polls/migrations/__init__.py
 create mode 100644 polls/models.py
 create mode 100644 polls/tests.py
 create mode 100644 polls/views.py
I then follow the steps to get the initial page to render and start the server again.

And again, it works. Now on to more complicated stuff.
Set Up Dolt as Your Database#
Now, I need to set up Dolt as my database.
First, we need to start a MySQL-compatible Dolt server and create a database. To do this, it’s best to open another terminal because you’re going to leave a running Dolt process.
Navigate to the place you would like your dolt server running. I chose ~/dolthub/djangodb
$ mkdir djangodb
$ cd djangodb
$ dolt sql-server
Starting server with Config HP="localhost:3306"|T="28800000"|R="false"|L="info"|S="/tmp/mysql.sock"
Now, in another terminal, we need to connect a client and create a database called mydatabase which is the recommended database name in the Django tutorial. We’ll use the built in dolt sql client to do that.
$ cd ~/dolthub/djangodb
$ dolt sql
Last login: Fri Jan 12 14:14:37 on ttys003
$ cd dolthub/djangodb
$ dolt sql
# Welcome to the DoltSQL shell.
# Statements must be terminated with ';'.
# "exit" or "quit" (or Ctrl-D) to exit.
> create database mydatabase;
> use mydatabase;
mydatabase/main>
I would leave that client terminal open just in case you want to inspect what’s going on in Dolt at any time. So at this point you should have three terminals open each running:
python manage.py runserverdolt sql-serverdolt sql
You’ll probably want an additional terminal or editor open to edit Python code.
Now, we need to point our Django application at that running database. in dolt_django/settings.py we change the databases section to:
DATABASES = {
    'default': {
        "ENGINE": "django.db.backends.mysql",
        "NAME": "mydatabase",
        "USER": "root",
        "PASSWORD": "",
        "HOST": "127.0.0.1",
        "PORT": "3306",
    }
}
This looks exactly like you are connecting to a MySQL database because Dolt is MySQL compatible.
Once we have that set, we have to create all the relevant database tables. Django has the concept of “migrations” to do this. We execute the migrations with:
$ python manage.py migrate
Operations to perform:
  Apply all migrations: admin, auth, contenttypes, sessions
Running migrations:
  Applying contenttypes.0001_initial... OK
  Applying auth.0001_initial... OK
  Applying admin.0001_initial... OK
  Applying admin.0002_logentry_remove_auto_add... OK
  Applying admin.0003_logentry_add_action_flag_choices... OK
  Applying contenttypes.0002_remove_content_type_name... OK
  Applying auth.0002_alter_permission_name_max_length... OK
  Applying auth.0003_alter_user_email_max_length... OK
  Applying auth.0004_alter_user_username_opts... OK
  Applying auth.0005_alter_user_last_login_null... OK
  Applying auth.0006_require_contenttypes_0002... OK
  Applying auth.0007_alter_validators_add_error_messages... OK
  Applying auth.0008_alter_user_username_max_length... OK
  Applying auth.0009_alter_user_last_name_max_length... OK
  Applying auth.0010_alter_group_name_max_length... OK
  Applying auth.0011_update_proxy_permissions... OK
  Applying auth.0012_alter_user_first_name_max_length... OK
  Applying sessions.0001_initial... OK
If we pop over to the Dolt SQL terminal, we can see the results:
mydatabase/main> show tables;
+----------------------------+
| Tables_in_mydatabase       |
+----------------------------+
| auth_group                 |
| auth_group_permissions     |
| auth_permission            |
| auth_user                  |
| auth_user_groups           |
| auth_user_user_permissions |
| django_admin_log           |
| django_content_type        |
| django_migrations          |
| django_session             |
+----------------------------+
10 rows in set (0.00 sec)
Now is a good time to make a Dolt commit, just in case we ever want to go back to this point in time. Dolt commits are just like Git commits. They preserve the state of your database at that point in time.
In SQL, Dolt version control functionality is exposed as procedures, system tables, or functions. They are names after their Git command line equivalent and follow the same command line convention for arguments. If you know how to use Git, you already know how to use Dolt.
In this case we’re looking for call dolt_commit.
mydatabase/main> call dolt_commit('-Am', 'Initial Django migrations');
+----------------------------------+
| hash                             |
+----------------------------------+
| t2v69v7b5ogurrn5mgqpo6u7ogg2soer |
+----------------------------------+
1 row in set (0.01 sec)

mydatabase/main> select * from dolt_log;
+----------------------------------+---------------------+-------------------------------+---------------------+----------------------------+
| commit_hash                      | committer           | email                         | date                | message                    |
+----------------------------------+---------------------+-------------------------------+---------------------+----------------------------+
| t2v69v7b5ogurrn5mgqpo6u7ogg2soer | __dolt_local_user__ | __dolt_local_user__@localhost | 2024-01-18 23:33:28 | Initial Django migrations  |
| nl68qhqka20jfmbiveogl1f2smi6jv8g | timsehn             | tim@dolthub.com               | 2024-01-18 23:28:13 | Initialize data repository |
+----------------------------------+---------------------+-------------------------------+---------------------+----------------------------+
2 rows in set (0.00 sec)
Additionally, after defining my polls model and registering it, I create an additional migration and run it.
$ python manage.py makemigrations polls
Migrations for 'polls':
  polls/migrations/0001_initial.py
    - Create model Question
    - Create model Choice
$ python manage.py migrate
Operations to perform:
  Apply all migrations: admin, auth, contenttypes, polls, sessions
Running migrations:
  Applying polls.0001_initial... OK
I can see the results in Dolt:
mydatabase/main> show tables;
+----------------------------+
| Tables_in_mydatabase       |
+----------------------------+
| auth_group                 |
| auth_group_permissions     |
| auth_permission            |
| auth_user                  |
| auth_user_groups           |
| auth_user_user_permissions |
| django_admin_log           |
| django_content_type        |
| django_migrations          |
| django_session             |
| polls_choice               |
| polls_question             |
+----------------------------+
12 rows in set (0.00 sec)

mydatabase/main> describe polls_question;
+---------------+--------------+------+-----+---------+----------------+
| Field         | Type         | Null | Key | Default | Extra          |
+---------------+--------------+------+-----+---------+----------------+
| id            | bigint       | NO   | PRI | NULL    | auto_increment |
| question_text | varchar(200) | NO   |     | NULL    |                |
| pub_date      | datetime(6)  | NO   |     | NULL    |                |
+---------------+--------------+------+-----+---------+----------------+
3 rows in set (0.00 sec)
So, I make another Dolt commit just in case I want to take the database back to this fresh state.
mydatabase/main> call dolt_commit('-Am', 'Polls Migrations');
+----------------------------------+
| hash                             |
+----------------------------------+
| c26ituckamjep728onl1en7c1nek34o0 |
+----------------------------------+
1 row in set (0.01 sec)
That’s it. Dolt is ready for our Django app!
Finish the Tutorial#
Now, it’s time to write some code. It took me about two hours to work through the rest of the Django tutorial. At the end I had a fancy Polling website with some interesting questions.
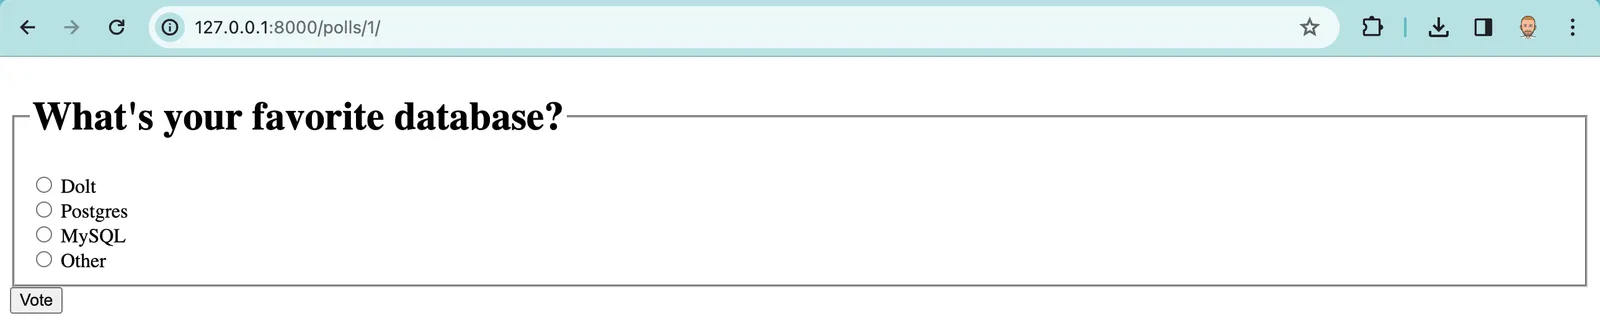
Check out out the source code at this commit to see where I was at code-wise.
Add Dolt Commits#
Now, we need to add our first Dolt feature. Like a Git commit, a Dolt commit saves the state of your database for future reference. You can branch, diff and merge at Dolt commits.
Automatic Commits#
Whenever someone votes or modifies a question using the admin console, we would like to make a Dolt commit.
As I mentioned earlier, Dolt version control functionality is exposed as procedures, system tables, or functions. Version control write operations, like dolt_commit(), are procedures. So we need to execute a stored procedure using raw SQL in Django. This can be done with the following code:
with connection.cursor() as cursor:
    cursor.execute("CALL DOLT_COMMIT('-Am', 'Some message')")
We just need to execute that code after every write database transaction. You have two options for overriding the save method in Django:
- Use inheritance to override the save method in your model subclass.
- Use Django signals.
I went with inheritance instead of Signals because this is a simple example. For more complicated applications, like the one we end up with at the end of this blog, Signals is the way to go. We’ve previously blogged about the Signal approach.
My models.py ends up looking like this:
import datetime

from django.db import models
from django.db import models, connection
from django.utils import timezone
from django.contrib import admin

def _dolt_commit(message):
    with connection.cursor() as cursor:
        cursor.execute("CALL DOLT_COMMIT('-Am', '" + message + "')")

class Question(models.Model):
    question_text = models.CharField(max_length=200)
    pub_date = models.DateTimeField("date published")

    def was_published_recently(self):
        now = timezone.now()
        return now - datetime.timedelta(days=1) <= self.pub_date <= now

    def save(self, *args, **kwargs):
        super(Question, self).save(*args, **kwargs)

        _dolt_commit("Saved a question")

class Choice(models.Model):
    question = models.ForeignKey(Question, on_delete=models.CASCADE)

    def __str__(self):
        return self.choice_text

    def save(self, *args, **kwargs):
        super(Choice, self).save(*args, **kwargs)

        _dolt_commit("Saved a choice")
And I can confirm from the dolt_log system table that Django is making Dolt commits after I tested by making a new question with three choices in the Django admin interface:
mydatabase/main> select * from dolt_log;
+----------------------------------+---------------------+-------------------------------+---------------------+----------------------------+
| commit_hash | committer | email | date | message |
+----------------------------------+---------------------+-------------------------------+---------------------+----------------------------+
| dcuhpk3phivf1vho104snnnngg2ud7av | root | root@% | 2024-01-20 00:06:46 | Saved a choice |
| nest4lu7m9hu33qa2uch01k5630calnj | root | root@% | 2024-01-20 00:06:46 | Saved a choice |
| a1k4qem843d8o5urbjqud67hm0phe26o | root | root@% | 2024-01-20 00:06:45 | Saved a choice |
| cqdqtquhnris3veu2rn3o8ef823rkspc | root | root@% | 2024-01-20 00:06:45 | Saved a question |
| cmgaqk9sfrt7oqs2qtmm9ae9n0iva6r5 | root | root@% | 2024-01-20 00:04:08 | Saved a choice |
| h8rsaadp8lu00ne6rm3d2p87sprkcud8 | root | root@% | 2024-01-20 00:02:35 | Test message |
| c26ituckamjep728onl1en7c1nek34o0 | __dolt_local_user__ | __dolt_local_user__@localhost | 2024-01-19 19:17:50 | Polls Migrations |
| t2v69v7b5ogurrn5mgqpo6u7ogg2soer | __dolt_local_user__ | __dolt_local_user__@localhost | 2024-01-18 23:33:28 | Initial Django migrations |
| nl68qhqka20jfmbiveogl1f2smi6jv8g | timsehn | tim@dolthub.com | 2024-01-18 23:28:13 | Initialize data repository |
+----------------------------------+---------------------+-------------------------------+---------------------+----------------------------+
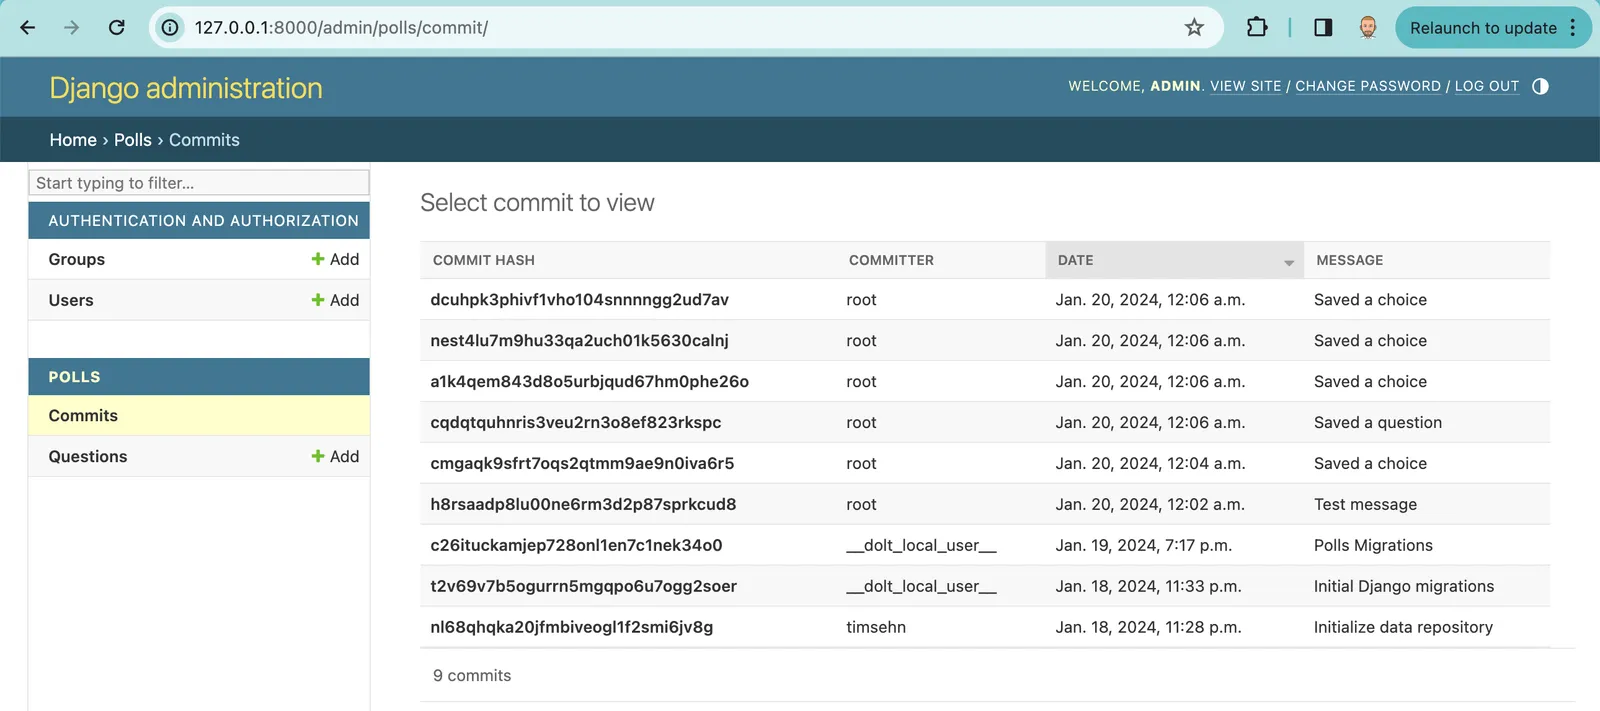
9 rows in set (0.00 sec)Add a Commit Log#
Now, let’s add a commit log in the Admin console. This is really easy to do in Django.
Commits are stored in the dolt_log system table. To expose the dolt_log system table to Django, we need to describe the table in models.py. The important thing here is to set the table to managed = False in the Meta class. This tells Django not to create the table. It exists already. Then we add all the fields in the dolt_log table to the model, noting that the commit_hash field is the primary key. Note, we also set it to order by date descending.
class Commit(models.Model):
    commit_hash = models.CharField(primary_key=True, max_length=20)
    committer = models.CharField(max_length=100)
    email = models.CharField(max_length=100)
    date = models.DateTimeField()
    message = models.TextField()

    class Meta:
        managed = False
        db_table = "dolt_log"
        verbose_name_plural = "commits"
        ordering = ["-date"]

    def __str__(self):
        return self.commit_hash
Then, we add a read-only admin display in admin.py.
class CommitAdmin(admin.ModelAdmin):
    list_display = ['commit_hash', 'committer', 'date', 'message']

    def has_change_permission(self, request, obj=None):
        return False

    def has_delete_permission(self, request, obj=None):
        return False

    def has_add_permission(self, request, obj=None):
        return False

    readonly = ['commit_hash', 'committer', 'email', 'date', 'message']

admin.site.register(Commit, CommitAdmin)
And voila, we have a commit log. Don’t forget to include the Commit using from .models import Choice, Question, Commit in admin.py.
Add Branch Functionality#
The Django Admin interface is an ideal place to add version control functionality.
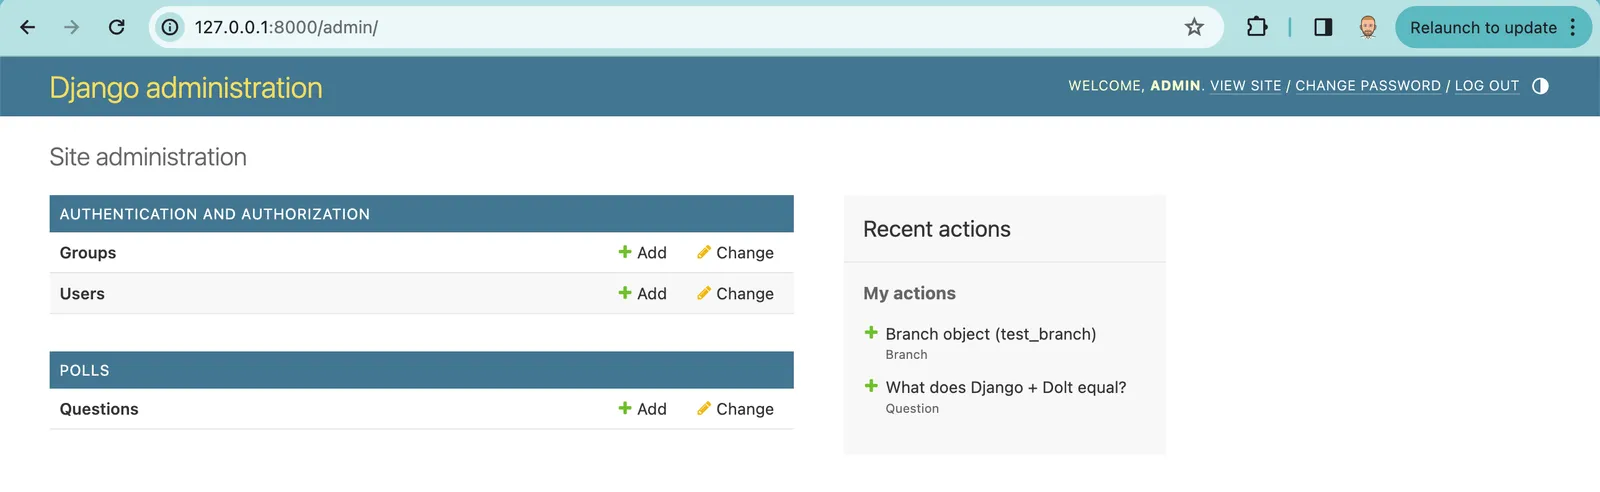
Let’s say we want to add branching functionality to our polling application. We want to create and delete branches in the admin interface. We want to set branches as active, meaning all reads and writes to the polling application happen on the active branch. This could be used for testing new questions or user interface changes without effecting the “main” branch. After we review what the application looks like on a branch, we can merge that branch into main. This process could get arbitrarily complicated with diffs and conflicts. You could make a full Pull Request workflow in the Django admin interface if you wanted to! Dolt makes this all possible.
Let’s walk through how.
Create Branches#
Dolt exposes branch information via the built-in system table, dolt_branches. Branch creation and deletion is handled by the dolt_branch() procedure.
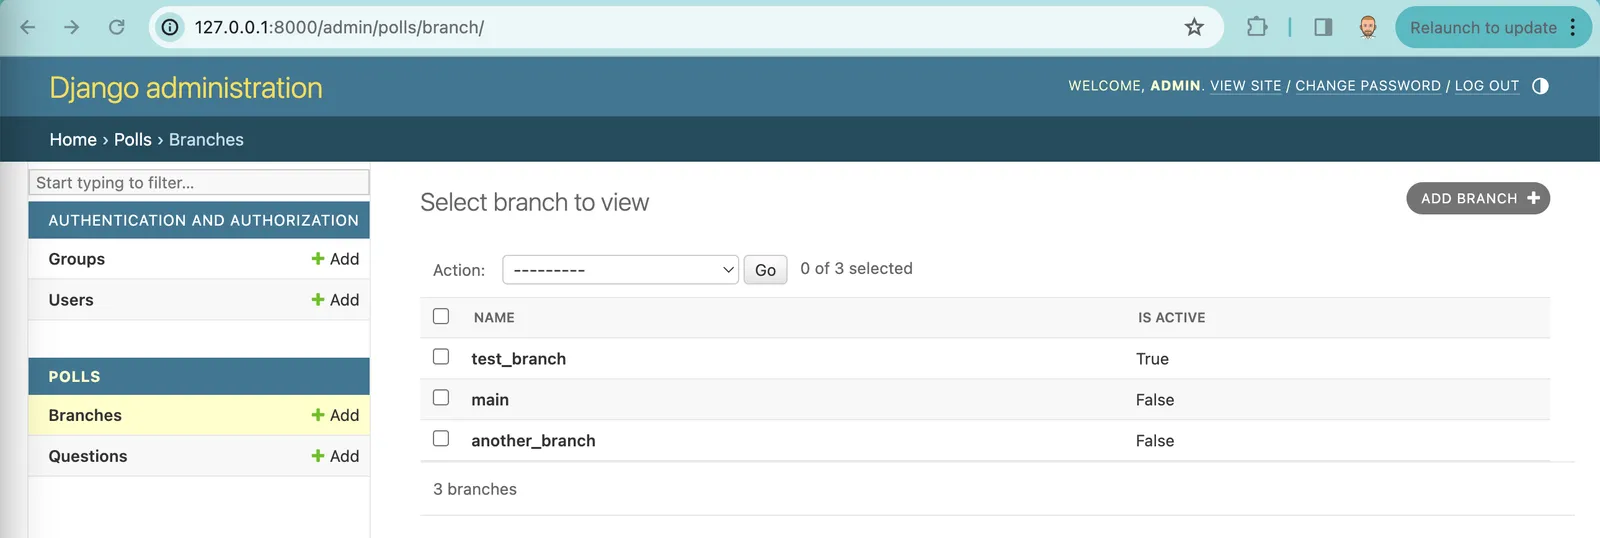
Like the dolt_log system table above for commits, to expose the dolt_branches system table to Django, we need to describe the table in models.py. Again we set managed = False in the Meta class to tell Django the table already exists. Then we add all the fields in the dolt_branches table to the model with the name field is the primary key. Finally, we override the save method to call dolt_branch() instead of inserting into the dolt_branches table as it would do normally.
Here is the working models.py.
class Branch(models.Model):
    """ Expose the `dolt_branches` system table """
    name = models.CharField(primary_key=True, max_length=400)
    hash = models.CharField(max_length=20)
    latest_committer = models.CharField(max_length=100)
    latest_committer_email = models.CharField(max_length=100)
    latest_commit_date = models.DateTimeField()
    latest_commit_message = models.TextField()

    class Meta:
        managed = False
        db_table = "dolt_branches"
        verbose_name_plural = "branches"

    def __str__(self):
        return self.name

    def save(self, *args, **kwargs):
        with connection.cursor() as cursor:
            branch_name = self.name
            cursor.execute("CALL DOLT_BRANCH('" + branch_name + "')")
Then, we need to expose that model to the admin interface. To do this we need to make a slight modification. We need to set all fields but the name field as read only so the admin users can’t modify system generated branch values like hash or latest_committer. We also want to only allow editing the name field when we create a branch. To do this, we override the get_readonly_fields method in admin.py.
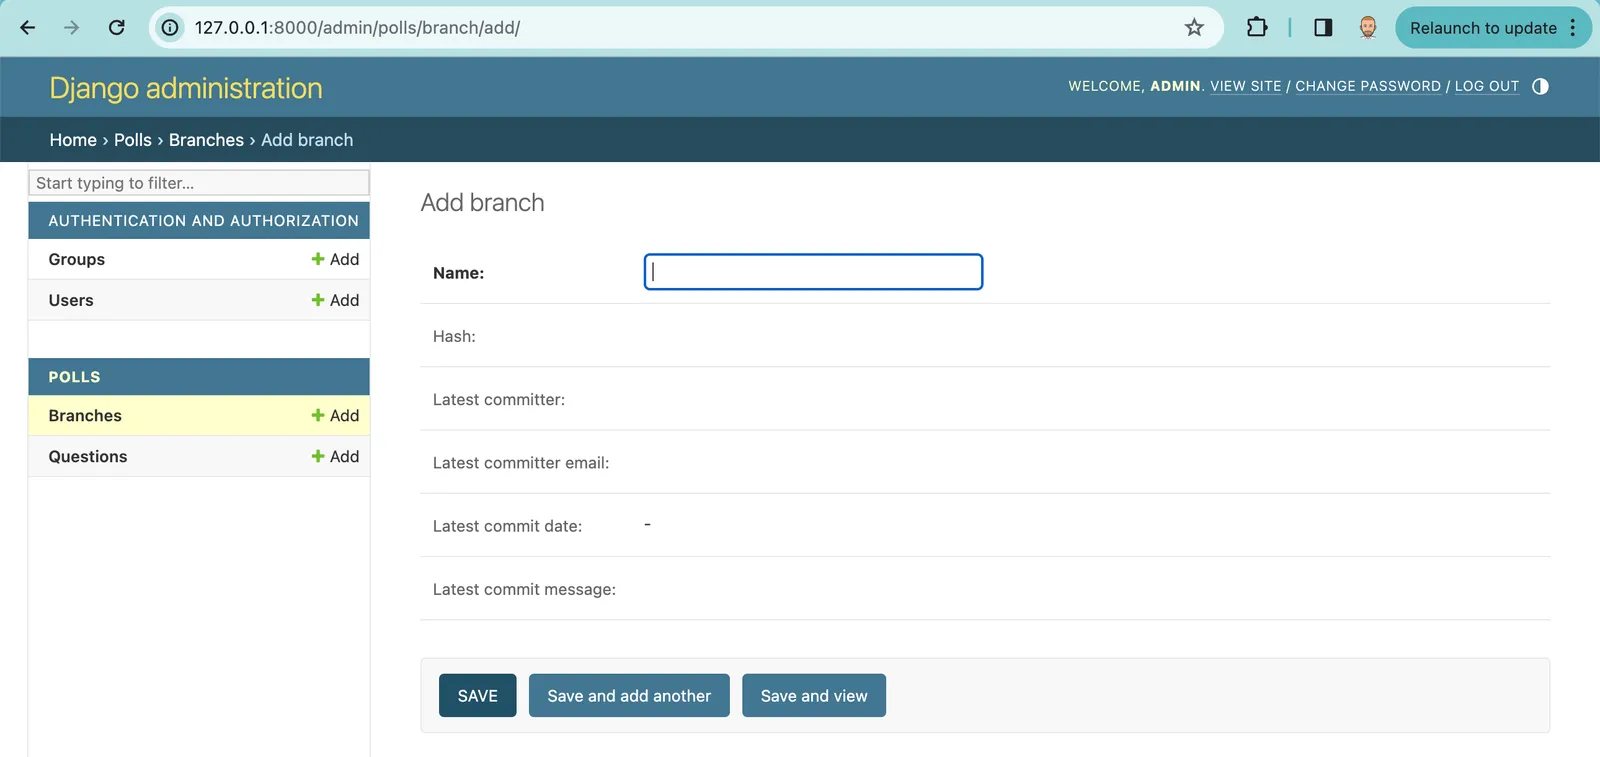
class BranchAdmin(admin.ModelAdmin):
def get_readonly_fields(self, request, obj=None):
if obj: # obj is not None, so this is an edit
return ['name', 'hash', 'latest_committer', 'latest_committer_email', 'latest_commit_date', 'latest_commit_message']
else: # This is an addition
return ['hash', 'latest_committer', 'latest_committer_email', 'latest_commit_date', 'latest_commit_message']
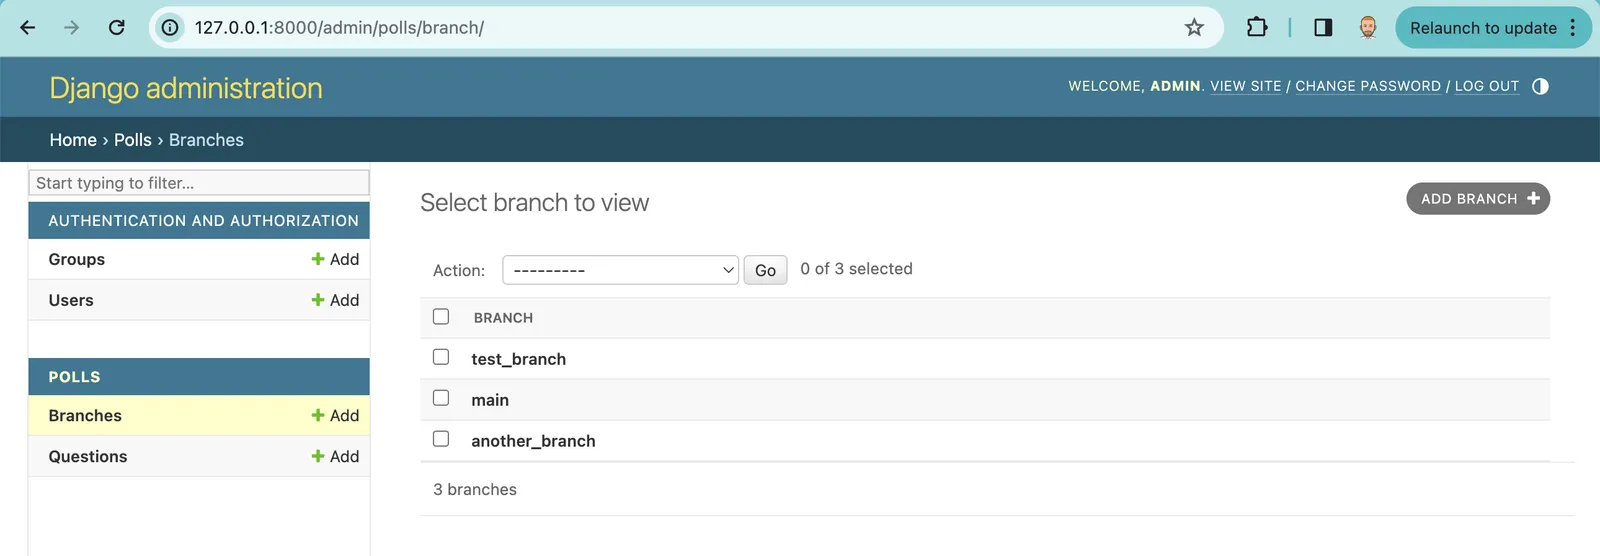
admin.site.register(Branch, BranchAdmin)After these modifications we can view and create branches in the admin interface for our Polling application.
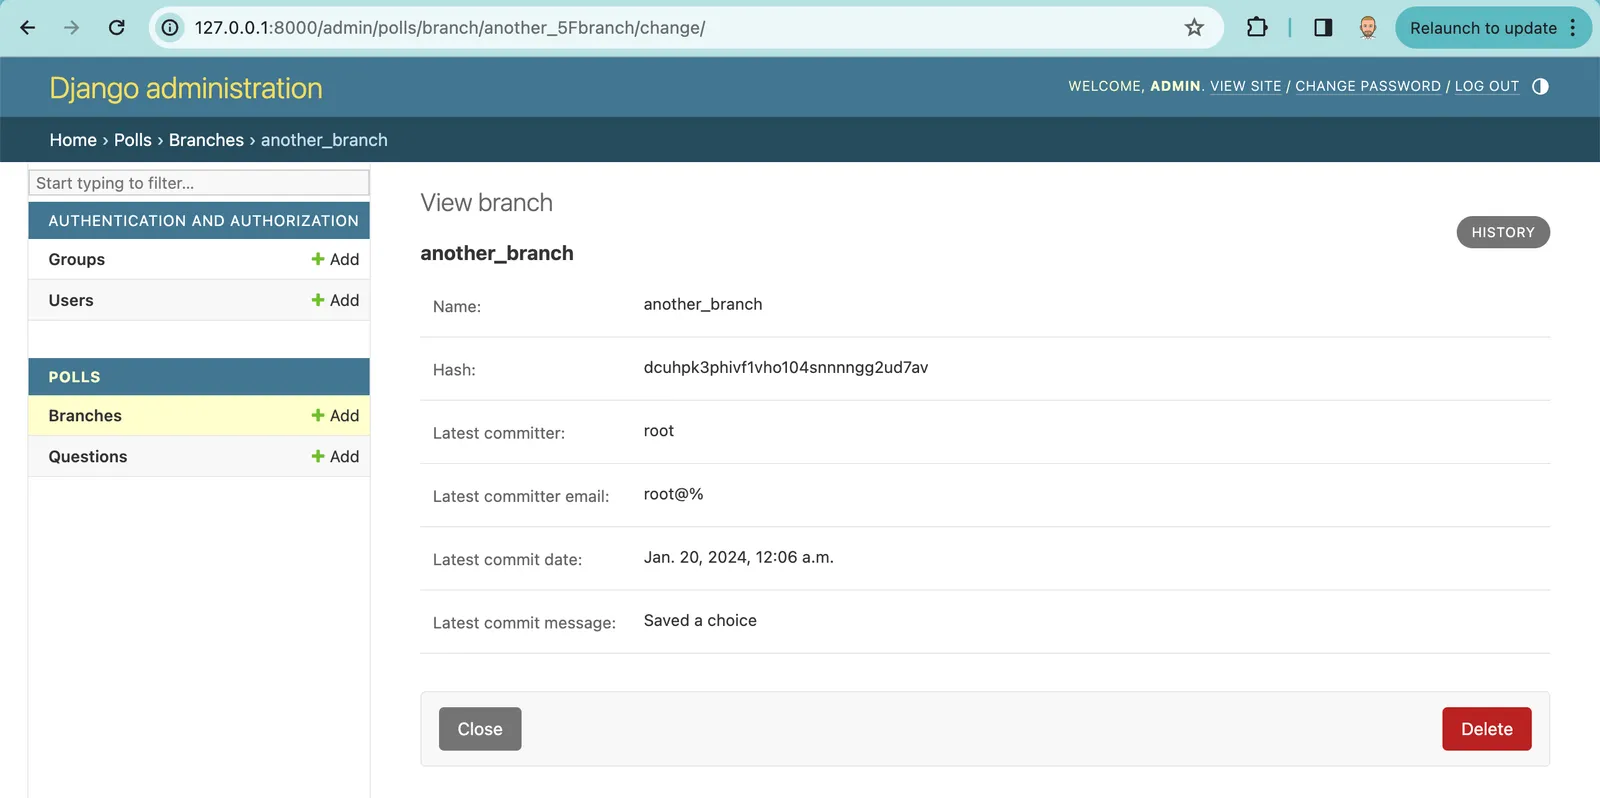
Delete Branches#
To add delete branch functionality we must override delete method to use the dolt_branch() procedure, similarly to the way we modified the save method. This could probably use some error handling like not allowing you to delete the last branch but we’ll leave that as an exercise for the reader.
    def delete(self, *args, **kwargs):
        with connection.cursor() as cursor:
            branch_name = self.name
            cursor.execute("CALL DOLT_BRANCH('-D', '" + branch_name + "')")
We also want to disable the ability to edit branch metadata. The easiest way to do this is to override the has_change_permission method.
    def has_change_permission(self, request, obj=None):
        return False
And now, we can view branch details and delete branches if need be.
Branch Multi-delete#
To be able to delete branches from the list view you also have to override the QuerySet functionality to not try and delete from the branches table. To do that you add this override to your models.py:
+class BranchQuerySet(models.QuerySet):
+    def delete(self, *args, **kwargs):
+        for obj in self:
+            with connection.cursor() as cursor:
+                branch_name = obj.name
+                cursor.execute("CALL DOLT_BRANCH('-D', '" + branch_name + "')")
+
 class Branch(models.Model):
     """ Expose the `dolt_branches` system table """
     name = models.CharField(primary_key=True, max_length=400)
@@ -67,6 +74,8 @@ class Branch(models.Model):
     latest_commit_date = models.DateTimeField()
     latest_commit_message = models.TextField()

+    objects = BranchQuerySet.as_manager()
Switch Branches#
Now we have the ability to create and delete branches using the Django admin interface. We now want to be able to switch which branch the application uses to make reads and writes.
The best way to handle branch functionality from Dolt in Django is using a custom Middleware. Django Middleware “is a framework of hooks into Django’s request/response processing. It’s a light, low-level “plugin” system for globally altering Django’s input or output.” Sounds like exactly what we need. We will change the active branch to what we want when a request comes in.
Let’s start by changing the branch to test_branch using middleware and figure out where to set the active branch later. We first create the polls/middleware/dolt_branch_middleware.py file and put the following code in it. Note the use of the dolt_checkout() procedure to switch branches. Dolt follows the Git command line conventions strictly. If you know how to use Git, you know how to use Dolt.
rom django.db import connection

class DoltBranchMiddleware:
    def __init__(self, get_response):
        self.get_response = get_response
        # One-time configuration and initialization.

    def __call__(self, request):
        with connection.cursor() as cursor:
            cursor.execute("CALL DOLT_CHECKOUT('test_branch')")

        response = self.get_response(request)

        return response
Then in setting.py, I add my new middleware:
MIDDLEWARE = [
'polls.middleware.dolt_branch_middleware.DoltBranchMiddleware',
'django.middleware.security.SecurityMiddleware',
'django.contrib.sessions.middleware.SessionMiddleware',
'django.middleware.common.CommonMiddleware',
'django.middleware.csrf.CsrfViewMiddleware',
'django.contrib.auth.middleware.AuthenticationMiddleware',
'django.contrib.messages.middleware.MessageMiddleware',
'django.middleware.clickjacking.XFrameOptionsMiddleware',
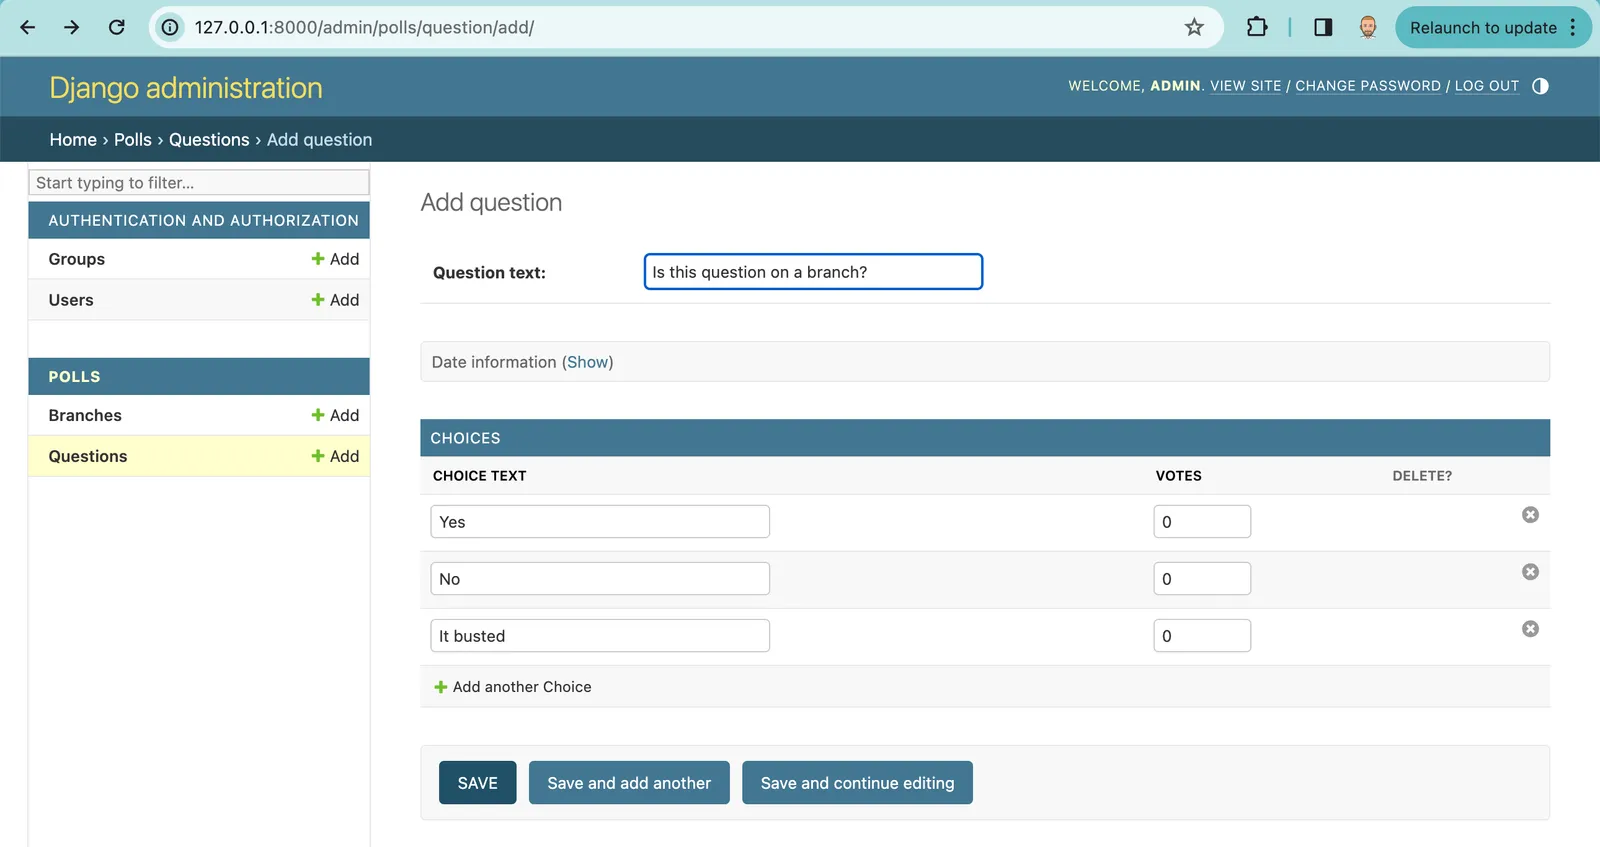
]Then I create a new question in the admin interface.
And now I pop over to my database console. On main, I do not see the new question:
mydatabase/main> select * from polls_question;
+----+--------------------------------+----------------------------+
| id | question_text                  | pub_date                   |
+----+--------------------------------+----------------------------+
| 1  | What's your favorite database? | 2024-01-19 19:24:28.729529 |
| 2  | What does Django + Dolt equal? | 2024-01-20 00:06:44        |
+----+--------------------------------+----------------------------+
2 rows in set (0.00 sec)
But I do see the new question on test-branch:
mydatabase/main> call dolt_checkout('test_branch');
+--------+----------------------------------+
| status | message                          |
+--------+----------------------------------+
| 0      | Switched to branch 'test_branch' |
+--------+----------------------------------+
1 row in set (0.00 sec)

mydatabase/test_branch> select * from polls_question;
+----+--------------------------------+----------------------------+
| id | question_text                  | pub_date                   |
+----+--------------------------------+----------------------------+
| 1  | What's your favorite database? | 2024-01-19 19:24:28.729529 |
| 2  | What does Django + Dolt equal? | 2024-01-20 00:06:44        |
| 3  | Is this question on a branch?  | 2024-01-23 22:43:44        |
+----+--------------------------------+----------------------------+
3 rows in set (0.00 sec)
It’s working!
Let’s finish by displaying the active branch in the admin user interface. To do this I add the following methods to the Branch class in my models.py:
    def active_branch(self):
        with connection.cursor() as cursor:
            cursor.execute("SELECT active_branch();")
            return cursor.fetchone()[0]

    def is_active(self):
        if ( self.name == self.active_branch() ):
            return True
        else:
            return False
Then I show the results of the is_active() method by adding it to the list_display in the admin.py:
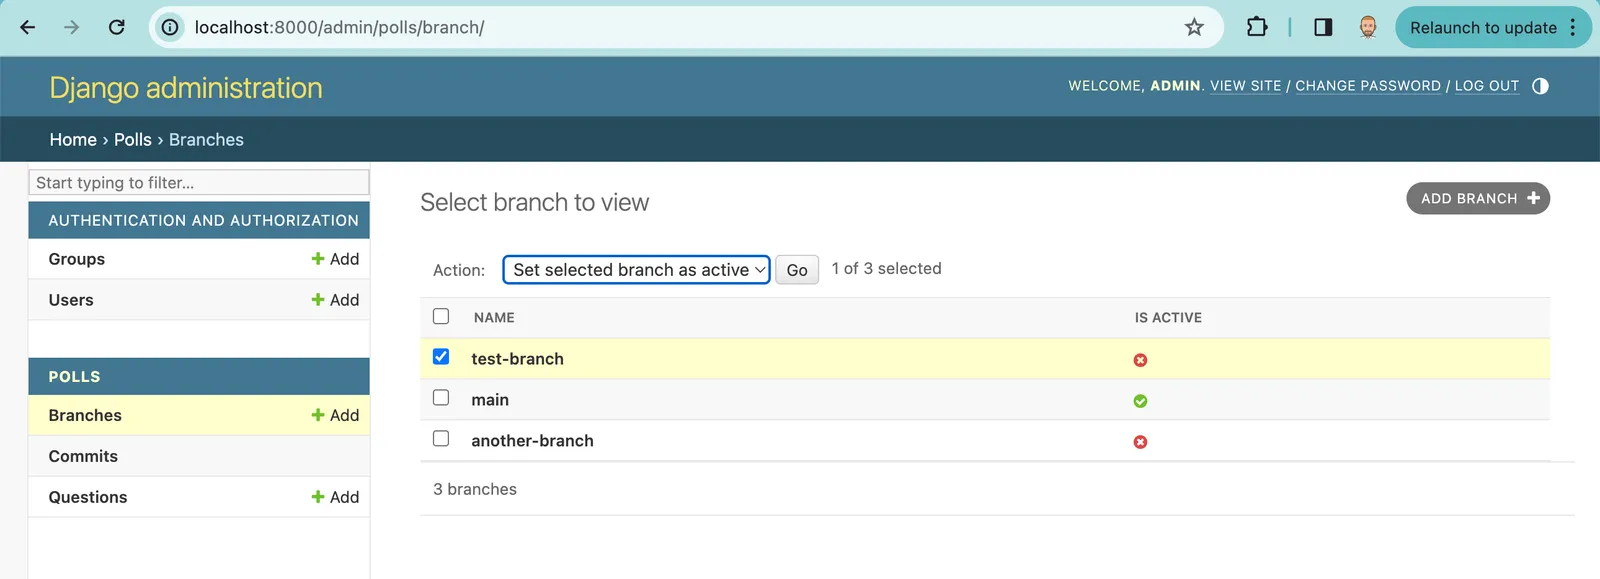
class BranchAdmin(admin.ModelAdmin):
    list_display = ['name', 'is_active']
    ...
Now I can see the active branch in the admin console.
But where do we store the active branch in Django so I don’t need to hard code it in my middleware? The best place to put the active branch for web applications is generally in the session. Thankfully Django has a built-in session interface.
In settings.py, we need to make a couple changes. First, we must move our Branch middleware class below the session class so you can use sessions in our middleware.
 MIDDLEWARE = [
-    'polls.middleware.dolt_branch_middleware.DoltBranchMiddleware',
     'django.middleware.security.SecurityMiddleware',
     'django.middleware.common.CommonMiddleware',
     'django.middleware.csrf.CsrfViewMiddleware',
     'django.contrib.sessions.middleware.SessionMiddleware',
     'django.contrib.auth.middleware.AuthenticationMiddleware',
     'django.contrib.messages.middleware.MessageMiddleware',
     'django.middleware.clickjacking.XFrameOptionsMiddleware',
+    'polls.middleware.dolt_branch_middleware.DoltBranchMiddleware',
 ]
Second, we need to set our SESSION_ENGINE to file or cookie-based sessions. The default session interface is in the database and since session information may not have been shared across Dolt branches, this can cause issues. Astute readers may notice some of the commit hashes and questions in my example changed. This is because I had a problem with database session storage and had to restart my example from scratch 🥲. So, the second change in settings.py is setting the SESSION_ENGINE to file.
 # https://docs.djangoproject.com/en/5.0/ref/settings/#default-auto-field

 DEFAULT_AUTO_FIELD = 'django.db.models.BigAutoField'
+
+SESSION_ENGINE = 'django.contrib.sessions.backends.file'
We then change our middleware to grab the branch from the session and DOLT_CHECKOUT() that branch instead of the hard-coded test-branch like in our above example code. We wrote a get_branch helper method to grab the branch and set it to main if the session doesn’t have it.
from django.db import connection

class DoltBranchMiddleware:
    def __init__(self, get_response):
        self.get_response = get_response
        # One-time configuration and initialization.

    def __call__(self, request):
        with connection.cursor() as cursor:
            branch_name = self.get_branch(request)
            cursor.execute("CALL DOLT_CHECKOUT('" + branch_name + "')")

        response = self.get_response(request)

        return response

    def get_branch(self, request, *view_args, **view_kwargs):
        if "active_branch" in request.session:
            return request.session.get("active_branch")
        return "main"
Finally, in admin.py we add a set_active_branch action that sets the selected branch to active.
...
@admin.action(description="Set selected branch as active")
def set_active(modeladmin, request, queryset):
    if queryset.count() != 1:
        messages.error(request, "Error: More than one branch selected.")
        return
    request.session['active_branch'] = queryset[0].name

class BranchAdmin(admin.ModelAdmin):
    list_display = ['name', 'is_active']
    actions = [set_active]
...
After we restart the server and log in, we can now set the active branch:
Now, we can switch branches in the admin interface, edit or make new questions, and see the results on the user-facing application. Branches are useful to isolate changes for testing.
Merge#
Dolt allows you to merge two branches using the dolt_merge() procedure. Let’s implement merge functionality in the admin user interface.
First in models.py, I add a merge method to the Branch class.
    def merge(self, merge_branch):
        with connection.cursor() as cursor:
            cursor.execute("CALL dolt_merge('" + merge_branch + "')")
Then in admin.py I add some an action to invoke that method with some error handling.
...
@admin.action(description="Merge selected branch into active branch")
def merge(modeladmin, request, queryset):
    if queryset.count() != 1:
        messages.error(request, "Error: More than one branch selected.")
        return

    active_branch_name = request.session.get('active_branch')
    merge_branch_name = queryset[0].name
    if ( merge_branch_name == active_branch_name ):
        messages.error(request, "Error: Select a branch that is not active to merge.")
        return

    base_branch = get_object_or_404(Branch, name=active_branch_name)
    base_branch.merge(merge_branch_name)

class BranchAdmin(admin.ModelAdmin):
    list_display = ['name', 'is_active']
    actions = [set_active, merge]
...
This works for basic merges where you add a question but I started to have trouble with uncommitted changes in Dolt both in my Question and Choices tables as well as my Django system tables. It turns out, it’s hard to manually intercept every place where Django writes to the database. So, I went back and implemented middleware that uses signals to Dolt commit every time Django modified the database.
I needed Signals After All#
To implement auto-Dolt Commit, we build another middleware class as described in this article. We hook into all the signals Django sends when it modified the database. We create a file called dolt_commit_middleware.py in our middleware directory. Then we use a context manager to fire on every request. You’ll notice we lose the ability to generate custom commit messages for each type of database modification.
from django.db.models.signals import m2m_changed, post_save, pre_delete
from django.db import connection

class AutoDoltCommit:
    def __init__(self, request):
        self.request = request
        self.commit = False

    def __enter__(self):
        # Connect our receivers to the post_save and post_delete signals.
        post_save.connect(self._handle_update, dispatch_uid="dolt_commit_update")
        m2m_changed.connect(self._handle_update, dispatch_uid="dolt_commit_update")
        pre_delete.connect(self._handle_delete, dispatch_uid="dolt_commit_delete")

    def __exit__(self, type, value, traceback):
        if self.commit:
            self._commit()

        # Disconnect change logging signals. This is necessary to avoid recording any errant
        # changes during test cleanup.
        post_save.disconnect(self._handle_update, dispatch_uid="dolt_commit_update")
        m2m_changed.disconnect(self._handle_update, dispatch_uid="dolt_commit_update")
        pre_delete.disconnect(self._handle_delete, dispatch_uid="dolt_commit_delete")

    def _handle_update(self, sender, instance, **kwargs):
        """
        Fires when an object is created or updated.
        """
        self.commit = True

    def _handle_delete(self, sender, instance, **kwargs):
        """
        Fires when an object is deleted.
        """
        self.commit = True

    def _commit(self):
        message = "Modified database in Django. Creating Dolt Commit."
        with connection.cursor() as cursor:
            cursor.execute("CALL DOLT_COMMIT('-Am', '" + message + "')")

class DoltAutoCommitMiddleware(object):
    def __init__(self, get_response):
        self.get_response = get_response

    def __call__(self, request):
        # Process the request with auto-dolt-commit enabled
        with AutoDoltCommit(request):
            return self.get_response(request)
Then we register this middleware in settings.py:
MIDDLEWARE = [
     'django.contrib.messages.middleware.MessageMiddleware',
     'django.middleware.clickjacking.XFrameOptionsMiddleware',
     'polls.middleware.dolt_branch_middleware.DoltBranchMiddleware',
+    'polls.middleware.dolt_commit_middleware.DoltAutoCommitMiddleware',
 ]
Finally, we delete the other commit logic in models.py and we have a working application that Dolt commits on every database modification.
Merge functionality is best played with. A set of screenshots does not do it justice. Get the sample app working using the instructions at the start of this blog. Make a new branch. Add a question. Switch your branch back to main and merge the branch you added a new question on. Magic! Imagine getting everything ready on a test branch and merging your changes into main to deploy to production.
An astute reader or tester may realize that this application is more likely to generate conflicts than other applications. If two branches vote a different amount of times on an answer, this will generate a conflict. Dolt has conflict resolution logic that you can implement in this case. You would do this in the merge function. This blog is already too long so I’ll leave that as an exercise for the reader.
Conclusion#
Wow. That was a journey. If you made it this far, thank you. If you just downloaded the code and played with the app, you got a good idea how a version controlled database can supercharge Django, especially the admin user interface.
You are now ready to build your own Dolt-powered application using Django. If this wasn’t enough to get you started, come by our Discord and someone will help you out. If you want to talk to me, just @timsehn.