
Welcome to the RGD (React + GraphQL + Dolt) stack!
As Dolt, the world’s first version controlled database, has grown from a better way to share data to a MySQL-compatible OLTP SQL database with Git features, it can now be used as a production database in many varieties of web stacks. Think: DERN (Dolt Express React Node), DEAN (Dolt Express Angular Node), DEVN (Dolt Express Vue Node), etc.
GraphQL has been growing in popularity as a powerful query language for APIs. Not only do we use the RGD stack for our web applications, but we think you should use it too.
Our newer product Hosted Dolt comes with a SQL workbench, which serves as a great example for connecting to a Dolt SQL server for a GraphQL + React application.
This blog will first give a brief overview of the Hosted Dolt architecture for context and then go through a more detailed example of how to build a sample RGD application from scratch.
Hosted Dolt Architecture Overview#
Hosted Dolt is AWS RDS for Dolt databases. Each cloud-hosted database comes with a built-in SQL workbench.
Unlike other SQL workbench products, Hosted Dolt’s workbench not only provides a sleek UI for viewing and updating your data tables, but it also utilizes Dolt’s powerful version control features to track branches, view commits, and explore diffs of changes made to your database. It also makes collaboration and human review of data easy and beginner-proof through familiar pull request workflows.

A previous blog includes this diagram of the key pieces of infrastructure to run https://hosted.doltdb.com.
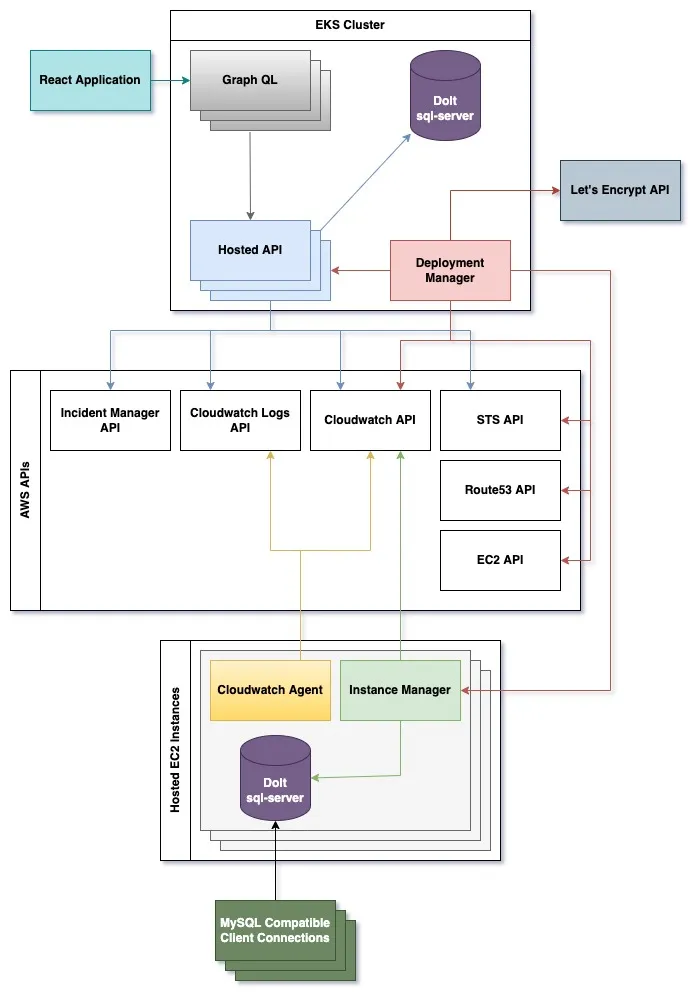
But that was created before the SQL Workbench existed. It now looks more like this:
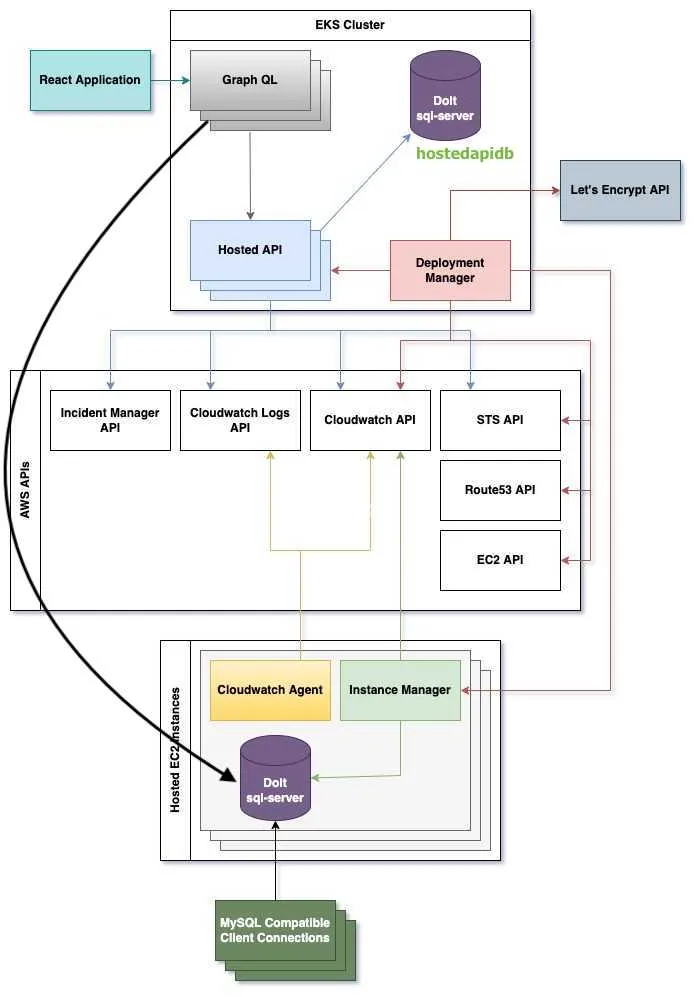
To fetch most of* the database metadata you see on the Hosted workbench, the GraphQL server creates a connection to the deployment’s Dolt sql-server and uses Dolt system tables and table functions to display metadata such as branches, commits, and diffs. You can also use the workbench SQL console to directly query table data and view the results at a certain revision.
*Pull request metadata is an exception. We manage pull request metadata through our Hosted API since we don’t have Dolt-specific tables and functions for them. Look out for a future blog about designing a pull request workflow like this.
This blog will focus on the workbench interactions that go directly from React to GraphQL to the Dolt SQL server.
How to build a RGD application#
Now we’ll go through an example that will take you through setting up a web application using the RGD (React + GraphQL + Dolt) stack from scratch. This example uses the same architecture and frameworks that we use to build the Hosted workbench. You can view the source code for this example here.
Our example application will display a list of a Dolt database’s branches. You can view a branch’s latest commit information as well as delete and create a branch.
1. Start a Dolt SQL server#
There are two ways you can start a Dolt SQL server. The first is to create a Dolt
database
and then run the dolt sql-server
command.
% dolt sql-server
Starting server with Config HP="localhost:3306"|U="root"|P=""|T="28800000"|R="false"|L="info"
The second is to create a fully-managed Dolt database on Hosted Dolt. You can follow the getting started guide here.
We’re going to continue with a Hosted Dolt database, since it’s what you’d most likely use in a production application.
2. Set up a GraphQL server#
We use the NestJS framework to build an efficient, scalable Node.js server-side application. NestJS has two built-in integrations that we utilize in our sample application: TypeORM and GraphQL. You can learn more about these frameworks and how to set them up here.
First, we need to create a connection to our Dolt database. We can do this by providing
connectivity information to the TypeORM
module and adding it to
the imports in the root AppModule. You can find this information in the Connectivity tab
of your Hosted Dolt deployment.
// src/app.module.ts
import { Module } from "@nestjs/common";
import { TerminusModule } from "@nestjs/terminus";
import { TypeOrmModule } from "@nestjs/typeorm";

@Module({
  imports: [
    TypeOrmModule.forRoot({
      type: "mysql",
      host: "dolthub-us-jails.dbs.hosted.doltdb.com",
      port: 3306,
      username: "myusername",
      password: "xxxxxx",
      database: "us_jails",
      ssl: {
        rejectUnauthorized: false,
      },
      autoLoadEntities: true,
      synchronize: false,
    }),
    TerminusModule,
  ],
})
export class AppModule {}
Next, we will use the dolt_branches system
table
to set up a DoltBranches
repository.
mysql> select * from dolt_branches;
+-------------+----------------------------------+---------------------+------------------------+-------------------------+-------------------------+
| name        | hash                             | latest_committer    | latest_committer_email | latest_commit_date      | latest_commit_message   |
+-------------+----------------------------------+---------------------+------------------------+-------------------------+-------------------------+
| delete-rows | u8s83gapv7ghnbmrtpm8q5es0dbl7lpd | taylorb             | taylor@dolthub.com     | 2022-06-14 19:11:58.402 | Accept PR 44            |
| new-branch  | sqjm4s0f2m48rjc97hr6cbpv2hqga00d | Dolt System Account | doltuser@dolthub.com   | 2022-09-14 19:30:41.132 | delete row              |
+-------------+----------------------------------+---------------------+------------------------+-------------------------+-------------------------+
2 rows in set (0.06 sec)
Once we add a DoltBranch
entity
based on the dolt_branches schema, we can add a service that lets us use different
methods to query or mutate data in that
database table.
Note that most Dolt system tables are read-only and require Dolt stored
procedures to
update them. We can utilize the query method to execute a raw SQL query that calls the
dolt_branch
procedure
to delete or create a branch.
// src/doltBranches/doltBranch.service.ts
import { Injectable } from "@nestjs/common";
import { InjectRepository } from "@nestjs/typeorm";
import { Repository } from "typeorm";
import { DoltBranches } from "./doltBranch.entity";

@Injectable()
export class DoltBranchesService {
  constructor(
    @InjectRepository(DoltBranches)
    private doltBranchesRepository: Repository<DoltBranches>,
  ) {}

  findAll(): Promise<DoltBranches[]> {
    return this.doltBranchesRepository.find();
  }

  findOne(name: string): Promise<DoltBranches | null> {
    return this.doltBranchesRepository.findOneBy({ name });
  }

  // The `dolt_branch` system table does not support inserts or deletes. We must use
  // the stored procedure instead.
  async remove(name: string): Promise<void> {
    await this.doltBranchesRepository.query(`CALL DOLT_BRANCH('-d', ?)`, [
      name,
    ]);
  }

  async create(fromRefName: string, newBranchName: string): Promise<void> {
    await this.doltBranchesRepository.query(`CALL DOLT_BRANCH('-c', ?, ?)`, [
      fromRefName,
      newBranchName,
    ]);
  }
}
Then we need to create GraphQL models and resolvers in order to generate a GraphQL schema. This will help us generate code that can be used by Typescript and React in the web server.
After adding the GraphQLModule to
AppModule
and defining a Branch
model,
we create a branch Resolver class. This has
access to the DoltBranchesService we implemented earlier and provides a way for our
client to interact with our Dolt branches.
// src/branches/branch.resolver.ts
@Resolver(_of => Branch)
export class BranchResolver {
constructor(private doltBranchService: DoltBranchesService) {}
@Query(_returns => [Branch])
async branches(): Promise<Branch[]> {
const branches = await this.doltBranchService.findAll();
return branches.map(fromDoltBranchesRow);
}
@Query(_returns => Branch, { nullable: true })
async branch(@Args() args: GetBranchArgs): Promise<Branch | undefined> {
const branch = await this.doltBranchService.findOne(args.name);
if (!branch) return undefined;
return fromDoltBranchesRow(branch);
}
@Mutation(_returns => Boolean)
async deleteBranch(@Args() args: GetBranchArgs): Promise<boolean> {
await this.doltBranchService.remove(args.name);
return true;
}
@Mutation(_returns => Boolean)
async createBranch(@Args() args: CreateBranchArgs): Promise<boolean> {
await this.doltBranchService.create(args.fromRefName, args.newBranchName);
return true;
}
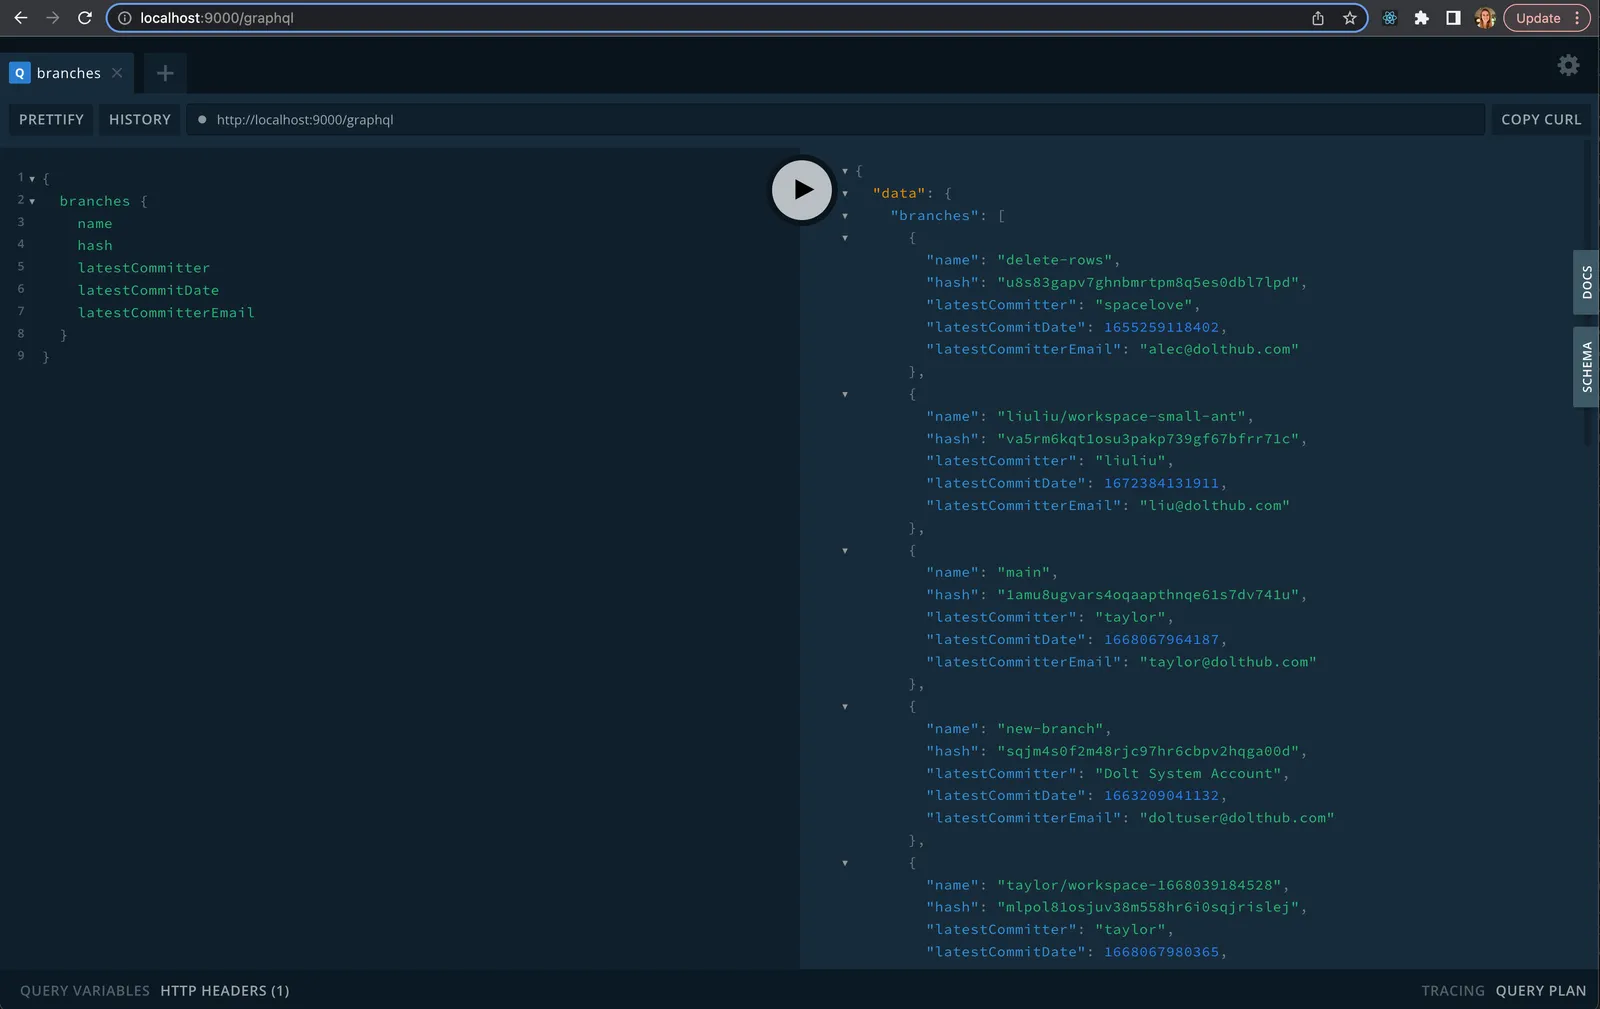
}Now if you run your GraphQL development server (yarn run dev), you should see a
schema.gql file updated with your model and resolver definitions. You can test your
GraphQL endpoint using the GraphQL
playground by going to
localhost:9000/graphql and running a query.
3. Set up a React application#
Now moving to the React portion of our RGD stack. We build our React web application using Next.js. We also use Apollo Client to manage our local and remote data with GraphQL. You can learn more about getting started with Next.js and Apollo Client here.
Once you’re set up and have created some pages, you can create your first component, which
we’ll call BranchList. We want this component to query our GraphQL endpoint for a list
of branches in our Dolt database and display their names.
First we create a GraphQL query.
// components/BranchList/queries.ts
import { gql } from "@apollo/client";

export const LIST_BRANCHES = gql`
  query ListBranches {
    branches {
      name
    }
  }
`;
Since we’re using Typescript, we use an additional package called GraphQL Code
Generator to generate Typescript types and React
query and mutation hooks based on our GraphQL schema. If set up correctly, the query above
will generate a useListBranchesQuery hook in gen/graphql-types.tsx. We can use this to
fetch our database’s branches.
// components/BranchList/index.tsx
import Link from "next/link";
import { useListBranchesQuery } from "@gen/graphql-types";

export default function BranchList() {
  const res = useListBranchesQuery();

  // Handle loading and error states

  if (!res.data?.branches.length) {
    return <div>No branches found</div>;
  }
  return (
    <ul>
      {res.data.branches.map(b => (
        <li key={b.name}>
          <Link
            href="/branches/[name]"
            as={`/branches/${encodeURIComponent(b.name)}`}
          >
            {b.name}
          </Link>
        </li>
      ))}
    </ul>
  );
}
Now if you go to localhost:3000 in your browser, you will see a list of Dolt branches.
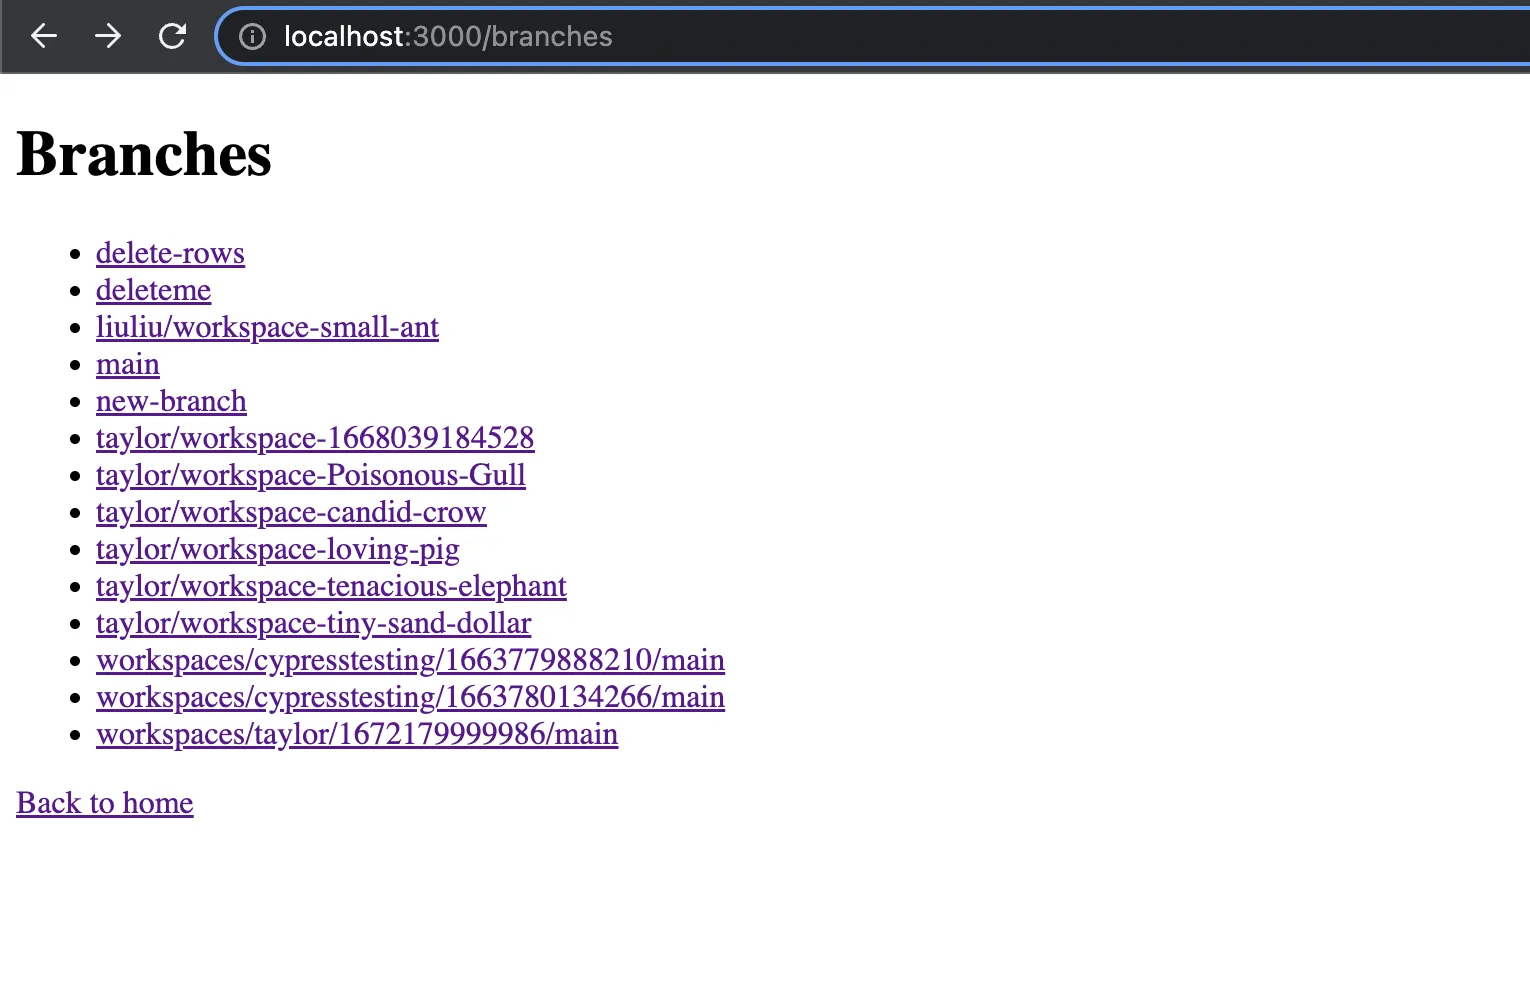
Congrats, you’ve created your first RGD application!
You can check out the source code to continue building this application, including adding a branch details page and using GraphQL mutations to delete and create branches.
Conclusion#
Dolt is a powerful MySQL-compatible OLTP database with version control features that can be used to build indestructible and RuGgeD web applications.
What use case do you have for the RGD stack? Come talk to us in Discord.