
In 2018 when we began building Dolt, we wanted to bring version control functionality to your datasets. We thought that the ability to branch and merge changes to data would allow for greater collaboration, resulting in higher quality data. Over time, we saw more interest in using Dolt as an OLTP database for web applications. The Git-Like functionality of Dolt makes Dolt a great fit for your web application development. The ability for multiple users to be working against different branches provides a much simpler way to develop and test new features and schema changes before taking them to production.
In a future blog I will talk about some of the ways that only Dolt can be used to improve development. But first, in this blog I’m going to be showing you how to create a webapp backed by Dolt. There are many platforms and technology stacks that we could use. I will be using AWS Amplify along with Hosted Dolt in order to build our webapp. Using AWS Amplify will allow us to deploy a serverless webapp with authentication, and it provides React components that make it easy to get something running quickly.
Before we Start#
Before we start, there is some software you will need to install. First you will install AWS Amplify and setup an AWS account. You can find the instructions for that here. Next, you will need to install Node.js.
Creating the Webapp#
Now that we have the software installed, we can create our webapp. First, we will use create-react-app which will create
a new React app for us with all the necessary dependencies and configuration.
npx create-react-app dolt-amplify-webappNow that our React app is created we can install the dependencies we need to use AWS Amplify.
cd dolt-amplify-webapp
npm install aws-amplify aws-amplify-react
Next, we run amplify init to initialize our project to use amplify. For this to work you must complete
the AWS and Amplify setup steps from the before we start section.
>cd dolt-amplify-webapp/
dolt-amplify-webapp>amplify init
Note: It is recommended to run this command from the root of your app directory
? Enter a name for the project doltamplifywebapp
The following configuration will be applied:

Project information
| Name: doltamplifywebapp
| Environment: dev
| Default editor: Visual Studio Code
| App type: javascript
| Javascript framework: react
| Source Directory Path: src
| Distribution Directory Path: build
| Build Command: npm run-script build
| Start Command: npm run-script start

? Initialize the project with the above configuration? Yes
Using default provider  awscloudformation
? Select the authentication method you want to use: AWS profile

For more information on AWS Profiles, see:
https://docs.aws.amazon.com/cli/latest/userguide/cli-configure-profiles.html

? Please choose the profile you want to use default
I choose all the default options, and the default profile we set up before we started. amplify init will create
the files and folders needed to manage your amplify resources, and the file aws-exports.js which is what we will use to tie
our React app to our amplify backend services. We tell our React app about this configuration by first
importing awsconfig from ./aws-exports.js, and Amplify from aws-amplify, then calling Amplify.configure(awsconfig)
in our src/App.js file (Additionally I’ve stripped out the default app tags and replaced them with placeholder text.
// src/App.js
import React from "react";
import "./App.css";

import { Amplify } from "aws-amplify";
import awsconfig from "./aws-exports";

Amplify.configure(awsconfig);

function App() {
  return <div className="App">Empty App</div>;
}

export default App;
We can now run our app via npm start and see that it is working (though there is not much to see yet).
Creating our Hosted Dolt Database#
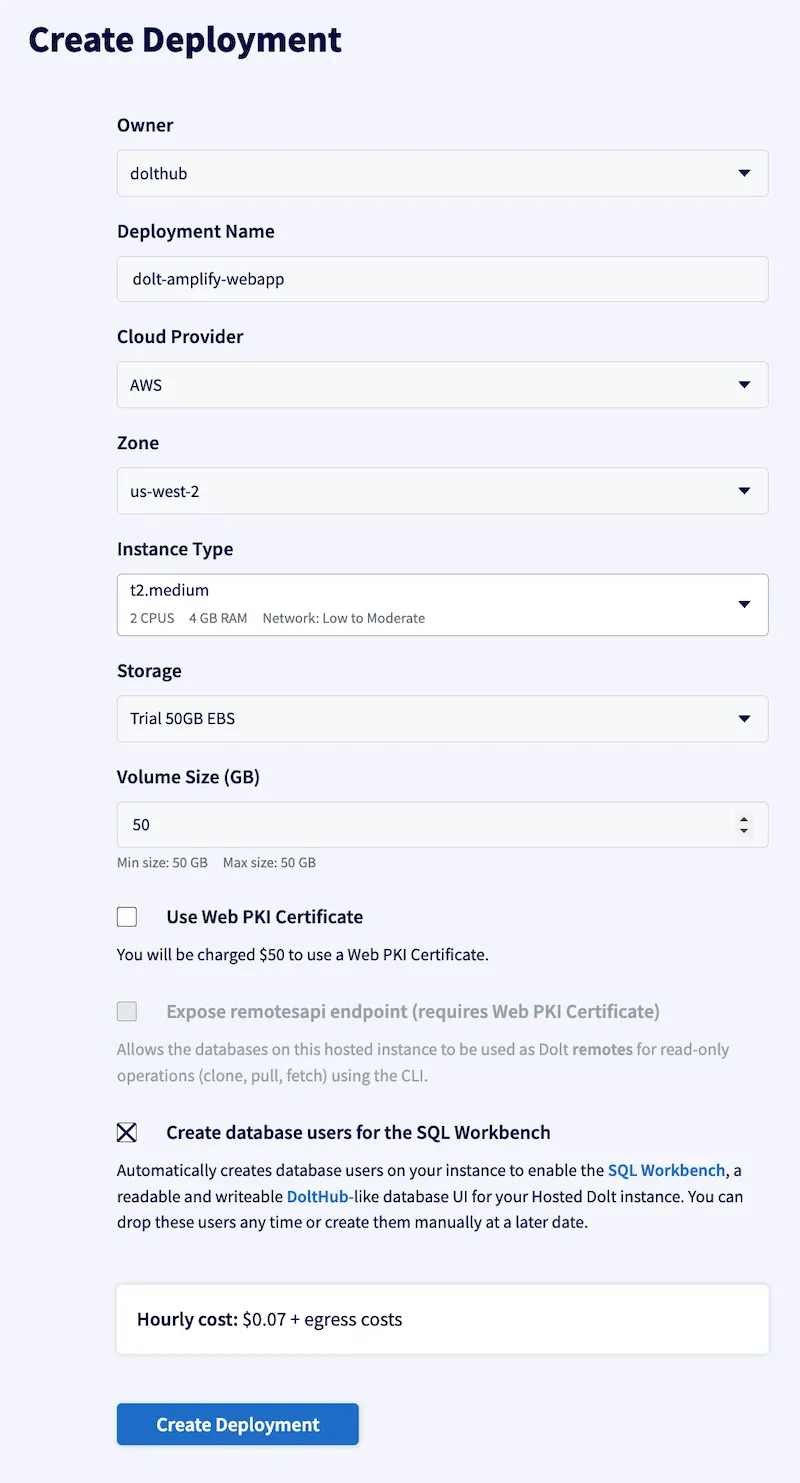
Now that we have our React app created, we can create our hosted Dolt database. You need to sign in to Hosted Dolt and create an account if you don’t already have one. Once you have an account, you can create a new deployment. We create an AWS deployment using the t2.medium instance type which is our trial instance size. The cost is $50 a month, and for that you get the full feature set of Hosted Dolt.
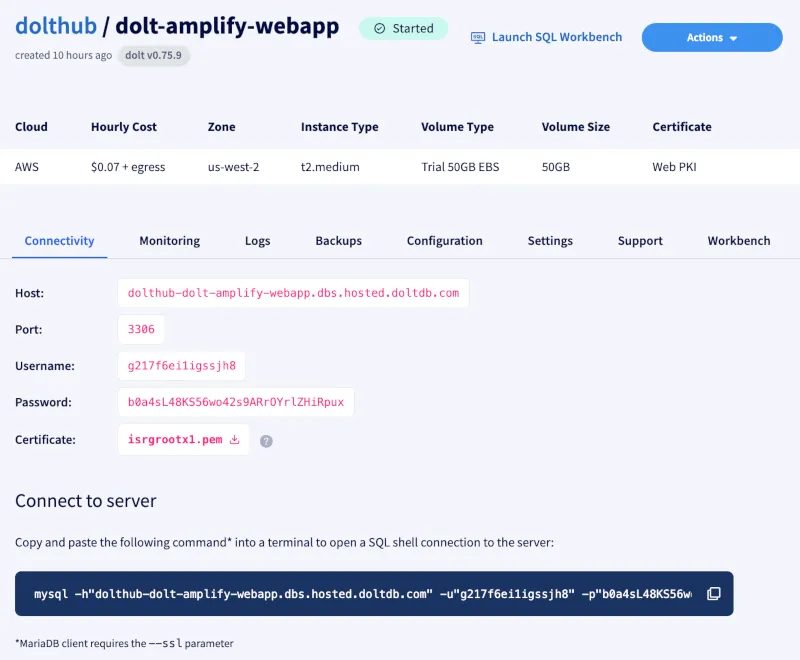
After a few minutes the connectivity tab of our deployment should be populated with the details necessary to connect to your database. You can use any MySQL client to connect to your database using the details provided. If you have the mysql or MariaDB client installed, you can copy the command provided in the “Connect to server” section.
Once connected, we can create a new database. We will call our database db and we will create
a table called quotes which will include a database of famous quotes.
>mysql -h"dolthub-dolt-amplify-webapp.dbs.hosted.doltdb.com" -u"g217f6ei1igssjh8" -p"b0a4sL48KS56wo42s9ARrOYrlZHiRpux"
Welcome to the MariaDB monitor.  Commands end with ; or \g.
Your MySQL connection id is 15
Server version: 5.7.9-Vitess

Copyright (c) 2000, 2018, Oracle, MariaDB Corporation Ab and others.

Type 'help;' or '\h' for help. Type '\c' to clear the current input statement.

MySQL [(none)]> CREATE DATABASE db;
Query OK, 1 row affected (0.062 sec)

MySQL [(none)]> USE db/main;
Database changed
MySQL [db/main]> CREATE TABLE quotes (
    ->     id int primary key auto_increment,
    ->     quote varchar(1024) NOT NULL,
    ->     author varchar(256) NOT NULL
    -> );
Query OK, 0 rows affected (0.049 sec)

MySQL [db/main]> exit
Bye
Here you will see that once I created the database, I executed USE db/main which sets the current database to db and the
branch to main. This is because Dolt is a version controlled database, and each database has a main branch by default. If no
branch is specified main is used (I am being explicit here so that you can see how we can connect to different branches).
With our database created, we can insert the quotation data into our database. We will use the sql script insert_quotes.sql to insert the data into our database.
>mysql -h"dolthub-dolt-amplify-webapp.dbs.hosted.doltdb.com" -u"g217f6ei1igssjh8" -p"b0a4sL48KS56wo42s9ARrOYrlZHiRpux" -Ddb/main <insert_quotes.sqlWith our database created and seeded with data, we can move on to creating the backend for our webapp.
Creating a Lambda Function#
Now that we have our project setup, and our database created it’s time to work on the backend. Amazon Lambda functions
are serverless functions that can be triggered by different events. In our case we will be using AWS API Gateway
to trigger our lambda when it receives an http request. We use the command amplify add api to create both our API and
the lambda function it triggers. There are quite a few prompts we need to answer to configure a new lambda function
that is triggered by an API Gateway endpoint.
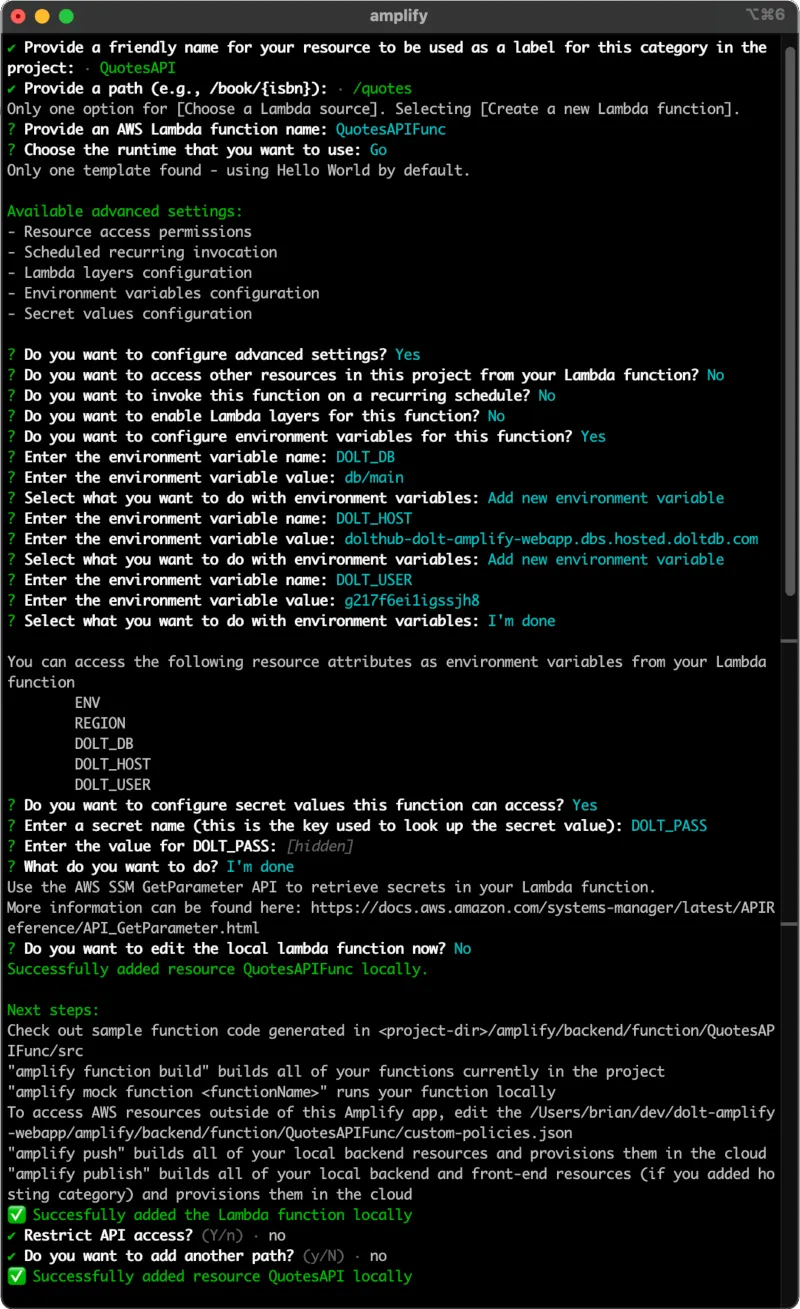
The first few prompts are related to the API we are creating. We want to create a REST API, with the name “QuotesAPI”, and
we want to configure the path /quotes. We will then choose to create a new lambda function that will be triggered when the
/quotes endpoint is hit. We will call our lambda function “QuotesAPIFunc” and we will use the Go runtime. Then we configure some advanced
settings in order to set up environment variables and secrets. We will add the environment variables DOLT_DB, DOLT_HOST, DOLT_USER,
setting their values equal to the values we find on the Dolt deployment “connectivity” tab. After our environment variables
are added, we can add the secrets for our database. We will add the secret DOLT_PASS and it’s value.
Once this has been configured you can deploy the infrastructure by running amplify push.
Implementing the Lambda Function#
Now that our function and API are configured it’s time to edit the code used in our lambda function. We can find the code
for our lambda function in the amplify/backend/function/QuotesAPIFunc/src folder. We will be editing the main.go file.
The first thing to note is that you need to change the signature of HandleRequest when using the API gateway to trigger
your function. We need to retrieve the environment variables and secrets that we configured in the amplify cli.
const (
    PasswordParameterName = "/amplify/d1bei8pu57dwsm/dev/AMPLIFY_QuotesAPIFunc_DOLT_PASS"
)

type params struct {
	Db       string
	Host     string
	Username string
	Password string
}

func mustGetEnvVar(name string) string {
	value := os.Getenv(name)
	if value == "" {
		panic("missing required environment variable: " + name)
	}
	return value
}

func readParams() params {
	sm := ssm.New(session.Must(session.NewSessionWithOptions(
		session.Options{
			SharedConfigState: session.SharedConfigEnable,
		},
	)))

	result, err := sm.GetParameter(&ssm.GetParameterInput{
		Name:           aws.String(PasswordParameterName),
		WithDecryption: aws.Bool(true),
	})

	if err != nil {
		panic("unable to get the dolt password: " + err.Error())
	}

	return params{
		Db:       mustGetEnvVar("DOLT_DB"),
		Host:     mustGetEnvVar("DOLT_HOST"),
		Username: mustGetEnvVar("DOLT_USER"),
		Password: *result.Parameter.Value,
	}
We use the ssm package to retrieve the password from the systems manager. One thing to note is that the name of the
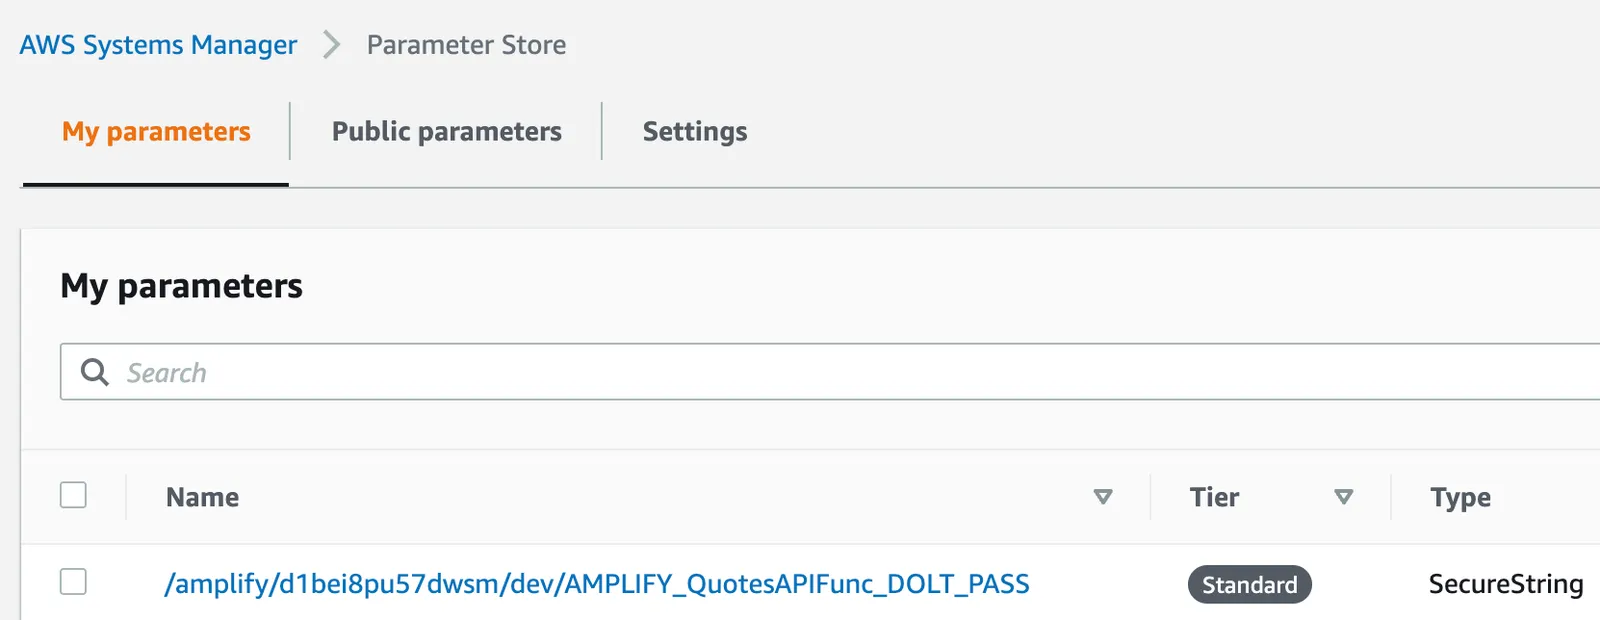
secret is not exactly the name that you provided to the Amplify CLI. The name of the secret will be prefixed with
/amplify/<amplify-project-id>/<env>/AMPLIFY_<function-name>_ and then the name of the secret you provided. I find it easiest
to log into the AWS console and navigate to the “Systems Manager” and view the parameter name in the “Parameter Store”
section.
Finally, we use os.Getenv to retrieve the environment variables, and now we are ready to connect to our
Hosted Dolt Database.
func connectToDolt() (*sql.DB, error) {
	p := readParams()

	cfg := mysql.NewConfig()
	cfg.User = p.Username
	cfg.Passwd = p.Password
	cfg.Addr = p.Host + ":3306"
	cfg.DBName = p.Db
	cfg.ParseTime = true
	cfg.TLSConfig = "skip-verify"

	log.Printf(`creating db connection - host: "%s", db: "%s", user: "%s"`, cfg.Addr, cfg.DBName, cfg.User)

	connector, err := mysql.NewConnector(cfg)
	if err != nil {
		log.Println("failed to create mysql connector: %s", err.Error())
		return nil, err
	}

	return sql.OpenDB(connector), nil
}
This code will call the readParams function we created in order to get the connection parameters, and then use the mysql
package to create a connection to our database.
Because Lambda functions are serverless, their lifecycle is managed by AWS. This means that when our lambda function is called it may be created, or it may reuse an existing instance. We could close our database connection after each request, but that increases the latency of our function. Instead, we will create a global variable to hold our database connection, and create a connection at startup and leave it open until the server is killed by AWS. While we are at it, we will also count the number of quotes in our database so that we can use it later to more easily select a random quote.
var db *sql.DB
var quoteCount int
func init() {
var err error
db, err = connectToDolt()
if err != nil {
panic("Failed to connect to our database: " + err.Error())
}
err = db.QueryRow("SELECT count(*) FROM quotes;").Scan("eCount)
if err != nil {
panic("Failed to count the quotes: " + err.Error())
}
log.Printf("Connected Successfully. There are %d quotes in our database", quoteCount)
}One issue with leaving the connections open is that the dolt sql server timeout is quite high by default. You can change your hosted dolt timeouts via the “Configuration” tab, so that servers that are killed by AWS won’t leave open connections for too long. We’ll set both the “listener_read_timeout_millis” and “listener_write_timeout_millis” to 30000 milliseconds (30 seconds).
Finally, the implementation for our lambda function needs to query the database for a random quote and return a JSON response every time it is triggered by the API gateway.
type response struct {
Author string `json:"author"`
Quote string `json:"quote"`
}
var rng = rand.New(rand.NewSource(time.Now().UnixNano()))
func HandleRequest(ctx context.Context, request events.APIGatewayProxyRequest) (events.APIGatewayProxyResponse, error) {
const query = "SELECT author, quote from quotes where id = ?;"
rId := rng.Int63()%int64(quoteCount) + 1
var author string
var quote string
err := db.QueryRow(query, rId).Scan(&author, "e)
if err != nil {
return events.APIGatewayProxyResponse{}, fmt.Errorf("failed to retrieve quote with id '%d': %w", rId, err)
}
responseJson, err := json.Marshal(&response{Quote: quote, Author: author})
if err != nil {
return events.APIGatewayProxyResponse{}, fmt.Errorf("failed to marshal response: %w", err)
}
return events.APIGatewayProxyResponse{
StatusCode: 200,
Headers: map[string]string{"Access-Control-Allow-Origin": "*"},
Body: string(responseJson),
}, nil
}Now that we have completed our implementation, we deploy it using the amplify push command again. This needs to be
executed any time you update the function and want to deploy it to AWS.
Calling our Lambda Function from our React App#
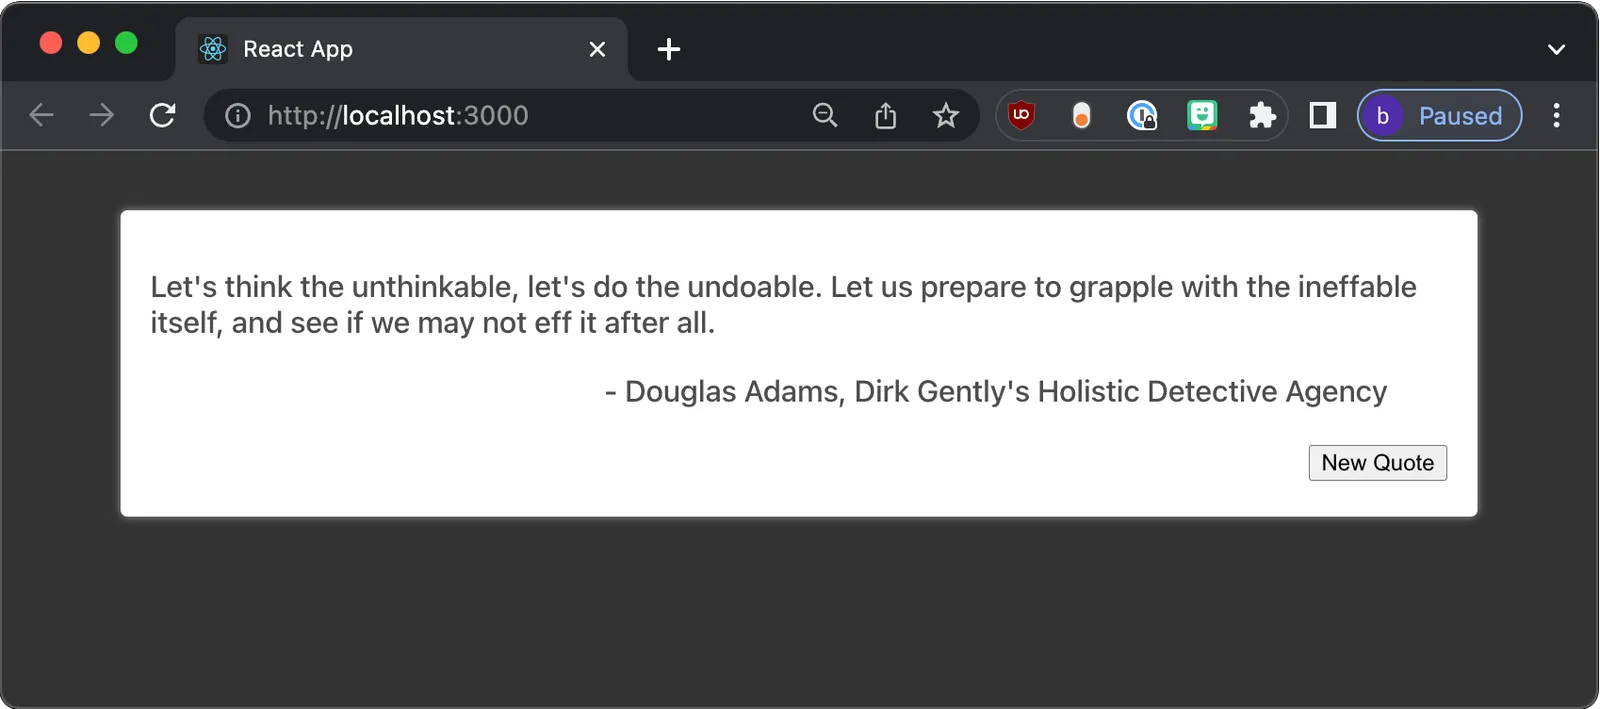
Now that the backend is ready we will update our React app to call the lambda function and display a quote, and it’s author every time the page loads, or the “New Quote” button is clicked. We start by creating a new React functional component called “Quote” in the file “components/Quote.js” and updating our App.js file to use it.
import React from "react";
import "./App.css";

import { Amplify } from "aws-amplify";
import awsconfig from "./aws-exports";
import Quote from "./components/Quote";

Amplify.configure(awsconfig);

function App() {
  return <Quote />;
}

export default App;
The Quote component will be responsible for making the API call to our lambda function. We make amplify API calls by first
importing the API module from the aws-amplify package, and then calling the API.get method. The first parameter is the
name of the API that we created in the Amplify CLI, and the second parameter is the path of the API endpoint. The returned
promise will resolve with the response from the API, or reject with an error if the API call fails. Here is an example of
what an API call looks like:
API.get("QuotesAPI", "/quotes", {})
  .then(response => {
    // handle success
  })
  .catch(error => {
    // handle error
  })
  .finally(() => {
    // always executed
  });
The Quote component is a very basic React functional component that I won’t go into in much detail. It uses the useState
hook to store the quote and author, and the useEffect hook to make the initial API call to our lambda function. Additional
calls are made when the “New Quote” button is clicked.
import React, { useEffect } from "react";
import { API } from "aws-amplify";

export default function Quote() {
  const [quote, setQuote] = React.useState({ author: "", quote: "" });
  const [enableRefresh, setEnableRefresh] = React.useState(true);

  function updateQuote() {
    setEnableRefresh(false);

    API.get("QuotesAPI", "/quotes", {})
      .then(response => {
        console.log(response);
        setQuote(response);
      })
      .catch(error => {
        console.log(error.response);
      })
      .finally(() => {
        setEnableRefresh(true);
      });
  }

  useEffect(() => {
    updateQuote();
  }, []);

  if (quote.quote === "") {
    return null;
  }

  return (
    <section>
      <div className="container-div">
        <div className="quote-div">{quote.quote}</div>
        <div className="author-div">- {quote.author}</div>
        <div className="button-div">
          <button onClick={updateQuote} disabled={!enableRefresh} type="button">
            New Quote
          </button>
        </div>
      </div>
    </section>
  );
}
I changed the App.css file to improve the basic look of the page.
* {
  box-sizing: border-box;
}

body {
  margin: 0;
  color: hsl(0, 0%, 30%);
  font-size: 1.1em;
  font-family:
    system-ui,
    -apple-system,
    BlinkMacSystemFont,
    "Segoe UI",
    Roboto,
    Oxygen,
    Ubuntu,
    Cantarell,
    "Open Sans",
    "Helvetica Neue",
    sans-serif;
  font-weight: 500;
  background: #333;
}

section {
  margin: 1em 1em;
  height: 100%;
  display: flex;
  flex-direction: column;
  justify-content: center;
  align-items: center;
}

.container-div {
  background: #fff;
  width: 800px;
  border: 0;
  border-radius: 4px;
  box-shadow: 0 0 5px 0 hsl(0, 0%, 60%);
  padding: 1em;
  height: fit-content;
  margin: 1em;
}

.quote-div {
  padding-top: 1rem;
  padding-bottom: 0.2em;
}

.author-div {
  padding-top: 1rem;
  text-align: right;
  padding-bottom: 0.2em;
  padding-right: 2em;
}

.button-div {
  padding-top: 1rem;
  text-align: right;
  padding-bottom: 0.2em;
}
That’s it! We have now created a fully functional serverless application that uses a React frontend and a Go backend deployed to AWS.

Conclusion#
In this post we looked at what takes to use Dolt as our application database. We created a simple database of quotes, and then used the Amplify CLI to create a serverless application that uses a React frontend and a Go backend. This was just a simple example that covered the basics of using Hosted Dolt with one tech stack. The sample source code is available here.
In the future I hope to dive deeper and highlight the Dolt only features that make it standout from other database technologies. Check out Dolt on Github, and visit Hosted Dolt to get started with your own managed instance of Dolt.