
ngrok is the programmable network edge that makes it easy to publish unreachable ports on the public internet. DoltLab is the self-hosted, self-managed version of DoltHub, where you can push your Dolt databases, collaborate on changes, manage pull requests, and view data diffs through a sleek, user-friendly UI.
Recently, users asked us how they could use port-forwarding to expose their DoltLab instance running on a closed host (or local host). Their goal was to easily grant their friends and colleagues access so they could experience DoltLab and start collaborating with them.
In response to this, we shipped DoltLab v0.5.5, available for download here, that supports port-forwarding with tools like ngrok. In this post I’ll cover how to configure ngrok and DoltLab so you too can start sharing and collaborating on your own DoltLab instance.
Be warned: exposing DoltLab in this way is a bit complicated and is not for the feint of heart. There are four DoltLab services which need ports exposed via ngrok, which requires some YAML customizations. Following the instructions in this post will make DoltLab work with ngrok, but it’s not going to be pretty. That said, if you want something easy, we recommend using DoltHub instead. DoltLab is for your inner System Administrator—get ready to bash this beast onto the public internet 🤠.
Please note that exposing DoltLab in this way requires running one of its services without authentication and is not recommended for production use. To run a production DoltLab instance, please refer to our previous blog post where we demonstrate how to spin up a production ready DoltLab instance.

To get started, install DoltLab v0.5.5 on a linux host. The quickest way to do this is to copy the ubuntu-bootstrap.sh script onto your host and run:
export DOLTLAB_VERSION=v0.5.5
chmod +x ubuntu-bootstrap.sh
sudo ./ubuntu-bootstrap.sh with-sudo "$DOLTLAB_VERSION"
Running this script installs all of DoltLab’s dependencies and puts its assets in a directory called ./doltlab.
Before doing anything else with DoltLab we need to install, configure, and run ngrok. In a separate shell, download the latest ngrok agent here and confirm your installation succeeded by running:
ngrok --version
ngrok version 3.0.6
Next, you’ll need to create a free account using ngrok’s dashboard. After you login, copy your personal auth token and run the following to authenticate your agent:
ngrok config add-authtoken <your auth token>After adding the auth token to the config, edit the config using ngrok config edit so that it contains the following tunnel definitions:
version: "2"
authtoken: <your auth token>
tunnels:
  doltlabui:
    proto: http
    addr: 80
    schemes: [http]
  doltlabfileserviceapi:
    proto: http
    addr: 4321
    schemes: [http]
  doltlabremotefileserver:
    proto: http
    addr: 100
    schemes: [http]
  doltlabremoteapi:
    proto: tcp
    addr: 50051
The above tunnel definitions will produce different urls we’ll supply as values to DoltLab’s docker-compose.yaml file. We’ll also use one hostname for the HOST_IP environment variable when we’re ready to start DoltLab.
First, start ngrok with:
ngrok start --allThis will start the ngrok agent and use the tunnel definition in the configuration file. ngrok will output something like the following:
Account                       example@email.com (Plan: Free)
Version                       3.0.6
Region                        United States (us)
Latency                       -

Web Interface                 http://127.0.0.1:4040

# hostname used for pushing, pulling, cloning
Forwarding                    tcp://2.tcp.ngrok.io:14290 -> localhost:50051

# hostname used for serving data files
Forwarding                    http://b862-54-200-56-40.ngrok.io -> http://localhost:100

# hostname should be `HOST_IP` environment variable
Forwarding                    http://c9bd-54-200-56-40.ngrok.io -> http://localhost:80

# url used for uploading user files
Forwarding                    http://e65d-54-200-56-40.ngrok.io -> http://localhost:4321
Using the output above, return to the original shell you used to run the ubuntu-bootstrap.sh script. cd into the ./doltlab directory.
We will edit portions of the docker-compose.yaml file by inputting the generated urls or hostnames output by ngrok.
First, copy the hostname used for serving data files that ngrok forwards to http://localhost:100. In our example, this value is b862-54-200-56-40.ngrok.io.
Next, edit the doltlabremoteapi command section of docker-compose.yaml. Replace the values supplied to the -http-host argument and the -backingStoreHostNameOverrideKey argument with the ngrok value of b862-54-200-56-40.ngrok.io.
  doltlabremoteapi:
    ...
    command:
      -http-host "b862-54-200-56-40.ngrok.io" # replace ${HOST_IP}:100 with b862-54-200-56-40.ngrok.io
      ...
      -backingStoreHostNameOverrideKey "b862-54-200-56-40.ngrok.io" # replace ${HOST_IP}:100 with b862-54-200-56-40.ngrok.io
      ...
We’re also going to supply this value to the -remoteApiHostNameOverrideKey argument in the doltlabapi command section:
  doltlabapi:
    ...
    command:
      ...
      -remoteApiHostNameOverrideKey "b862-54-200-56-40.ngrok.io" # replace ${HOST_IP}:100 with b862-54-200-56-40.ngrok.io
      ...
Now, copy the url from the ngrok output that forwards to http://localhost:4321. In our example above this is http://e65d-54-200-56-40.ngrok.io.
Still editing the doltlabapi command section arguments, replace the value of -userImportUploadsFileServiceBrowserHost with http://e65d-54-200-56-40.ngrok.io.
  doltlabapi:
    ...
    command:
      ...
      -userImportUploadsFileServiceBrowserHost "http://e65d-54-200-56-40.ngrok.io" # replace http://${HOST_IP}:4321 with http://e65d-54-200-56-40.ngrok.io
      ...
Then, copy the hostname used for pushing, pulling, and cloning that forwards to http://localhost:50051, which for us is 2.tcp.ngrok.io:14290, and set this value as the environment variable CLONE_REMOTE_HOST in the doltlabui environment section:
  doltlabui:
    ...
    environment:
      ...
      CLONE_REMOTE_HOST: "2.tcp.ngrok.io:14290"
Finally, edit the doltlabfileserviceapi command section. Add the argument -no-auth, disabling authentication for user uploaded files:
  doltlabfileserviceapi:
     ...
     command:
       -no-auth
       ...
Unfortunately ngrok removes cross-origin credentials required to run doltlabfileserviceapi with authentication. This change is necessary for enabling user file uploads on DoltLab exposed with ngrok.
Save these changes and you can now start up your DoltLab instance. Use the start-doltlab.sh script and supply HOST_IP=c9bd-54-200-56-40.ngrok.io:
HOST_IP=c9bd-54-200-56-40.ngrok.io \
POSTGRES_PASSWORD=<password> \
DOLTHUBAPI_PASSWORD=<password> \
POSTGRES_USER=dolthubadmin \
EMAIL_PORT=<smtp port> \
EMAIL_HOST=<smtp host> \
EMAIL_USERNAME=<smtp username> \
EMAIL_PASSWORD=<smtp password> \
NO_REPLY_EMAIL=example@email.com \
./start-doltlab.sh
Your DoltLab instance should now be accessible at http://c9bd-54-200-56-40.ngrok.io.
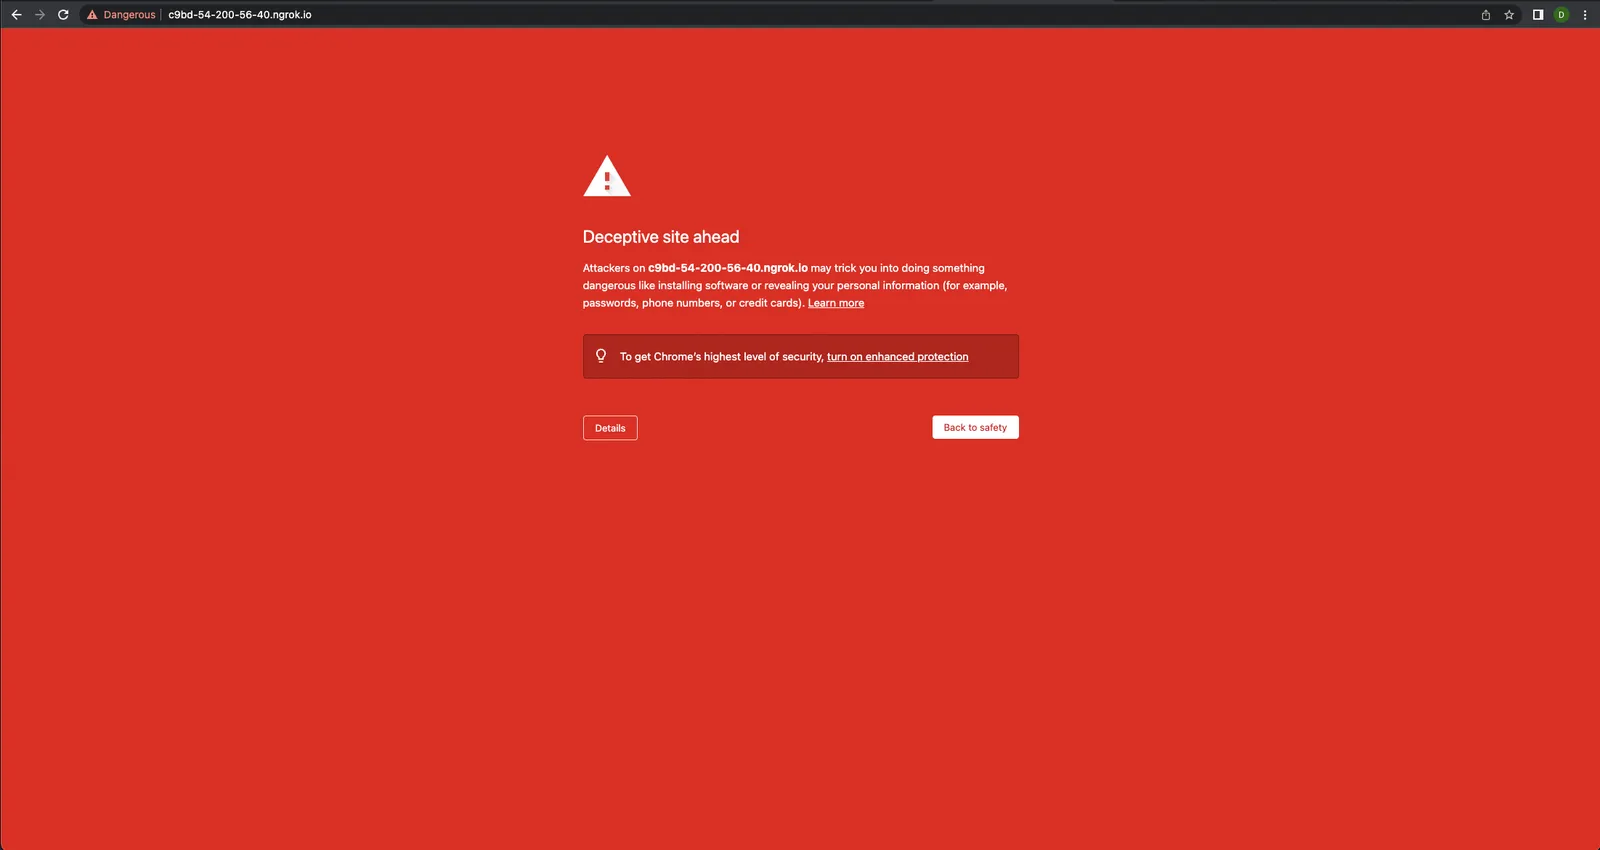
Don’t be alarmed if you see the screen above, you can simply bypass it by clicking “Details”, and continuing on to the DoltLab site. You might need to refresh the page a couple times, but afterward, you should see your fully operational DoltLab instance being served.

Make sure you only visit ngrok urls from sources you trust! We take no responsibility for any stolen Bored Apes.
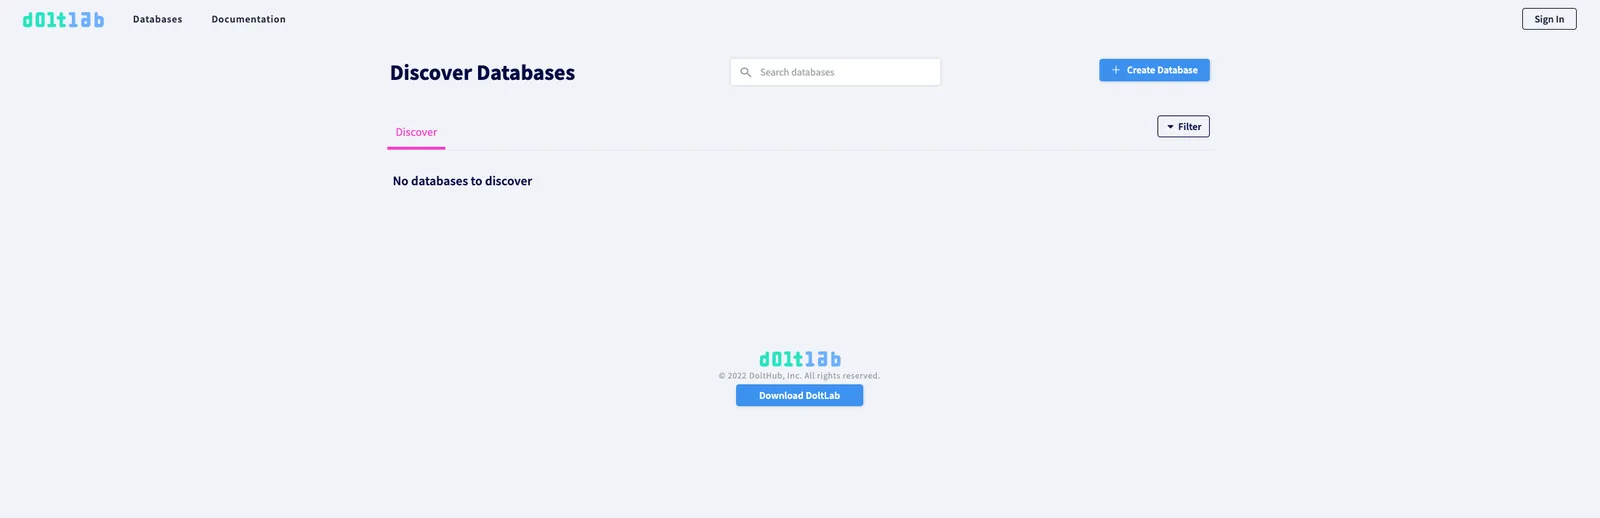
If you see the following screen, you know it’s working correctly.
Conclusion#
We love getting feedback, questions, and feature requests from our community, so if there’s anything you’d like to see added in DoltLab or in one of our other products, please don’t hesitate to reach out. You can checkout each of our different product offerings below, to find which ones are right for you:
- Dolt—it’s Git for data.
- DoltHub—it’s GitHub for data.
- DoltLab—it’s GitLab for data.
- Hosted Dolt—it’s RDS for Dolt databases.