How to get more than 2TB of Disk on AWS EC2 Ubuntu 20.04

Today's blog is a quick how-to guide aimed at helping others provision and actually use more than 2TBs of disk on an AWS EC2 Ubuntu 20.04.
I never planned on writing this blog, but experiencing the surprisingly clunky and cryptic process compelled me to. Usually I find Amazon's documentation to be pretty direct and ripe with useful tutorials and examples.
Not to mention there are often a number of really helpful blog posts at the top of Google search that provide the exact steps needed to do... pretty much anything on the cloud.
But, when trying to do this myself a couple weeks ago while setting up our DoltLab demo instance with 10TBs of disk, I found that my usual "check-the-docs", "check-google" strategy for learning to do things quickly, didn't work for this.
So, I'm writing this post to help past-me and future-you(s) quickly learn how to do this. And, if this blog happens to out rank all the other EC2 large disk blogs at the top of Google right now, so be it 🤠.
TL;DR
- Use a different volume than the root volume
- Know the EBS volume type you're provisioning
- growpart doesn't work on MBR > 2 TBs
- Use cloud-init to change the partitioning scheme
- Verify the volume and partition are correct
- Solved, Why Ubuntu 20.04 launches with MBR and not GPT
From Humble Beginnings
When I set about doing this, I thought the process would be pretty straightforward. We use Terraform for DoltHub's infrastructure, so when it came time to provision a host I was feeling pretty confident.
I figured all I needed to do to get 10TBs of disk was specify that amount in the block_device_mappings, volume_size field within an aws_launch_template. Something like:
resource "aws_launch_template" "doltlab" {
...
  block_device_mappings {
  device_name = "/dev/sda1"
    ebs {
      volume_size = 10240
      delete_on_termination = true
    }
  }
...
}
I've easily provisioned up to 2 Tom Bradys of gp2 before on EC2, so I didn't really see a problem bumping up the number much higher. Then, after launching an instance from my new template, I could see from the EC2 console that everything worked as I expected.

Next, I connected to new instance, and I was in disbelief when I saw:
Welcome to Ubuntu 20.04.4 LTS (GNU/Linux 5.13.0-1014-aws x86_64)

 * Documentation:  https://help.ubuntu.com
 * Management:     https://landscape.canonical.com
 * Support:        https://ubuntu.com/advantage

  ...

  System load:  0.04             Processes:             127
  Usage of /:   0.1% of 1.94TB   Users logged in:       0
  Memory usage: 1%
  Swap usage:   0%


0 updates can be applied immediately.


The list of available updates is more than a week old.
To check for new updates run: sudo apt update

ubuntu:~$
Hmmm... notice the Usage of /: 0.1% of 1.94TB problem? That's only 2 Tom Bradys and I said 10 Tom Bradys, Amazon! 10!

Running df on the instance confirmed that, in fact, I was 8 Tom Brady's short of what I asked for. Well, it was there, I just couldn't use it.
ubuntu:~$ df -h
Filesystem      Size  Used Avail Use% Mounted on
/dev/root       2.0T  2.9G  2.0T   1% /
devtmpfs        7.7G     0  7.7G   0% /dev
tmpfs           7.7G     0  7.7G   0% /dev/shm
tmpfs           1.6G  812K  1.6G   1% /run
tmpfs           5.0M     0  5.0M   0% /run/lock
tmpfs           7.7G     0  7.7G   0% /sys/fs/cgroup
/dev/loop0       27M   27M     0 100% /snap/amazon-ssm-agent/5163
/dev/loop1       44M   44M     0 100% /snap/snapd/14978
/dev/loop2       68M   68M     0 100% /snap/lxd/22526
/dev/loop3       62M   62M     0 100% /snap/core20/1361
/dev/loop4       56M   56M     0 100% /snap/core18/2284
/dev/loop5       45M   45M     0 100% /snap/snapd/15534
/dev/loop6       56M   56M     0 100% /snap/core18/2344
/dev/loop7       62M   62M     0 100% /snap/core20/1434
/dev/loop8       68M   68M     0 100% /snap/lxd/22753
tmpfs           1.6G     0  1.6G   0% /run/user/1000

Where are my GOATs?
So after a bit of investigation, turns out there are some size limitations to EBS volume's, based on a volume's partitioning scheme. Here's table shown in the docs:
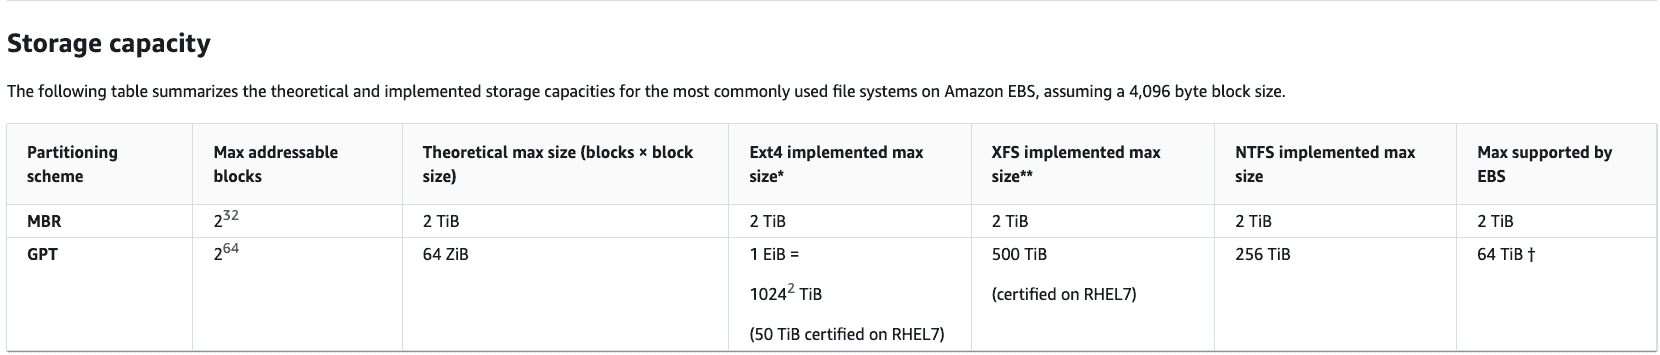
So it would appear that my current instance's EBS volume uses the MBR partitioning scheme and not GPT.
"Cool," I thought, now I'll just go back to my aws_launch_template and set a field called, like, partitioning_scheme: gpt since it likely defaults to mbr.
But, as it turns out, there is no such field to set in the block_device_mappings definition. Nor is there a field in the aws_launch_template to specify gpt partitioning. And still, no field in an aws_ebs_volume definition to specify the partitioning scheme either.
"Curious," I thought. But surely, obviously, I must be very close to the solution. People use a ton of disk on EC2 all the time, it's gotta be really easy to fix this.
So my next impulse was to quickly try to spin up a new GPT partitioned EBS volume from the EC2 console and attach it to my running instance. I was certain I could change a field, or press a button, and get what I wanted.
But again, nothing about partitioning schemes was configurable.
After pouring over the Ubuntu AMI looking for a partitioning scheme setting, and attempting to work through some blog posts about converting MBR to GPT by detaching a volume and running some commands then reattaching it as the root device on the original instance, I had just about had enough 🤬.
I finally had to ask my coworker, Aaron, "Why tf is it so complicated to get more disk on EC2, and why is my magic number always bad ?!?!". He replied "Hmmm, have you heard of 'cloud-init'?"
And... so... now I know about cloud-init 💃💃💃.
Ok, so here's what I did to my launch template that will successfully launch an instance with > 2TBs of disk, that's visible with lsblk and df and ready to use!
Don't use the root volume, attach a second volume
The first step is to use a separate volume from the root volume for the large amount of storage you want. This large volume we'll call the GOAT volume 🐐.
The root device, for my purposes, didn't need to be very large, so provisioning a separate volume for the extra space made sense and reduced my risk of damaging the root volume during partitioning, filesystem creation, and mounting.
resource "aws_launch_template" "doltlab" {
...
  block_device_mappings {
  device_name = "/dev/sda1"
    ebs {
      volume_size = 100
      delete_on_termination = true
    }
  }

  block_device_mappings {
    device_name = "/dev/sdb"
    ebs {
      volume_size = 10240
      delete_on_termination = true
    }
  }

  user_data = base64encode(local.user-data)
}
In the above snippet I've allocated 100GBs for the root device and 10TBs for the second EBS volume /dev/sbd.
Know if you're on the Nitro System
Interestingly, despite specifying the device mapping, the actual device name of the volume on the instance might be different that the device_name defined in the block_device_mappings, if for example the instance type specified uses the Nitro System.
From the docs, for EBS volumes on Nitro System instance types, "the device names are /dev/nvme0n1, /dev/nvme1n1, and so on. The device names that you specify in a block device mapping are renamed using NVMe device names (/dev/nvme[0-26]n1)."
You can confirm this by using the lsblk command on your instance. Here's what it looks like on the instance launched from my original launch template:
ubuntu:~$ lsblk
NAME        MAJ:MIN RM  SIZE RO TYPE MOUNTPOINT
loop0         7:0    0 26.7M  1 loop /snap/amazon-ssm-agent/5163
loop1         7:1    0 43.6M  1 loop /snap/snapd/14978
loop2         7:2    0 67.9M  1 loop /snap/lxd/22526
loop3         7:3    0 61.9M  1 loop /snap/core20/1361
loop4         7:4    0 55.5M  1 loop /snap/core18/2284
loop5         7:5    0 44.7M  1 loop /snap/snapd/15534
loop6         7:6    0 55.5M  1 loop /snap/core18/2344
loop7         7:7    0 61.9M  1 loop /snap/core20/1434
loop8         7:8    0 67.8M  1 loop /snap/lxd/22753
nvme0n1     259:0    0   10T  0 disk
└─nvme0n1p1 259:1    0    2T  0 part /
We can see NVMe EBS volume with 10TBs of disk, but only a 2TB partition mounted at /.
Trust that growpart, here, no worky
In case there's a savvy reader out there whose thinking, "why not just follow the docs here and use the growpart command on the nvme0n1p1 partition?"
Well, that's not gonna fly, human:
ubuntu:~$ sudo growpart /dev/nvme0n1 1
WARNING: MBR/dos partitioned disk is larger than 2TB. Additional space will go unused.
NOCHANGE: partition 1 is size 4294965248. it cannot be grown
ubuntu:~$ lsblk
NAME        MAJ:MIN RM  SIZE RO TYPE MOUNTPOINT
loop0         7:0    0 26.7M  1 loop /snap/amazon-ssm-agent/5163
loop1         7:1    0 43.6M  1 loop /snap/snapd/14978
loop2         7:2    0 67.9M  1 loop /snap/lxd/22526
loop3         7:3    0 61.9M  1 loop /snap/core20/1361
loop4         7:4    0 55.5M  1 loop /snap/core18/2284
loop5         7:5    0 44.7M  1 loop /snap/snapd/15534
loop6         7:6    0 55.5M  1 loop /snap/core18/2344
loop7         7:7    0 61.9M  1 loop /snap/core20/1434
loop8         7:8    0 67.8M  1 loop /snap/lxd/22753
nvme0n1     259:0    0   10T  0 disk
└─nvme0n1p1 259:1    0    2T  0 part /
growpart will work though on MBR partitions under 2 TBs.
cloud-init is your friend
Ok so what you want to do is use #cloud-config, the configuration for cloud-init, in the user data you supply to your launch template.
Recall that the new aws_launch_template definition has two volumes, the root volume and the large, large, GOAT volume.
What you want to do is configure the partitioning scheme, filesystem type, and partition size for the GOAT volume via the cloud-config:
locals {
  user-data = <<USERDATA
#cloud-config

resize_rootfs: false

disk_setup:
    /dev/nvme1n1:
        table_type: 'gpt'
        layout: true
        overwrite: false

fs_setup:
    - label: DATA
      filesystem: 'ext4'
      device: '/dev/nvme1n1'
      partition: 'auto'

mounts:
    - ["/dev/nvme1n1", "/data", "ext4", "defaults,nofail", "0", "0"]
USERDATA
}
You can read about each of these cloud-init modules here, but basically, what the above snippet does is make our GOAT volume, called/dev/nvme1n1, use a gpt partitioning scheme, adds an ext4 filesystem partition on it for the full size of the volume, and mounts that volume to the host at /data.
You are now a champion!
Congratulations! If you've followed along, you too are now a champion.
If you connect to an instance that was run with the cloud-init user data shown above, lsblk will show you the device with a 10TB partition mounted at /data:
ubuntu@:~$ lsblk
NAME        MAJ:MIN RM  SIZE RO TYPE MOUNTPOINT
loop0         7:0    0 26.7M  1 loop /snap/amazon-ssm-agent/5163
loop1         7:1    0 61.9M  1 loop /snap/core20/1361
loop2         7:2    0 43.6M  1 loop /snap/snapd/14978
loop3         7:3    0 67.9M  1 loop /snap/lxd/22526
loop4         7:4    0 55.5M  1 loop /snap/core18/2284
loop5         7:5    0 44.7M  1 loop /snap/snapd/15534
loop6         7:6    0 55.5M  1 loop /snap/core18/2344
loop7         7:7    0 61.9M  1 loop /snap/core20/1434
loop8         7:8    0 67.8M  1 loop /snap/lxd/22753
nvme0n1     259:0    0  100G  0 disk
└─nvme0n1p1 259:2    0  100G  0 part /
nvme1n1     259:1    0   10T  0 disk
└─nvme1n1p1 259:3    0   10T  0 part /data
Running df also now shows the GOAT volume and you're ready to start storing DoltLab databases 🤠!
ubuntu:~$ df -h
Filesystem      Size  Used Avail Use% Mounted on
/dev/root       7.7G  2.9G  4.9G  37% /
devtmpfs        7.7G     0  7.7G   0% /dev
tmpfs           7.7G     0  7.7G   0% /dev/shm
tmpfs           1.6G  832K  1.6G   1% /run
tmpfs           5.0M     0  5.0M   0% /run/lock
tmpfs           7.7G     0  7.7G   0% /sys/fs/cgroup
/dev/loop0       27M   27M     0 100% /snap/amazon-ssm-agent/5163
/dev/loop1       62M   62M     0 100% /snap/core20/1361
/dev/loop2       44M   44M     0 100% /snap/snapd/14978
/dev/loop3       68M   68M     0 100% /snap/lxd/22526
/dev/loop4       56M   56M     0 100% /snap/core18/2284
/dev/nvme1n1p1   10T   73M  9.5T   1% /data
/dev/loop5       45M   45M     0 100% /snap/snapd/15534
/dev/loop6       56M   56M     0 100% /snap/core18/2344
/dev/loop7       62M   62M     0 100% /snap/core20/1434
/dev/loop8       68M   68M     0 100% /snap/lxd/22753
tmpfs           1.6G     0  1.6G   0% /run/user/1000
ubuntu:~$ df -h /data
Filesystem      Size  Used Avail Use% Mounted on
/dev/nvme1n1p1   10T   73M  9.5T   1% /data
Here's why Ubuntu 20.04 is like this 🕵️♂️
TIL why Amazon's Ubuntu 20.04 AMI uses MBR for it's EBS volume partitioning schemes. Turns out, AMIs get their EBS volume partitioning schemes from the EBS volume attached to the EC2 instance used to build the AMI. In the case of the Ubuntu 20.04 AMI, the build instance used an MBR EBS volume 🤯.
In addition, the AMI itself doesn't know which partitioning scheme the EBS volume attached to its build instance used. I mean, why would it? And this explains why examining the AMI's details in the AWS console didn't reveal the partitioning scheme information I tried looking for.
So, aside from following the steps above to use a GPT volume with the Ubuntu 20.04 AMI, it's certainly possible to create your own Linux AMI and build it to use a GPT EBS volume. Doing this might require a few attach, reattach volume steps and comes with the additional cost of maintaining and updating your custom AMI's dependencies.
Another option is to simply wait. Looks like there's hope on the horizon aimed to solve this exact problem, as mentioned in this bug ticket. Spoilers: the Ubuntu 22.04 AMI might default to use GPT instead of MBR. Dare to dream 🌈 .
Got questions, comments, or want more information about our products?
Checkout DoltHub, DoltLab, Hosted Dolt (coming soon!), and Dolt.