
Download the latest DoltLab here and head over to https://doltlab.com/docs for the latest documentation
In recent months, we’ve had a number of customers reach out to us in Discord telling us they’re interested in exploring Dolt for their company, but feel uncomfortable pushing their company’s private data to DoltHub.
More often than not, these conversations include a request to our CEO, Tim Sehn, for an on-prem DoltHub that users can self-host and self-manage. Unfortunately, before today, we did not offer such a solution.
The original vision for DoltHub was modeled on GitHub and it was designed to be a closed-source hub for all Dolt databases. But, as we are seeing now, and especially with the popularity of GitLab, people want a DIY DoltHub option. Well, giddy-up yall 🤠!
Today, we’re excited to announce the launch of our latest product: DoltLab, your self-hosted, self-managed DoltHub solution! Since demand for such a product has been steadily increasing in our Discord server, we set out to quickly ship a product users could run themselves to more deeply explore the power of Dolt for their enterprise use-cases.
Caveats#
Please note, this blog will only cover how to start running your own DoltLab instance and is designed to be a step-by-step guide on how to launch DoltLab on EC2. We will cover some of the more technical aspects of DoltLab and how we created it in later blog posts.
Before we begin, please be aware that this is an alpha version of our DoltLab product and more stable releases will come out in the next few months. There will be no migration option for these early releases, so to upgrade to a newer DoltLab version you’ll have to kill this one and start a new one. Currently, the DoltLab code is still closed-source, but we are working to open-source it along with the code for DoltHub. But be warned, DoltLab, in its current state, is only for the bold. There are known bugs and broken pieces of core functionality that I will identify in this blog’s conclusion, but it works decently enough to get you started.
If you encounter any such bugs, please feel free to file issues for them so we can triage and fix them, and come chat with us on Discord in our #doltlab channel.
Let’s get started!
Get Started with DoltLab#
- Provision a Linux machine
- Install Dependencies
- Download and Unzip DoltLab
- Start DoltLab
- Create an Account
- Add Dolt Credentials
- Create a Database
- Push Data
Installing and Running DoltLab on EC2#
At the time of this blog, DoltLab’s current version, v0.1.0, is only supported on Linux and its setup and operation may be a bit too complicated for some of our users. We are prioritizing improving the development and operational experience of DoltLab, but if you are undeterred by a bit of shell-fu, read on!
DoltLab, in its current form, is a collection of service images that we maintain in a publicly accessible ECR repository. To run these services together, we provide a zip folder available for download from S3.
This folder contains everything you need to run DoltLab, including a start-doltlab.sh script. However, there is a bit of setup and installation we need to do first before we can start our DoltLab instance.
Provision a Linux machine
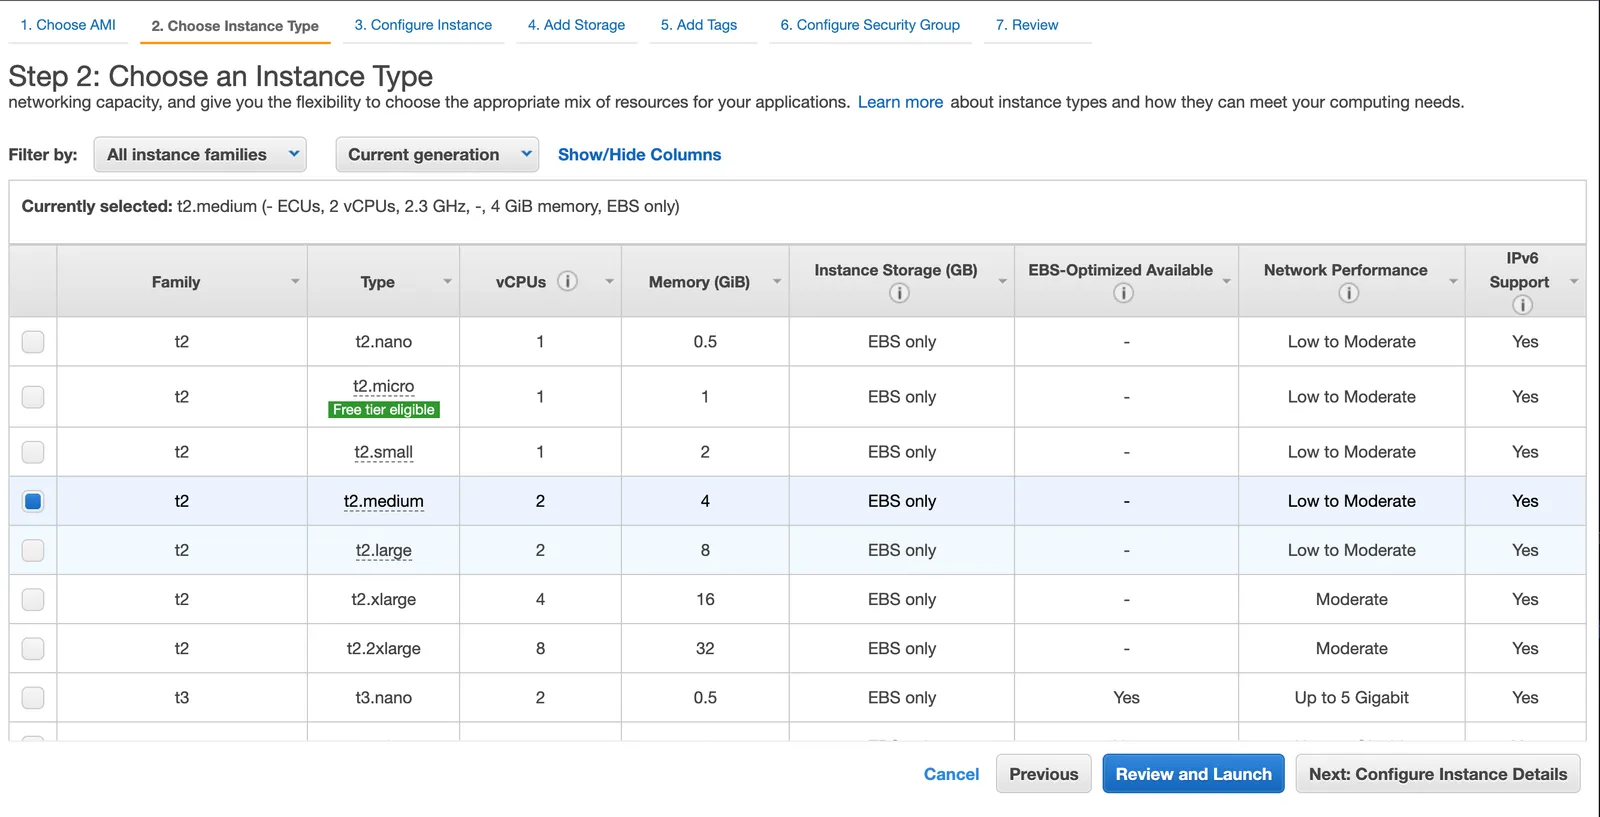
To start, you need a Linux amd64 host with specific ports open, plenty of RAM, and plenty of disk. For this walkthrough I’ll use a smaller EC2 instance type, but if you want to push large databases to DoltLab, don’t skimp on the machine. For this guide I chose an Ubuntu Server 18.04 AMI.

Here I’m using a t2.medium instance as I will only be pushing a single example database to my DoltLab instance.
Next, you’ll need to open four specific ports in the “Security Group” settings.
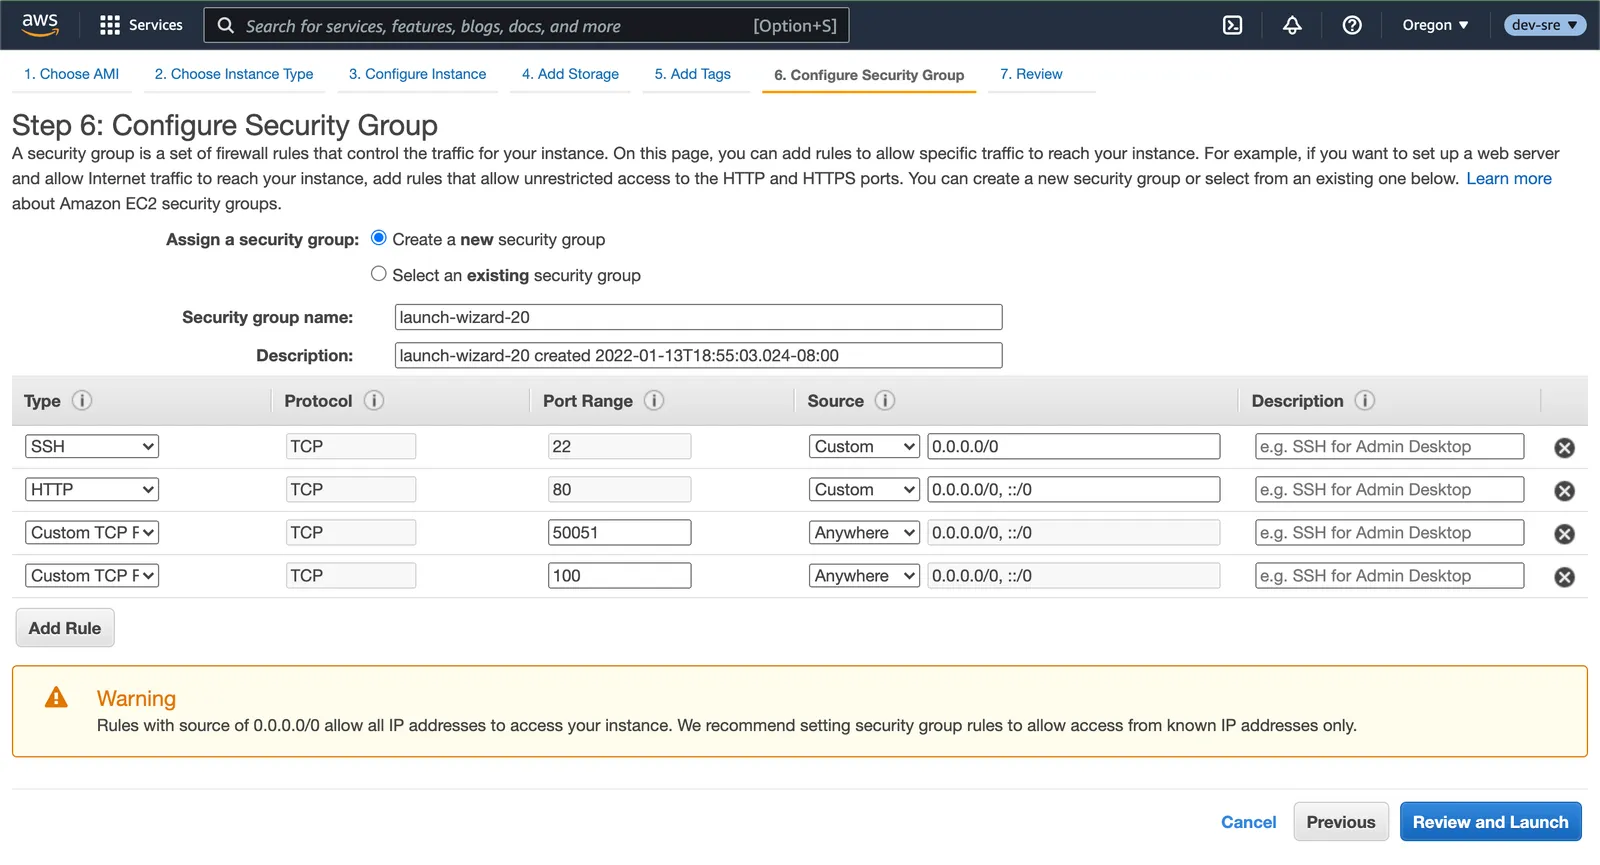
22 is for connecting to the machine using ssh, 80 is for connecting to DoltLab (currently only http is supported), 100 is a port used by DoltLab for retrieving data, and 50051 is the port used to push and pull data using Dolt.
At the time of this blog, these ports are not configurable 🤠.
After launching our instance and connecting to it using ssh, it’s time to install the dependencies we need to download and run DoltLab.
Install Dependencies
I’ve included below the exact commands I’ve run on this machine, in the exact order I ran them.
Install unzip and make#
$ sudo apt update -y$ sudo apt install unzip$ sudo apt install makeInstall and Configure aws cli#
To download the DoltLab zip folder from ECR, you can use the aws cli. Installation instructions can be found in detail here, but here’s what I ran:
$ curl "https://awscli.amazonaws.com/awscli-exe-linux-x86_64.zip" -o "awscliv2.zip"$ unzip awscliv2.zip$ sudo ./aws/installVerify the installation succeeded:
$ aws --version
aws-cli/2.4.11 Python/3.8.8 Linux/5.4.0-1060-aws exe/x86_64.ubuntu.18 prompt/off
Configure the client with your AWS credentials:
$ aws configure
AWS Access Key ID [None]: XXXXXXXXXXXXX
AWS Secret Access Key [None]: XXXXXXXXXXXXXXXX
Default region name [None]:
Default output format [None]:
Install Docker, Docker-Compose, and Perform the Post-Install Steps#
Detailed instructions for installing Docker on ubuntu can be found here. Instructions for installing Docker-Compose can be found here. I ran:
sudo apt-get updatesudo apt-get install \
ca-certificates \
curl \
gnupg \
lsb-releasecurl -fsSL https://download.docker.com/linux/ubuntu/gpg | sudo gpg --dearmor -o /usr/share/keyrings/docker-archive-keyring.gpgecho \
"deb [arch=$(dpkg --print-architecture) signed-by=/usr/share/keyrings/docker-archive-keyring.gpg] https://download.docker.com/linux/ubuntu \
$(lsb_release -cs) stable" | sudo tee /etc/apt/sources.list.d/docker.list > /dev/nullsudo apt-get updatesudo apt-get install docker-ce docker-ce-cli containerd.iosudo apt-get install docker-ce=5:20.10.12~3-0~ubuntu-bionic docker-ce-cli=5:20.10.12~3-0~ubuntu-bionic containerd.ioVerify the installation succeeded:
docker --version
Docker version 20.10.12, build e91ed57
sudo curl -L "https://github.com/docker/compose/releases/download/1.29.2/docker-compose-$(uname -s)-$(uname -m)" -o /usr/local/bin/docker-composesudo chmod +x /usr/local/bin/docker-composeVerify the installation succeeded:
docker-compose --version
docker-compose version 1.29.2, build 5becea4c
Detailed instructions for the post-install steps (required so that Docker can be run without the sudo command) can be found here. I ran:
sudo groupadd dockersudo usermod -aG docker $USERnewgrp dockerVerify docker can run without sudo:
docker ps
CONTAINER ID   IMAGE     COMMAND   CREATED   STATUS    PORTS     NAMES
Install and Configure amazon-ecr-credential-helper#
Installation instructions for amazon-ecr-credential-helper can be found here. I ran:
git clone https://github.com/awslabs/amazon-ecr-credential-helper.gitcd amazon-ecr-credential-helper && make dockersudo mv ./bin/local/docker-credential-ecr-login /usr/local/bin/Verify the installation was successful:
docker-credential-ecr-login -v
amazon-ecr-credential-helper
Version:    0.5.0
Git commit: f15886b
Now, we can create the required config.json file:
cd ..
mkdir ~/.docker
echo '{"credHelpers":{"public.ecr.aws":"ecr-login"}}' > ~/.docker/config.jsonDownload and Unzip DoltLab
Now for the good stuff! It’s finally time to download and run DoltLab. I ran the following two commands to download and unzip the current release of DoltLab:
aws s3 cp s3://doltlab-releases/linux/amd64/doltlab-v0.1.0.zip doltlab-v0.1.0.zipunzip doltlab-v0.1.0.zip -d doltlab
Archive: doltlab-v0.1.0.zip
inflating: doltlab/gentokenenckey
inflating: doltlab/docker-compose.yaml
inflating: doltlab/envoy.yaml
inflating: doltlab/start-doltlab.shInside the unzipped directory doltlab, you’ll find four items. gentokenenckey is a simple binary used to generate a token encryption key that DoltLab uses to sign tokens. It will create a file called iter_token.keys during start up.
envoy.yaml is the configuration for DoltLab’s proxy server, required for service-to-service communication, and docker-compose.yaml is the docker-compose configuration file used to run all of DoltLab’s services in unison.
start-doltlab.sh is the script used to start DoltLab, and that’s what we will run to start our DoltLab instance. We need to supply a couple environment variables, though, to successfully run the script and start DoltLab.
Start DoltLab
You’ll need to supply four environment variables to the start-doltlab.sh script:
HOST_IP is the IP address or DNS address of your EC2 instance. POSTGRES_USER=dolthubadmin is the postgres user used to create and run DoltLab’s PostgreSQL server.
Finally, POSTGRES_PASSWORD and DOLTHUBAPI_PASSWORD are used to set the password for the postgres server and DoltLab API database. You can choose any password for these last two environment variables.
You can now execute start-doltlab.sh which will setup all the services, and run them with docker-compose in daemon mode:
HOST_IP=12.345.678.901 POSTGRES_USER=dolthubadmin POSTGRES_PASSWORD=password DOLTHUBAPI_PASSWORD=password ./start-doltlab.shOnce the script finishes, verify the services are running:
docker ps
CONTAINER ID IMAGE COMMAND CREATED STATUS PORTS NAMES
b7848c4fbe34 public.ecr.aws/dolthub/doltlab/dolthub-server:v0.1.0 "docker-entrypoint.s…" 21 seconds ago Up 21 seconds 3000/tcp doltlab_doltlabui_1
9439cd82c13d public.ecr.aws/dolthub/doltlab/dolthubapi-graphql-server:v0.1.0 "docker-entrypoint.s…" 22 seconds ago Up 21 seconds 9000/tcp doltlab_doltlabgraphql_1
3ec92577e04d public.ecr.aws/dolthub/doltlab/dolthubapi-server:v0.1.0 "/app/go/services/do…" 23 seconds ago Up 22 seconds 0.0.0.0:60051->60051/tcp, :::60051->60051/tcp doltlab_doltlabapi_1
7d2786e5cf6c public.ecr.aws/dolthub/doltlab/doltremoteapi-server:v0.1.0 "/app/go/services/do…" 24 seconds ago Up 22 seconds 0.0.0.0:100->100/tcp, :::100->100/tcp, 0.0.0.0:50051->50051/tcp, :::50051->50051/tcp doltlab_doltlabremoteapi_1
d47a2c9ae9de public.ecr.aws/dolthub/doltlab/postgres-server:v0.1.0 "docker-entrypoint.s…" 28 seconds ago Up 25 seconds 5432/tcp doltlab_doltlabdb_1
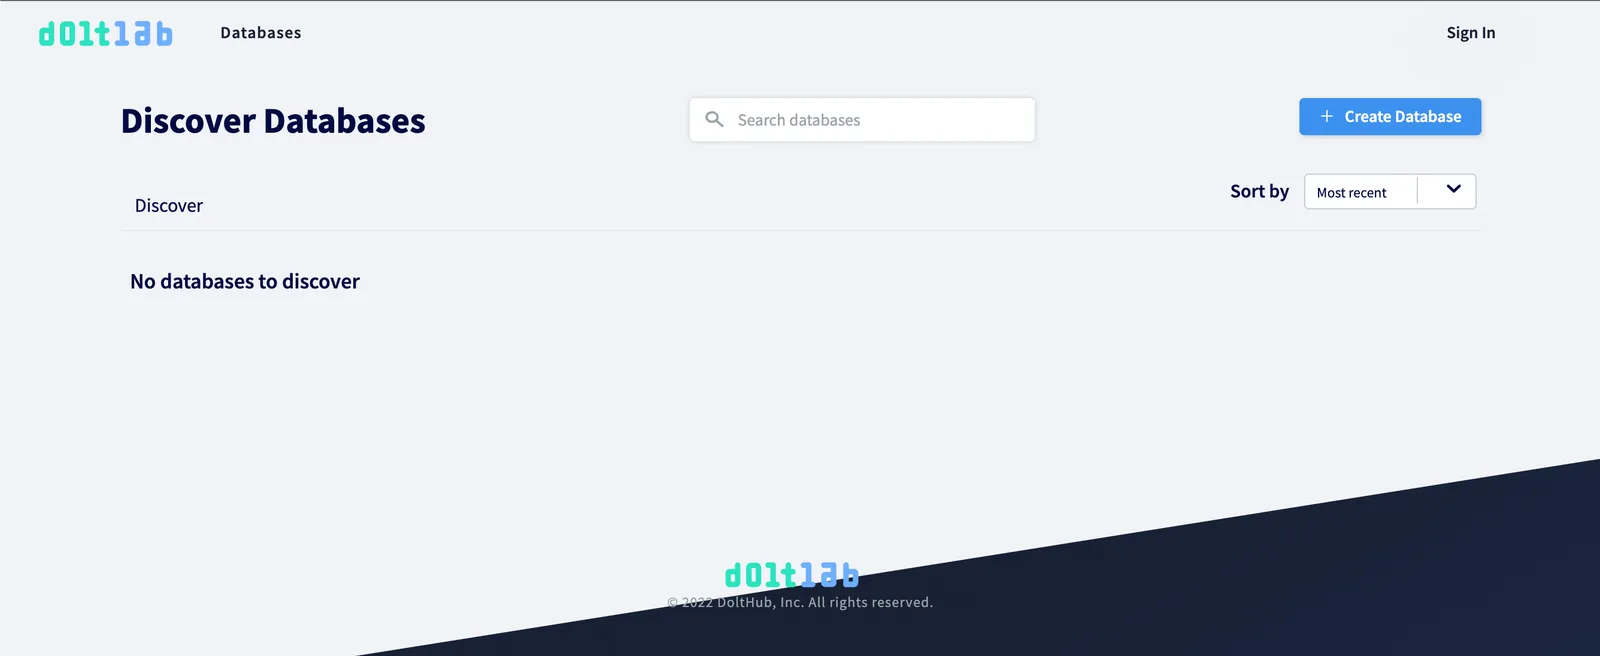
7fbf7e5d4c20 envoyproxy/envoy-alpine:v1.18-latest "/docker-entrypoint.…" 28 seconds ago Up 24 seconds 0.0.0.0:80->80/tcp, :::80->80/tcp, 10000/tcpYour Doltlab instance is now running. Navigate to the IP address of your machine in your browser (for example http://12.345.678.901/), and you’ll see DoltLab’s minimal homepage:
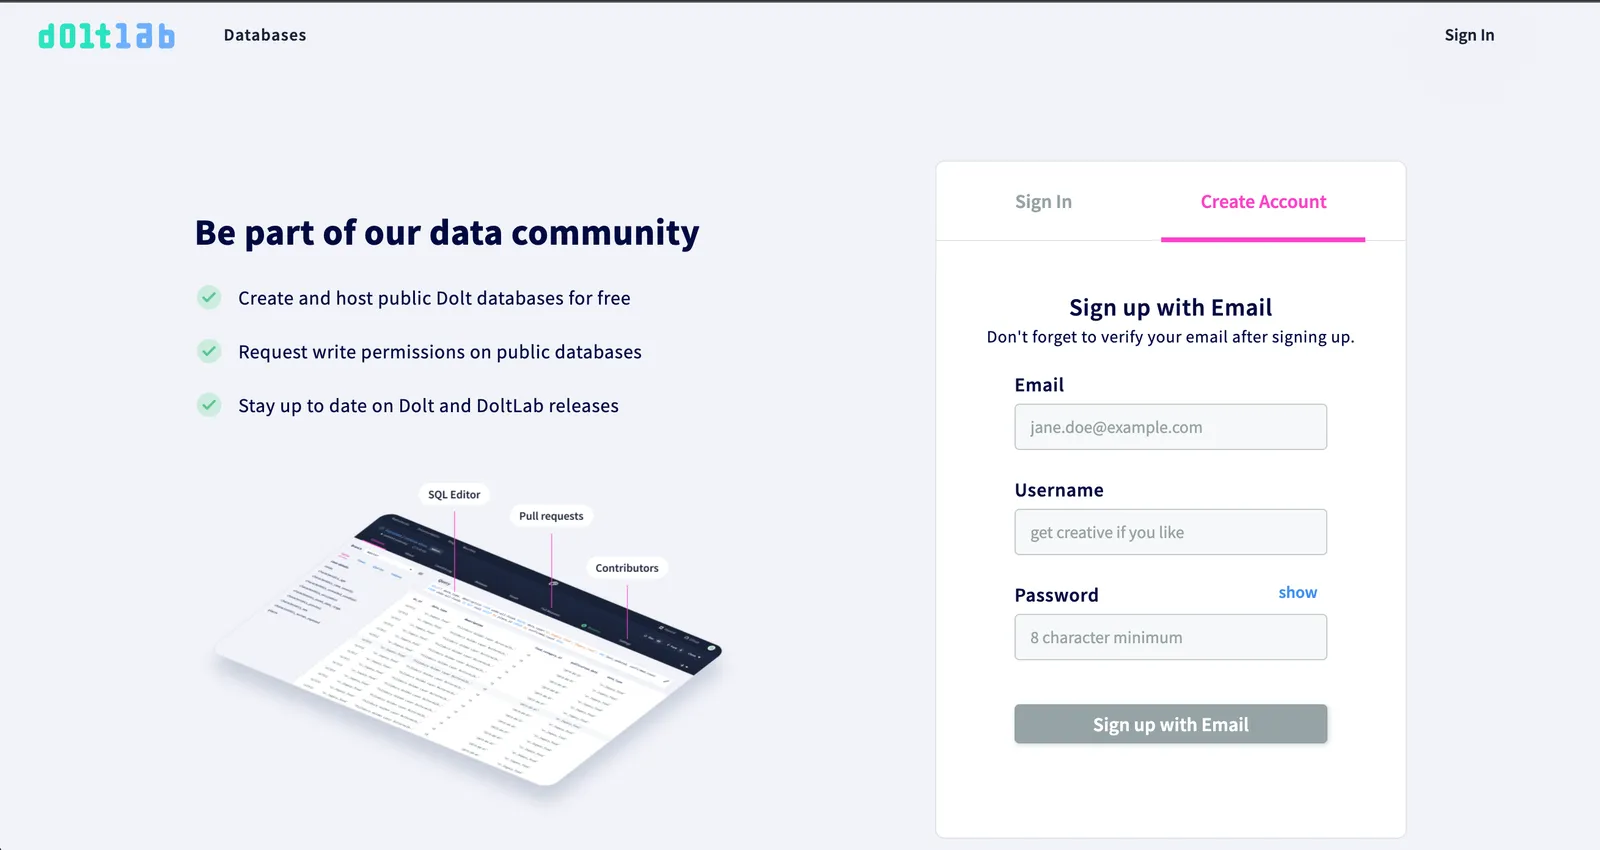
Create an Account
To start using DoltLab, click the “Sign In” button then click “Create Account”, then click “Sign up with Email”. New accounts created on DoltLab will be instantly verified.
After you’ve created your new account, you’ll see “Welcome to DoltLab” and some instructions on how to install Dolt and authenticate your Dolt client to start pushing, pulling, and cloning DoltLab databases.
Add Dolt Credentials
Unfortunately, using a Dolt client on the same machine where DoltLab is running takes a bit of work, since DoltLab’s remote API runs inside a docker network.
I recommend using your local Dolt client to connect to your DoltLab instance, but if you insist on using Dolt on the same machine, you’ll need to do so by using the Dolt client inside a Docker container that is attached to the DoltLab Docker network, ie:
docker run -it --rm --network doltlab_doltlab ubuntu:18.04 /bin/bashThe above command will provide you an ubuntu:18.04 container with access to the doltlab_doltlab network, where you can connect a Dolt client to the remote host http://doltlabremoteapi:50051/[owner name]/[database name].
For now, let’s keep things a bit simpler by just working with the Dolt client installed on our local computer.
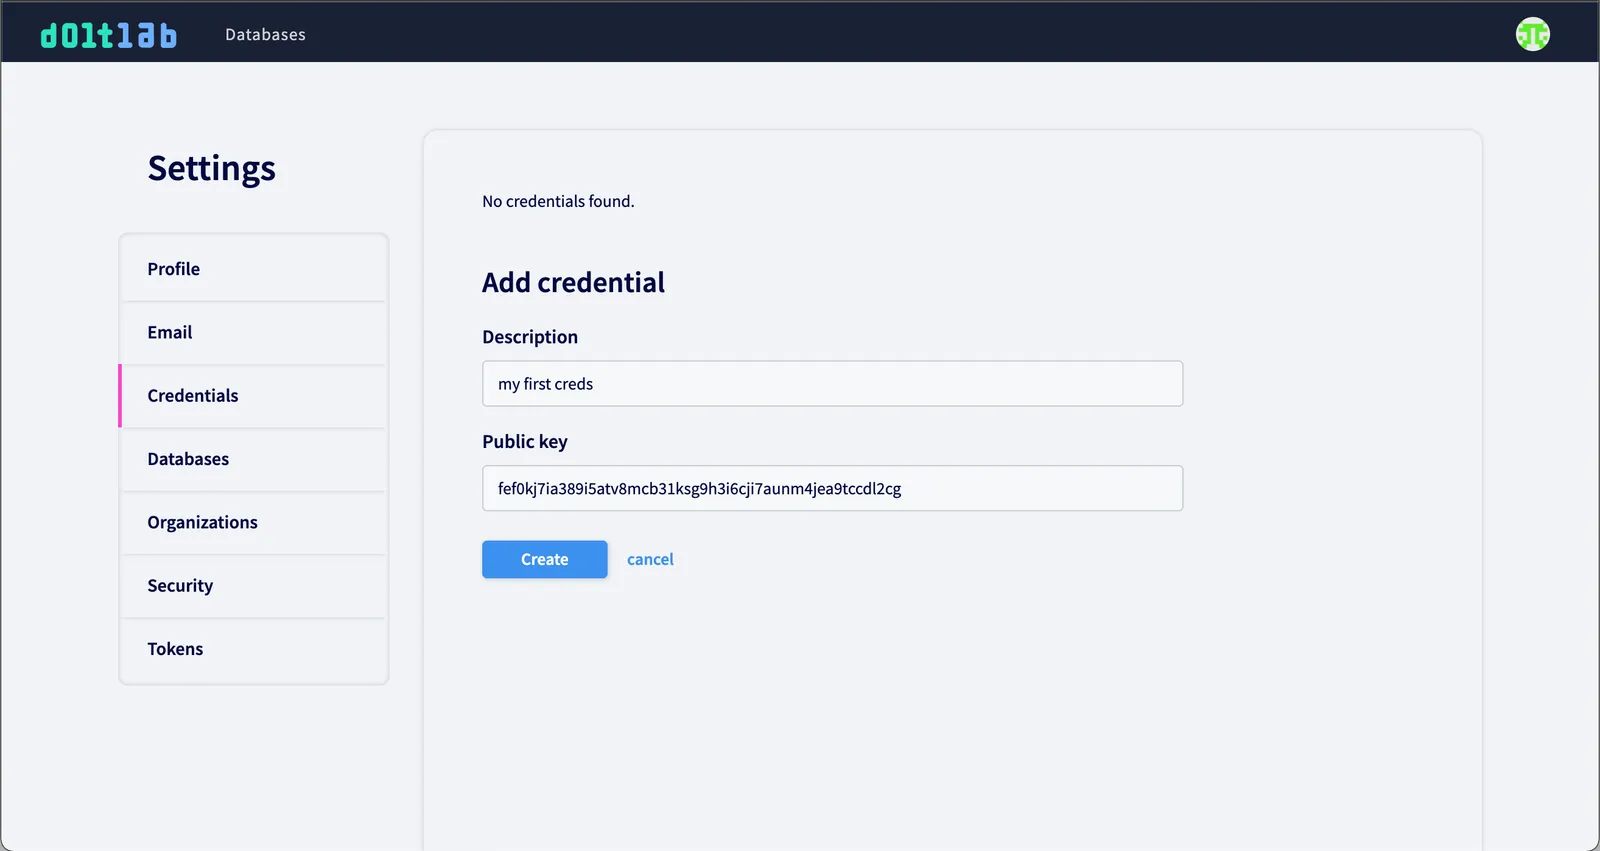
To authenticate your Dolt client to use DoltLab, run the dolt creds new command, which will output a new public key:
dolt creds new
Credentials created successfully.
pub key: fef0kj7ia389i5atv8mcb31ksg9h3i6cji7aunm4jea9tccdl2cg
Copy this public key and run:
dolt creds use fef0kj7ia389i5atv8mcb31ksg9h3i6cji7aunm4jea9tccdl2cgFinally, on DoltLab, click your Profile image, then click “Settings”.
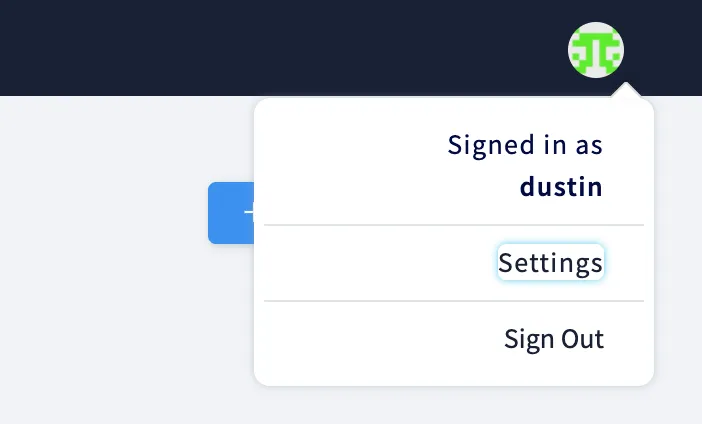
Next, click “Credentials.” Add the new public key here. This will allow you to start pushing, pulling, and cloning databases.
Create a Database
Click the “Databases” link at the top of the page, then click the “Create Database” button to create your first database. For this example, let’s create a copy of DoltHub’s dolthub/corona-virus database.
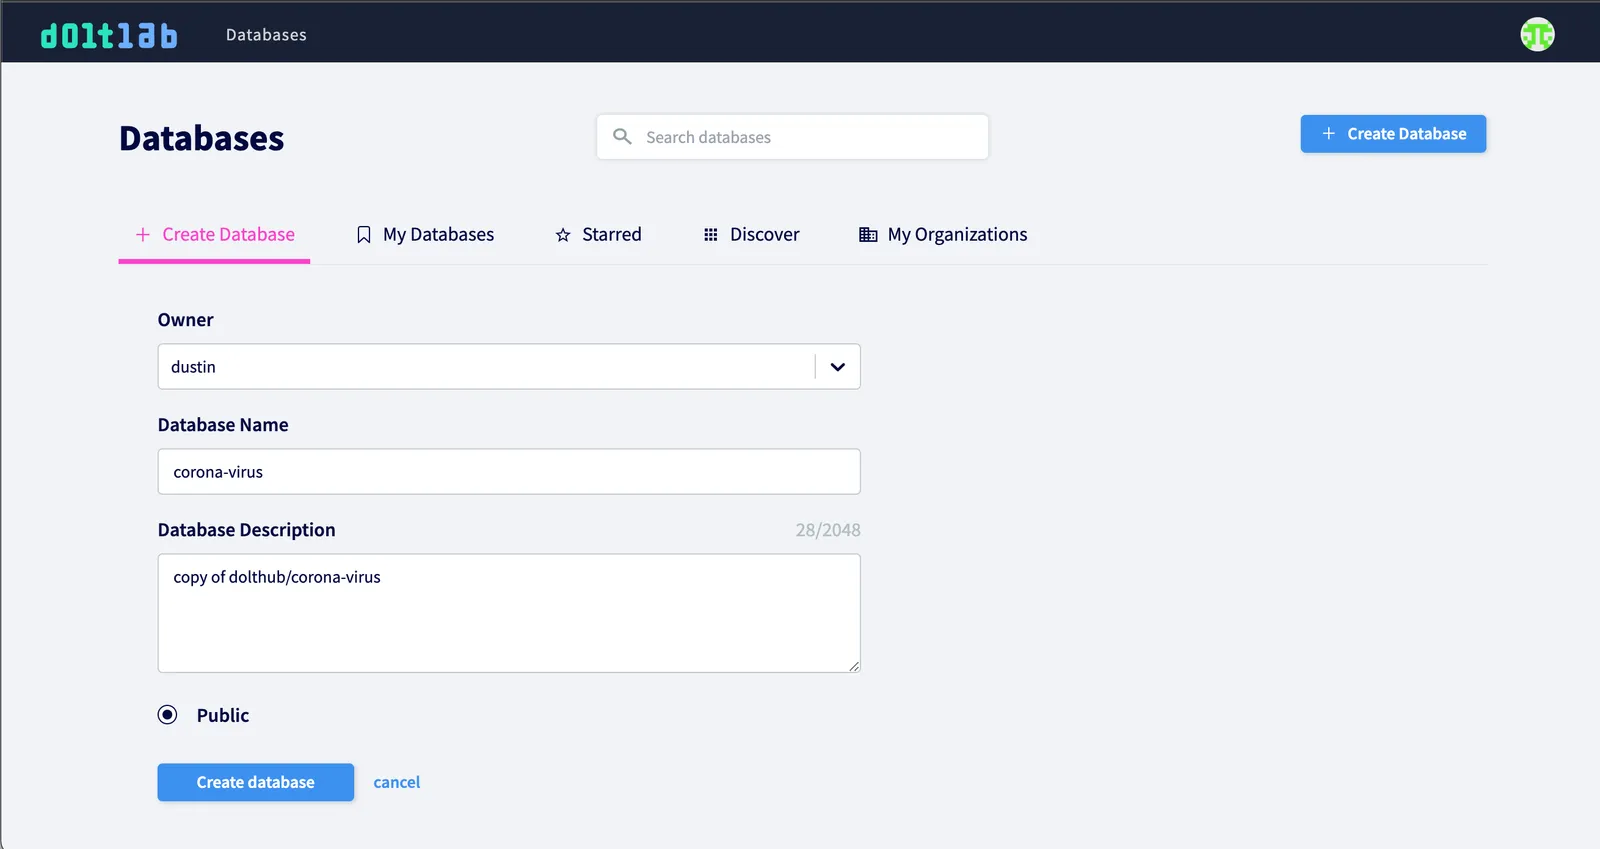
Currently, DoltLab only supports public databases. Click “Create database”. You’ve now successfully created a new database on DoltLab! As our final step, lets push the data from dolthub/corona-virus to our copy on DoltLab.
Push Data
With our local Dolt client, let’s clone dolthub/corona-virus by running:
dolt clone dolthub/corona-virusAfter the clone completes, cd into the corona-virus directory and run the dolt remote add command to add your DoltLab instance as a new remote:
dolt remote add doltlab http://12.345.678.901:50051/dustin/corona-virusAnd lastly, run the dolt push command to push the data to your DoltLab database:
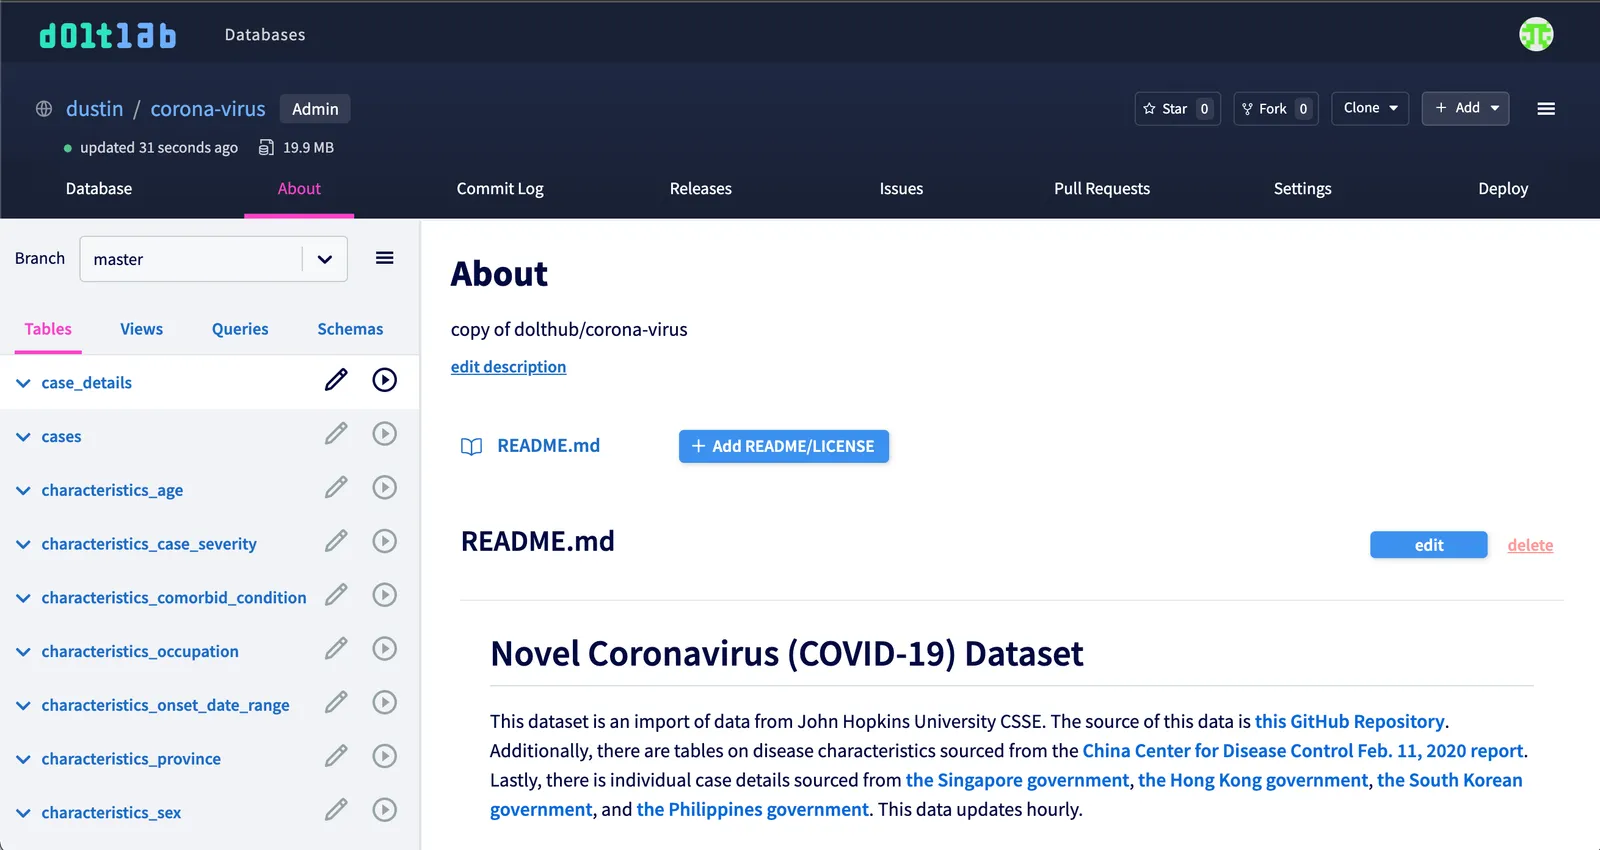
dolt push doltlab masterAfter the push completes, refresh the database page on DoltLab and you’ll see the pushed data!
Conclusion
As I mentioned above, this is an alpha release of DoltLab. Currently, there’s some core functionality that is broken, like, private databases are unsupported, pull request merges and forking don’t really work, but we will continue fixing these issues as well as improving the DoltLab operator experience so that it’s much more pleasant and ergonomic.
At this time it is also unclear how well DoltLab will scale to accommodate large databases. Be sure to provision a large enough machine for what you’re attempting to do. If you have any questions, or need additional help, please don’t hesitate to contact us here or on Discord.