
Dolt is a SQL database with Git-style versioning. In Git the unit of versioning is files. In Dolt, the unit of versioning is SQL tables. Dolt will eventually support 100% of the Git command line and 100% of MySQL SQL. Moreover, anything you can do on the Git command line, you will be able to do via SQL. Right now, we’re at about 90% coverage of the Git command line and SQL.
DoltHub is a place to share Dolt repositories. In the Git context, you clone, push, and pull from DoltHub as if it was a remote. Like GitHub, DoltHub is a central place to collaborate on Dolt data projects. You can create or find public data to work on. You can give read and write permissions to your Dolt repositories to other users. You can have them create pull requests to improve your data. In the future we imagine DoltHub issues and releases. We also expect to invent some new data-specific features.
Sound interesting? We think so. In an earlier blog post, we showed you you how to get started as a data consumer. In this blog post, we’ll show you how to publish data for other people to use.
Step 1: Create a DoltHub account#
Go to DoltHub. Read some of our blogs to get a better feel for what we’re doing. Click sign in and create an account. Right now, you need a Google account to sign up but in the next few weeks we will support GitHub login and email/password. Sign up for our mailing list using the box on the right and we’ll tell you when. Choose a username. Check out some of our public datasets for inspiration. Star some of the ones you like.
Step 2: Create a New Repository on DoltHub to push to#
Now navigate to your repositories page which will be populated with the repos you starred. In the top right corner click the Create New Repository link. You will be greeted by the following page:
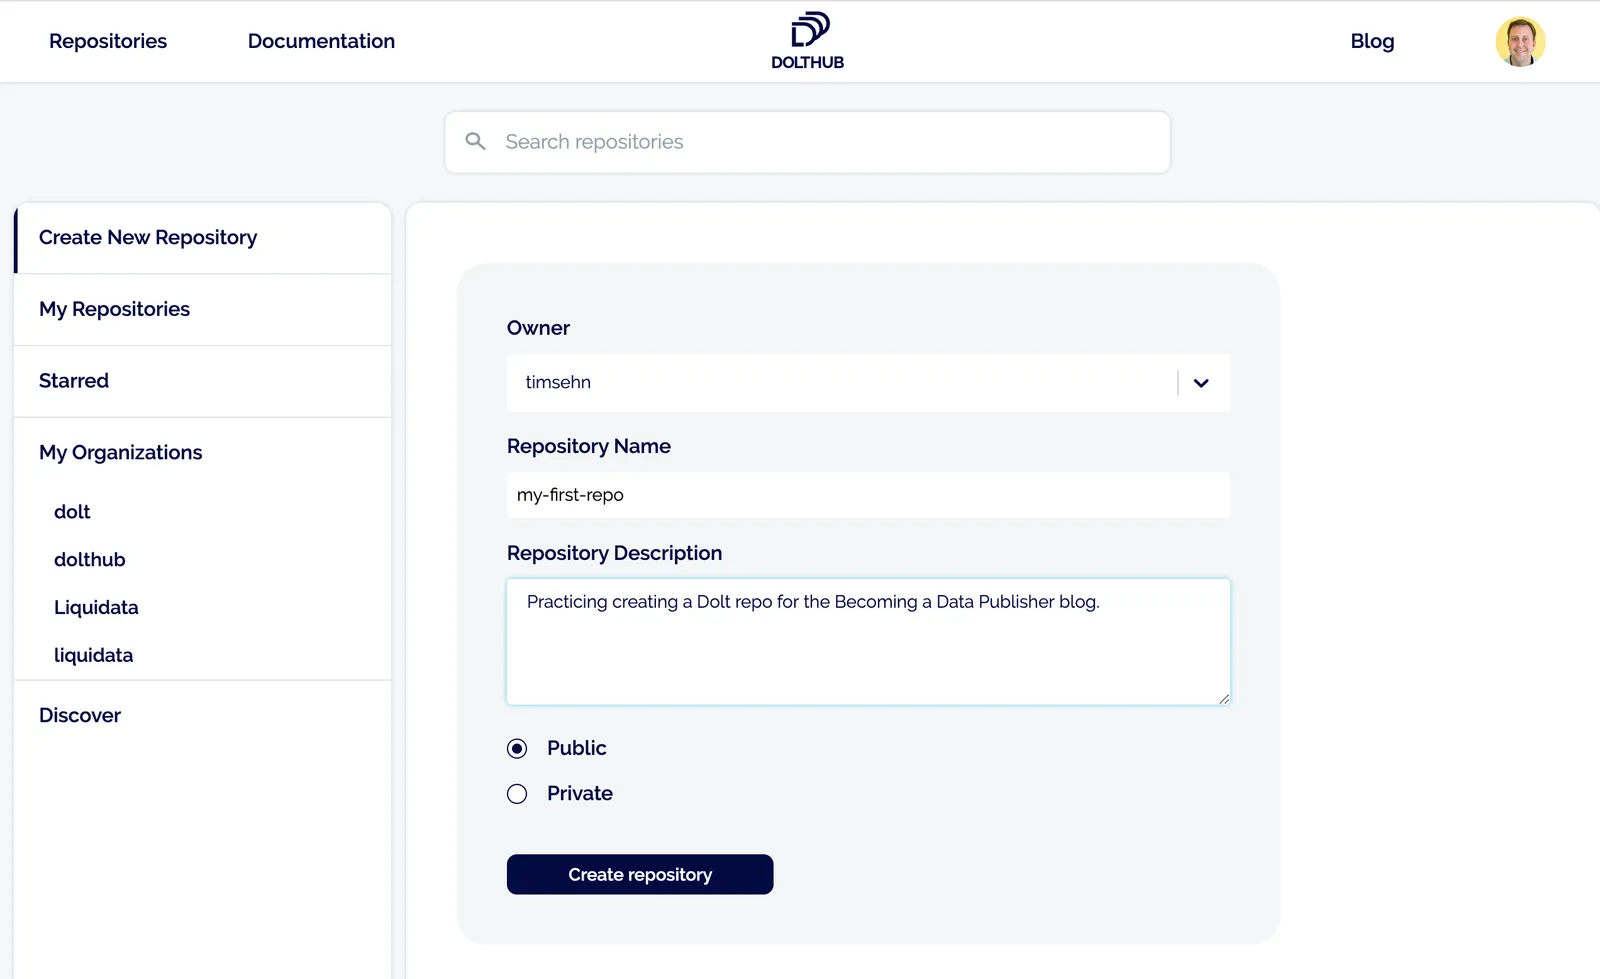
Leave the owner as is and pick a descriptive repository name. Add a description for others if you’d like. Leave the repository Public unless you want it to be private only to you. Private repositories on DoltHub are a paid feature.
After clicking create you’ll have a new empty repository on your repositories page that looks like this:
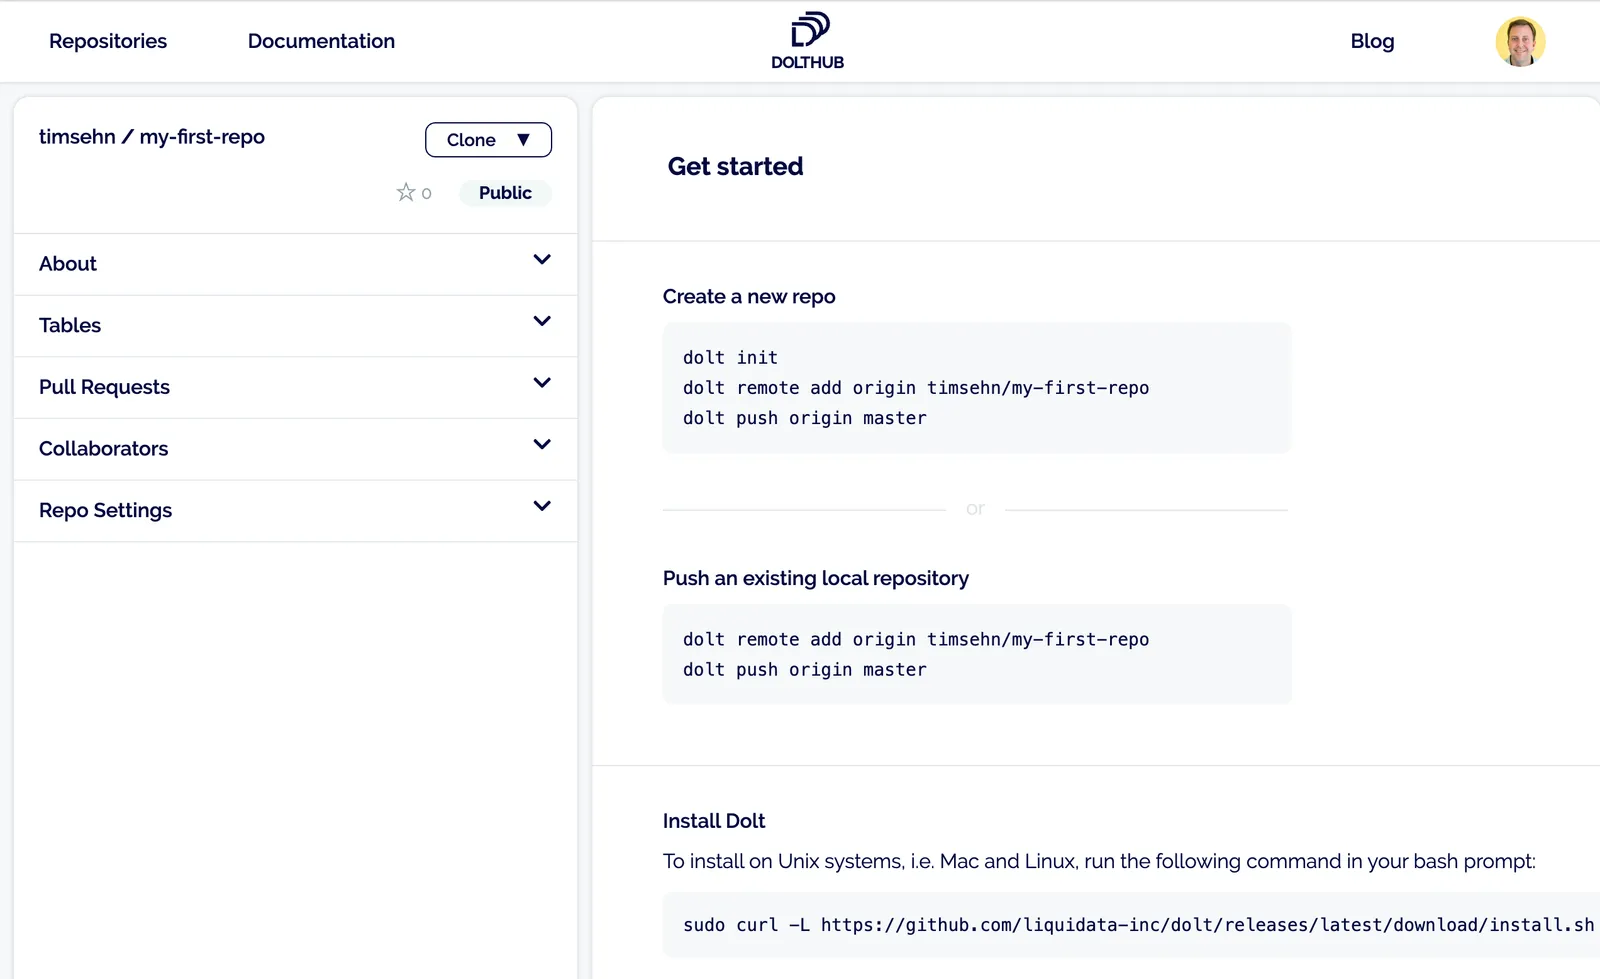
Now you have to populate the repository with some data.
Step 3: Prepare the data you want to import#
Get the data you want to import ready. Data with a natural primary key(s) works best. A primary key is an ID field or set of fields that will not have any duplicates in the table. Dolt uses primary keys to resolve differences and merges between versions so creating a Dolt table requires one or more primary keys that are not NULL (or blank).
If your data doesn’t have a natural primary key, it’s often ok to make every column the primary key but this method removes duplicate rows. The other option is to make the primary key the line number of the row but this means importing the dataset again when it changes will likely not produce useful diffs. Keying each row in your database is good practice so using Dolt at least forces best practices on you. We have plans to make Dolt support tables without primary keys but that feature is a ways off.
Dolt is a SQL database so all other relational database schema design best practices apply. Columns have restrictive types. Use a mapping table for one to many relationships. Joins will be slower than straight table scans. Brush up on your schema design skills.
Dolt accepts SQL as single statements via dolt sql -q <query> or a batch file dolt sql < <file.sql>. You can also create individual tables using dolt schema import and dolt table import by providing a CSV, PSV, or JSON file. You’ll need to get your data in one of these formats. We’ll explore the SQL option here and discuss CSV import in a later blog.
For this exercise, we will import ImageNet with the associated WordNet database so we can write relational queries on ImageNet data. This data is large enough and has a complicated enough schema to show off some of Dolt’s power. We’ve already built this database for DoltHub and written a blog about it. But, it’s a cool one so we’ll let you all try.
For this dataset, the schema is already designed for you. I also parsed and cleaned the WordNet source and managed to find copies of the ImageNet labeled image data. I produced a batch SQL file for this blog. Download this file now.
Step 4: Install Dolt Locally#
Now you want to create a repository locally and get the data you prepared into it.
First step is getting the Dolt command line application. Dolt looks a lot like Git all the way down to the help documentation. If you are familiar with Git, you can use your exact same flows but you are working with tables, not files.
Getting the command line depends on your operating system. For *nix and Mac systems, open up a terminal and run:
sudo curl -L https://github.com/dolthub/dolt/releases/latest/download/install.sh | sudo bashThis will download the latest release of Dolt and put it on your path. For Windows users, download and run the most current Microsoft installer (.msi file) from the Dolt release page on GitHub.
Now that it’s installed, run dolt in a terminal. You should see:
shell$ dolt
Valid commands for dolt are
                init - Create an empty Dolt data repository.
              status - Show the working tree status.
                 add - Add table changes to the list of staged table changes.
               reset - Remove table changes from the list of staged table changes.
              commit - Record changes to the repository.
                 sql - Run a SQL query against tables in repository.
          sql-server - Starts a MySQL-compatible server.
                 log - Show commit logs.
                diff - Diff a table.
               blame - Show what revision and author last modified each row of a table.
               merge - Merge a branch.
              branch - Create, list, edit, delete branches.
            checkout - Checkout a branch or overwrite a table from HEAD.
              remote - Manage set of tracked repositories.
                push - Push to a dolt remote.
                pull - Fetch from a dolt remote data repository and merge.
               fetch - Update the database from a remote data repository.
               clone - Clone from a remote data repository.
               creds - Commands for managing credentials.
               login - Login to a dolt remote host.
             version - Displays the current Dolt cli version.
              config - Dolt configuration.
                  ls - List tables in the working set.
              schema - Commands for showing and importing table schemas.
               table - Commands for copying, renaming, deleting, and exporting tables.
           conflicts - Commands for viewing and resolving merge conflicts.
Looks like Git, right? That’s what we’re going for.
Step 5: Create a Dolt repository and link it to DoltHub#
Now that you have your local copy of Dolt, you need to make a repository and connect Dolt to DoltHub so you can push the repository there.
First, set your dolt username and email. Run the following commands:
$ dolt config --global --add user.email YOU@DOMAIN.COM
$ dolt config --global --add user.name "YOUR NAME"
This lets Dolt know which user name and email to put on your commits as well as what account to link to when you run dolt login. Run dolt login now. Your terminal will wait and a browser window will open to the DoltHub credentials page:
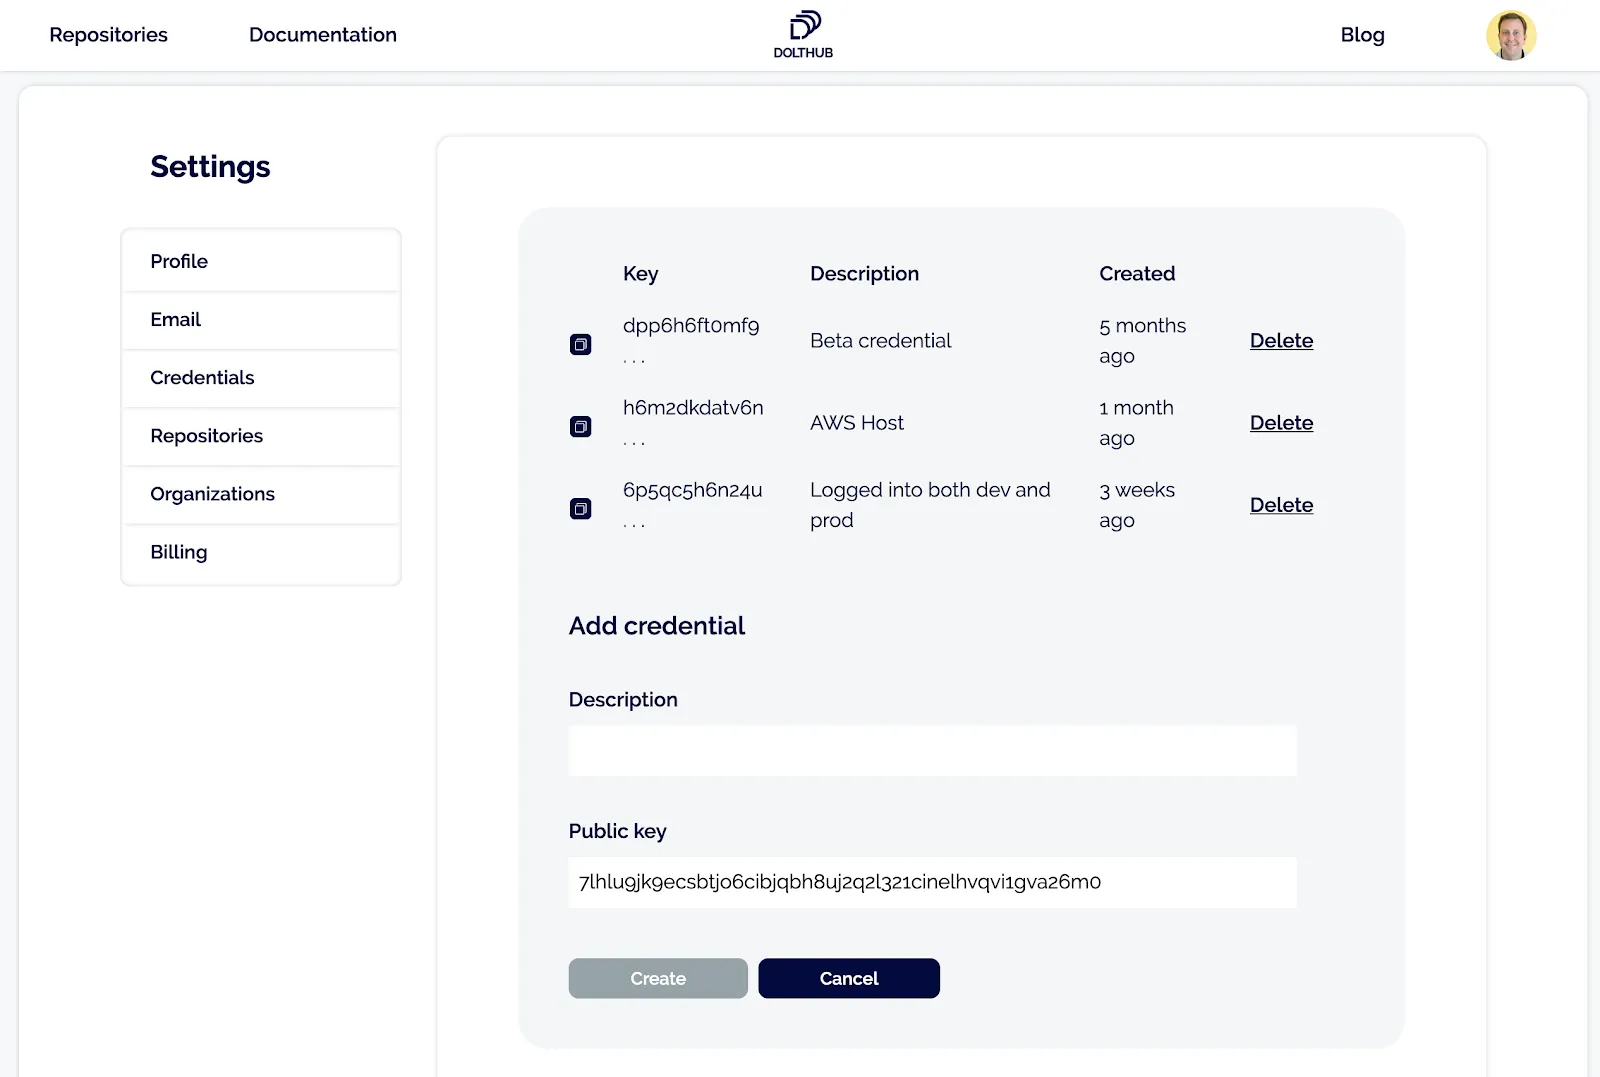
Add a description and click the Create button. Your terminal is polling DoltHub waiting for you to create the credential. Once you click Create, your terminal should return like so:
shell$ dolt login
Credentials created successfully.
pub key: 7lhlu9jk9ecsbtjo6cibjqbh8uj2q2l321cinelhvqvi1gva26m0
/Users/timsehn/.dolt/creds/8umkfb37c3l8q02au07fs447c6cjmg0kk1j4jm0ohn2rm.jwk
Opening a browser to:
	https://dolthub.com/settings/credentials#7lhlu9jk9ecsbtjo6cibjqbh8uj2q2l321cinelhvqvi1gva26m0
Please associate your key with your account.
Checking remote server looking for key association.
requesting update

Key successfully associated with user: timsehn email tim@liquidata.co
Now make a directory named after your repository, in this case, mkdir my-first-repo. Then navigate to that directory and run dolt init to let dolt know this directory will contain a dolt repository. Tell the repository that it has a DoltHub remote by running dolt remote add origin timsehn/my-first-repo.
dolt init creates a README.md and LICENSE.md file for you. You can edit the files if you’d like or delete them if you don’t want them. Dolt versions these files for you. You can add them to commits, diff them between versions, and all the rest of that good versioning stuff. They are displayed on DoltHub under the About section of your repository. Your README.md is the title page for your repository on DoltHub.
Once you are ready make a commit using dolt add and dolt commit. Then, you run dolt push origin master and your new repository will be available on DoltHub. It won’t have anything in it yet except your LICENSE.md and README.md file(s) but it will not be completely empty anymore.
This workflow should be familiar if you’ve used Git in the past. We’ve built Dolt and DoltHub with Git as the model.
Step 6: Import your Data#
Now it’s time to import the data into your Dolt repository. Find the SQL file you downloaded earlier. This is the link, just in case you missed that step.
The SQL file is easier because the schema for the database is encapsulated in the SQL statements. Unpack the file using tar -xvzf imagenet.sql.tar.gz. To import from the SQL file, dolt sql < imagenet.sql. It should take about 30 minutes to run. There is about 2.5Gb or a little over 15 million SQL statements to churn through.
Once that finishes. Run dolt ls to see your brand new tables. Pop into a SQL shell using dolt sql and run show tables, describe statements, and various exploratory SQL queries to see what you have created. An explanation of the schema data can be found in this blog post. When we published that blog post, joins didn’t work but now they do. But these tables are giant for the current Dolt so expect joins to be slow. We’re working on it.
Do you want to show off some things you can do with the data in your repository? Create a sample query using dolt sql --save -q <query>. When you commit and push the change to DoltHub, DoltHub will now display your saved query. A user can run your saved queries with a click (as long as it doesn’t take longer than 20 seconds to execute). This is a great way to create living documentation for your repository. I added a few to the example repository we’re working with
Step 7: Publish to DoltHub#
Publishing to DoltHub is as simple as running dolt push origin master again. Now you can see your repository under https://www.dolthub.com/repositories/<user name>/<repository name>. The one I created is here.
Step 8: Tell your friends#
Share the link to your repository with anyone you know who might be interested. She can get a local copy of your repository by running dolt clone <user name>/<repository name>.
If she wants to make a change, she can use a standard Git workflow: dolt checkout -b <branch name>, make the change using SQL, dolt add <table name>, and dolt commit. Give them write permissions under the collaborators section and they can push their branch to DoltHub and create a Pull Request for you to review.
Conclusion#
Now you should have everything you need to publish your own data with Dolt and DoltHub yourself. Start being part of our data community today by becoming a publisher.